Showing posts with label multiples/assembly line. Show all posts

December 26, 2013

Elegant Anniversary Card

I made this a very long time ago, maybe a year and a half. Sometimes I browse my photos and wonder if maybe a card has been missed. Now I have a ‘Not Posted’ File so that helps but when I’m in a hurry, it’s so hard to keep track!

elegant anniversary card snelling

Originally I designed this layout as a ‘thank you for your business’ card, without the pearls and with black and gold or black and ivory paper on bottom, for a friend’s business. My BFF saw it and much to my delight, went on and on about how it was hte prettiest card she’d ever seen and how she’d frame it. So of course, I obliged making her one. Then I had the opportunity to make it again for a very classy couple for their anniversary . I thought adding the dancing couple was a nice touch.

I’ve made this as multiples so I know it isn’t that hard and I think it would also make great monogrammed stationery. It would also make amazing formal shower, wedding, anniversary party or any formal invites

Enjoy, Rebecca

RECIPE
please email for details. Most manufacturers are found in the tags.

November 24, 2013

Fresh Florals Thank You Card

I love the WPlus9 stamp set called Fresh Florals so when I got a SSS card kit with similar leaf and flower stamps, I was so happy!

floral wreath ty

This card is so simple, I don’t think there’s much to say about it. I must admit the rhinestones are a bit oddly placed; I stamped the three dot stamp in a bright/darkish purple and it totally ruined it! Not being one to throw away a project that can be saved, I added the rhinestones to cover my mistake! The edging is done with a Pilot silver paint pen.

Enjoy, Rebecca

RECIPE
Stamps:
SSS Life is a Journey
Ink: various hero arts, SU! and PTI
Paper: cardstock-SSS card kit, DP-MME
Accessories: pilot paint pen, oval Nesties, foam dots-Jody Morrow, silver EP-SU!, Tiny Twinkles-TE

October 23, 2013

Ghost Stamping Flowers Card

I hosted a new swap on Swap-Bot for ghost stamping as shown by Jennifer McGuire a while back. I love the look but struggled to find the right stamps at first.

ghost stamping thanks

First I tried using the tree from the giving thanks set. Not such a good look. I think it best suits backgrounds and single images. It looked weird when I tried to create a scene with it. So I redid that card, I’ll post it soon, and started this one since I still needed a ghost stamped card for the swap. I’m really happy with how it turned out. It’s rare that I make a one layer card but I could make a ton of these happily! Maybe I should make a set and keep them as a hostess gift! I like making some small things and keeping them on hand as gifts.

Enjoy, Rebecca

RECIPE
Stamps:
Giving Thanks
Ink: Hero Arts pale tomato, cup o joe , lemon tart, summer sunrise-PTI, white-Versamagic
Paper: kraft-PTI
Accessories: rhinestones-Dollarama, Zva Creative, Y35 Copic

May 26, 2013

Engagement Card for Max

Max is a wonderful woman who came into our lives as an autism consultant who, thank goodness, is paid for by a wonderful organization called Kerry’s Place Autism Services. She helps families navigate the difficult world of parenting a child with autism with kindness and a quiet dignity mixed with passion for insisting children’s rights are preserved. I recently found out she got engaged so I made this card for her; she deserves every happiness.

max engage

It is super simple so there isn’t much to say except to tell you how I got the variegated flowers. I used cube ink pads inking with autumn rose all over then with scarlet jewel very lightly in the middle then heavily only in the very center so I wouldn’t get distinct lines of where one colour stopped and another started. One flower, top left is all scarlet and one bottom right is all autumn rose. I’d switch those two if I made this again. IRL it is so pretty because I used REAL Swarovski crystals. They are so twinkly and amazing. I save them for the most special of cards. I hope she loves it!

Enjoy, Rebecca

RECIPE
Stamps:
rose-SU!, love sentiment-PSX
Ink: autumn rose, scarlet-PTI, Versamark
Paper: sweet blush, vanilla CS-PTI
Accessories: gold EP-SU!, foam dots-Jody Morrow, ribbon-stash, crystals-Fire Mountain Beads, Imaginisce ribbon cutter

April 07, 2013

Modern Hospitality Card for Mojo Monday

I think this is the last in a series of cards I’ve been making for my sister. She likes much more modern cards than I do so, once again, I made this set to her tastes. I promise, there are much more girlie and shabby designs to come!

mod hospitality for sarah

These were part of a wine gift set I gave her. I made or personalized most of what was in there: a wine tote made of oatmeal and black Paris-themed fabric with a handmade beaded rose and insulated sleeve to keep white wine cold (I even created my own design/pattern for the entire thing from a photo!), an engraved wine stopper with their last name and wedding date, hand stencilled wine glasses with their monogram, wine tags to go on bottles they may give as gifts when invited out somewhere, wine aerators, hand-beaded wine charms, some nice wine themed tea towels and these cards and of course a nice big bottle of wine. They loved everything, yeah!

I used this week’s Mojo Sketch and I’m pretty sure that for once I finally managed to get it up in time! Yeah again! Click on the sketch below to visit the blog.

Mojo287Sketch

Enjoy, Rebecca

RECIPE
Stamps: PTI
Ink: spring moss-PTI, London fog-Memento, Antique Linen Distress
Paper: aqua mist, white CS-PTI, DP-Basic Grey Upcycle
Accessories: rhinestones-Taylor’s Tiny Twinkles-TE, foam dots-Jody Morrow, ribbon-stash, doily die-MFT, angled labels die-PTI

March 30, 2013

CAS Elegant Wedding Thank You Notes

It doesn’t get any simpler than these. Two die cuts, two stamps, two ink colours, one piece of ribbon and some foam dots. Easy peasy, lemon squeezy.

CAS wedding TY

I hope the people my sister gives these to enjoy them! I don’t think I can add anything else, these are so simple!

Enjoy, Rebecca

RECIPE
Stamps:
Thanks all ways-PTI
Ink: hawaiian shores-PTI, archival black-Ranger
Paper: aqua mist, ivory, black CS-PTI
Accessories: man and wife dies-PTI, foam dots-Jody Morrow, sheer ivory ribbon-stash

March 04, 2013

Eiffel Tower Merci Card

I made a ton of thank you cards for my sister for all her wedding showers and engagement parties. Since there were so many multiples and I haven’t posted them until now, along with lots of swaps, I didn’t post much December and January. My kids and I also made lots of cards for Newtown but they didn’t turn out blog worthy as I was hurrying. I hadn’t noticed how bad those months were until recently and I’m so sorry. Bad blogger. Here’s what I was up to!

eiffel merci for sarah

I don’t do CAS very well but I was proud of this. I usually hate when I make CAS but not this time, yeah! I can’t remember for the life of me what DP this is, maybe Echo park? A basics pack? Sorry. I feel like I am always apologizing on this blog. Bad photos, forgetting sources, not enough posts… I would help if I got a few more comments so I had some feedback that let me know what you guys think!

Enjoy, Rebecca

RECIPE

Stamps: a.muse
Ink: archival-Ranger
Paper: black CS-SU!, white CS-PTI, silver paper-stash, DP-Echo Park?
Accessories: rhinestones-Zva, foam dots- Jody Morrow, WRMK corner chomper, circle Nesties, Cuttlebug embossing folder

February 25, 2013

Monogrammed Notecard Set for Papertrey Ink Blog Hop

PTI blog hop logo

This month’s challenge was to create with monograms. Not something I do a lot of but isn’t that why they call it a ‘challenge’ and not an ‘easy’!? hee hee!

monogram notecards

I decided to make myself a pretty set of monogrammed notecards. I never have a decent thing to write a note on to the teacher despite having literally reams worth of GORGEOUS paper! Absolutely disgusting! So I was happy to finally have something nice to write on.

monogram notecards4a

I plan to make a few more like these and a few more with just stamping and the monogram for when I need more space plus they will take less time to make. I may even stamp the monogram instead of die cutting it saving even more time. 4 was plenty for now considering I’ve just finished making 230 wedding favours for my sister’s wedding! Kinda sick of multiples for a while. I’m going to have a tutorial soon with tips on die cutting and stamping huge quantities of items! Stay tuned or check back if you are new to my blog.

monogram notecards3

Many of you may be new today so you don’t know me. But I am, in the words of Tim Gunn (Project Runway), a “make it work” type of person. So I rarely throw a card in the trash. An element or two maybe but even that is rare. So when a comedy of errors befell these cards, I made them work! First, my stupid cutter’s blade was dull so my papers had whiskers. So I trimmed them off with a scissors. Then I was adding the monograms and using a fine tipped bottle of glue. It virtually never clogs so I just kept adding more and more pressure to get the darn glue out until… you guessed it, a gigantic blob of glue landed on my notecard! Fortunately, it wasn’t the kind that sinks down into the paper so I used an adhesive eraser once it was dry!

monogram notecards2

I laid out all my stamps along the left edge of the paper to arrange them. When the hand touched my acrylic block, the pencil too came for a ride even though I had moved it out of the way, just not far enough. I guess I inked the hand on the edge of the pad and didn’t ink the pencil so once I checked how it looked the first time, something I do when stamping multiples, especially with a stamp I’ve not used before, I went ahead and stamped the rest. I guess I hit the ink pad differently the other times because the pencil partially stamped and not in the colour or place I wanted it to. grrr… After saying bad things under my breath I tried stamping over. Nope, the lines were so thin, I couldn’t see them through my block and yes, it is clean! The solid end lined up.

So, is this worth trashing, especially when it’s the last step? IMHO, nope! Seriously, its a note to the teacher. Does she care if the pencil isn’t lined up? Nope! So think about that the next time something is headed for the round file! Does it matter that much? If it is headed to CHA, then yes, save the flubbed one for grandma and redo it but otherwise, take a deep breath and move on! I have to work very hard to not obsess and take myself too seriously! My kids need me and I can’t spend all day in my craft room redoing things and it isn’t healthy. So make it work ladies!

I hope you are enjoying the hop! If you like what you’ve seen or you don’t want to forget to come back for my assembly line die cutting and stamping tutorial or to see my wedding favours, be sure to subscribe by RSS or email subscription. They are both on my left sidebar. If you read this far, you are amazing and I thank you for visiting. Have a great day!

Enjoy, Rebecca

RECIPE
Stamps:
Button Boutique, Take Note-PTI
Ink: Aqua Mist, Spring Moss, Kraft, Chocolate
Paper: DP-PTI, ivory-cheap stuff
Accessories: chevron die-PTI, alpha die-Quickutz

February 22, 2013

Spa Party 2011

Yep, you read that correctly! 2011! I had a spa party for some of my girlfriends and I forgot to blog it! Crazy! I bought some of the stuff I needed and made others. Here are the things I made.

The invite…

spa party invite

Do you have any idea how long and hard I Had to look to find this You’re Invited stamp? OMW! I thought I was going to go crazy looking for it!

spa party clothespins4

Aren’t these cute? I didn’t have that many people so I tailored the designs to suit each person.

spa party clothespins2

Yep, two sets using these older papers. Nice for almost anyone. For a couple people whose favourite colours I didn’t know.

spa party clothespins3

These two were my favourites.

spa party clothespins5

The outside of the tins were decorated with embossed vellum and a die cut topped by a medallion.spa party pencils

Everyone got a pretty beaded pencil too. Also in the bags were a mini lip gloss, a mani kit, a bath scrubbie, a hair band and a bracelet beading kit. I think there were a couple other things too but it was such a long time ago! I wish I had a picture of how I decorated the bags too!

We made the bracelet, did our nails and some of us put on a clay face mask while we watched movies. We ate all manner of goodies as I set up a candy bar, made an enchilada dinner and had cupcakes not only for dessert but also all afternoon. If you are really on the ball you will have figured out that I did all of this while 6 months pregnant!

It would take ages to write a recipe for this so if you have any questions, fee free to email me or leave a comment with your email.

Enjoy, Rebecca

December 10, 2012

Two Little Birdies Thank You Cards

More birdie themed thank you cards for my sister. She doesn’t know it, but we are throwing her a Jack and Jill shower soon and she will need thank you notes for the gifts she will get.

sarahs birdie thank yous2

She will be surprised by the shower, if I manage to not blow it! I am not eager to tell her but I keep forgetting she doesn’t know! It was hard to find papers to coordinate with the bird and tree scene and not get too far away from things my sister likes. In all fairness, they really aren’t her style so I stopped making this type and started making some other ones. I’ll blog them soon. Since I’m making multiples, I’m going very CAS.

sarahs birdie thank yous

Hope she likes them!

Enjoy, Rebecca

RECIPE
Stamps: sentiment-SU!, tree-Out on a Limb Revised PTI, birds-CDS
Ink: celery, pretty in pink-SU!, chocolate, lemon, kraft-PTI
Paper: lemon tart, white CS-PTI, DP-Echo Park
Accessories: edge, circle strip, tab dies, button-PTI, Divine Twine

December 03, 2012

Sweetly Pink Baby Girl Card

Could a baby girl card be more girly? It looks much nicer IRL; it was very hard to photograph and edit.

kaiserc baby die script

The swirly baby die cut is from Joan’s Gardens. To be honest, I forget which company makes it right now. My guess would be Marianne. The diaper pin comes with it. I don’t emboss my die cuts a lot but this one definitely benefits from the detail embossing adds. Again, much more obvious IRL. The triple layered flower is from my girlfriend, thanks Bec!

I am entering this in the Simon Says Stamp ‘anything goes’ challenge.

I wanted to layer the die cut over the pink paper but they were too similar and the word didn’t show up. So I tried layering pink vellum, one was too bright and one was the wrong shade. UGH. The white let too much of the pink show through. So I used two layers. I was careful to only use adhesive under the die cut and pearls to prevent the adhesive showing through.

Here’s an example of how bad my memory is. I made this card mid month for SFYTT. I just realised it now, Dec 1st! I internally gasped as I thought I had missed entering a card for November. I just checked and realized that I made another card for SFYTT for November! So not only did I forget I made this card and make another for the challenge, but I linked up that card and then forgot that just now as I am typing this! Seriously???? At least I still have a chance to finish out the year! But it ends early so if you are playing, be sure to get your card linked up by midnight Dec 24. So sad it will be the last SFYTT ever. Sad smile

Enjoy, Rebecca

RECIPE
Paper:
white CS-TE, DP-Kaisercraft, vellum-stash
Accessories: baby dies-Marianne (?), scallop die-PTI, pearls-Dollarama, circle die-Nestabilities, heart button-stash

July 23, 2012

PTI Stamp-a-Faire Challenge–Handmade Embellishments

This DIY badge is for making your own embellishments. I rarely use store-bought bellies that can be handmade. So I had fun choosing which tutorial to try out. But since I was short of time, I went to an easy one, layered butterflies.

SAF butterfly bellie tag

I only have two butterfly dies so I had to use one twice but you can barely see it in the photo; look at the top right of the pink butterfly. You will see a tiny bit of moss peeking  out.  Unfortunately, it is really late here and I am hurrying to get to bed so I can’t take another. But it looks cute!

Enjoy, Rebecca

RECIPE
Stamps:
Mega Mixed Messages, Label Basics
Ink: memento toffee crunch
Paper: all PTI
Accessories: berry button, label die, small butterfly die-PTI, large butterfly die-Sizzix

PTI Stamp-a-Faire Challenge-Card Set

This is my entry for the Correspondence Badge, Card Set. I love the design that Melissa Phillips created; I had to substitute a lot but I think you can see her inspiration.

SAF card set

Here’s my set all together. I can’t believe I managed to get a decent shot of them all together!

SAF card set closeup

In the close up you can see the tiny bit of shine I added from glitter in the heart within the butterfly die cut. I decided to use Scor-Tape behind the die cut instead of liquid glue to jazz up my design a bit; I love the subtle way it catches the light.

Enjoy, Rebecca

RECIPE
Stamps:
Mega Mixed Messages
Ink: Memento toffee crunch, aqua, moss-PTI
Paper: white CS-TE, kraft CS, DP-PTI
Accessories: dies-PTI, ribbon-stash

March 25, 2012

Papertrey Ink March Blog Hop–Lemon Aqua Inspiration Baby Card

PTI blog hop logo

lemon aqua PTI blog hop baby card2

Here is my card based on the inspiration photo below.

lemon aqua PTI blog hop insp pic

And a close up…

lemon aqua PTI blog hop baby card closeup (2)

This card is very similar to the one I designed as thank you cards for my shower but in different colours. I haven’t posted it yet because I am hoping to find a magazine looking for interactive cards so I can enter it. It uses much less paper so is ideal for making multiples; the front panel is only held on with the brad in the corner and the whole front panel swings upwards. The aqua is only one layer, not a card base. So 1/2 the amount of aqua cardstock is used compared to a normal card. I forgot about writing on the base, under the focal panel, when I embossed it. Oops! So I guess I will add a layer of copy weight paper when I write in it. My shower ones had unembossed bases so they were easy to write on.

A few details: The scallop at the top edge is the eyelet lace die, I just have it positioned so you can’t see the holes. The socks are made from felt, I just love the fuzzy socks my baby wears so I had to reproduce them as closely as possible for this card. The ribbon is seam binding dyed with Copic Blender Solution and Y21 reinker. If you enlarge the photo, you will see that the brad has tiny stars on it like the yellow shirt DP. The background was inked by swiping the pad across the edges to highlight the embossed pattern. Then I distressed it with Antique Linen ink.

And now for a photo I took a few days ago of my 3 month old Theodore aka Teddy Bear.

teddy march photo

This isn’t even edited! I need to warm it up some but otherwise I’m pretty happy with it SOOC (straight out of camera). Isn’t he adorable?!

teddy march photo2

Thanks for visiting. If you like my blog, I hope you will subscribe. Both RSS feeds and email subs are available on my sidebar. Have fun on the rest of the blog hop.

Enjoy, Rebecca

RECIPE
Stamps:
Mega Mixed Messages, Hanging Out-PTI
Ink: Colourbox chalk (2 browns), Memento cocoa, SU! banana, celery, PTI fresh snow, Antique Linen and Vintage Photo Distress
Paper: All CS and DP PTI
Accessories: PTI dies: Hanging Out, Eyelet Lace, brad, yellow ‘tab’ ribbons-stash, Hug Snug Seam Binding, blue felt-Etsy, foam dots-Jody Morrow

February 10, 2012

Baby Girl Card–Pinterest and PTI Inspired

Today, well, technically yesterday, Nichole challenged us to use Pinterest inspiration to make a card. The DT made their card and showed us their pinned inspiration. We needed to use their inspiration or something from Pinterest of our choice.

baby PTI pint insp

In case you haven’t jumped on the bandwagon, Pinterest is an online bulletin style inspiration board. Instead of bookmarks on your computer, you save the photos and the link to the origin is automatically saved. YOu can save under multiple categories to keep everything organized; it is awesome!!

Ashley

I used the stripes and monochromatic colour scheme, white with one other colour, from this photo.

Erin

I used the typography and one tilted letter from this photo.

Jessica

I used Jessica's card layout and instead of embossing across the paper strips, I used stitching and buttons.

Sorry the photo sucks, I took another with more contrast in the background but my computer won’t read my camera card. For some weird reason, when I eject my camera card using the little ‘Remove Hardware Safely’ button, it ejects the whole program! When the computer is turned off first, it works fine next time. So I’ll replace the photo after hubby gets up and fixes it.

Enjoy, Rebecca

RECIPE
Stamp:
PTI Hanging Out
Ink: pink-SU!
Paper: Sweet blush CS-PTI, confetti white, pink CS-SU!
Accessories: silk ribbon-May Arts, Baker’s Twine, buttons-PTI, thread, cotton twine-Dollarama, flower button-SU!, alpha dies-Sizzix, foam dots-Jody Morrow

January 24, 2012

Hero Arts Thinking of You Card

I bought one of the new Hero Arts sets that includes stamps and matching dies. The dies are unique in that they cut right at the very inner edge so no guessing where it is going to cut like dies with the cutting edge in the middle. Of course, then there is no way to stencil or emboss so it’s a trade off.

ha think you levy
I sincerely apologize for the icky colour cast. I have come to realize that photographing my cards in the daytime in my light box is never going to work. The lights I use have a very yellow cast and the light in my room is daylight so quite blue. The mix seems to confuse my camera sensor in a very nasty way. I don’t have software that will auto correct and the manual adjustments I made didn’t help much. I’d take another photo but I already gave the card away. Sigh… I hope you can use your imagination to get rid of the bluishness.

The authentic colours are celery, banana and apricot in the background, pretty in pink and regal rose for the flower and celery and olive for the leaves, all from SU! I used markers to colour the flower and then spritzed the stamp lightly with pearlized water I made from Perfect Pearls. Next time, I’ll use a bit more water as I wish it had blended a bit better. I was inspired by a card I found by Melissa Bickford posted Jan 14th on Just Dandy. Thanks Melissa!

This card says Thinking of You but I used it as a sympathy card. I stamped a sentiment from JustRite stamps inside. A dear friend lost a brother and sister within the space of a month. Sadly, I didn’t know about the brother so the card only says sister inside but they get the idea.

Enjoy, Rebecca

RECIPE
Stamps:
Hero Arts-Floral set and dot stamp from some other HA set
Ink: celery, rose, banana, apricot, olive, pink-SU!
Paper: doily-Wilton, white, banana, celery CS-SU!
Accessories: Ribbon-May Arts, dies-HA

January 07, 2012

Mojo Moments Card

I needed a bunch of thank you cards for the lovely professionals who cared for Teddy and me in the hospital. I had several great nurses and my OB was great too so I did an assembly line.

breath moments mojo

I used Mojo Monday 222 sketch for this card. I really like this layout and I’m certain I’ll use this again.

Mojo222Sketch

Such a simple card, I think I’ll leave it at that!

Enjoy, Rebecca

RECIPE
Stamps:
PTI-Out on a Limb Sentiments
Ink: Memento black, celery-SU!
Paper: pink CS-PTI, white CS-Taylored Expressions, DP-Echo Park Country Drive, doily-Wilton
Accessories: button-PTI, Divine Twine, foam dots-Jody Morrow, square punch-SU! (used to create banner ends on sentiment)

December 06, 2011

Baby Thank You Gift Set

Friends of my husband’s just had a baby and since he helped us move (huge job!) I just had to make them a baby gift. I’ve been too busy getting ready for our own baby (37 weeks as of Sunday! almost there…) to make anything too extravagant but I managed to whip up a set of 10 CAS thank you cards.

baby buggy card set boxed

Here they are, as a set, all boxed up with envelopes. I would have made the box more interesting but everything I could think of would have gotten crushed when I put it in a padded envie to mail it. And I’m not sure they are the sentimental types to save and/or reuse a pretty box.

baby buggy card set card closeup

Isn’t this stamp gorgeous and detailed? I just love it! I tried interesting my mom in stamping a while back and she bought quite a few stamps but never kept it up so I inherited this beauty! Such a great focal stamp, fabulous all on it’s own.

baby buggy card set card

Here’s the card all by itself. I went with very CAS because I’m told they are not into things that are too ‘frou-frou’! These should work well. I don’t think I’ve ever made cards with so few ‘ingredients’! I’ve made quite a few thank you cards for my own use already but if I run out, I may make a few more of these!

Enjoy, Rebecca

RECIPE
Stamp:
oops, I forget, email me if you want to know but its older so probably retired, thank you-PTI (I think)
Paper: marina mist, vanilla CS-SU!
Ink: night of navy-SU!

October 19, 2011

Baby Onesie Favour for Taylored Expression Blast from the Past Blog Hop

The theme this month is Trick or Sweet. Since I don’t celebrate Halloween I decided to go with Sweet. I’ve got baby on the brain of course, being almost 7 months pregnant, so a baby shower favour seemed like a no brainer. And I won a TE baby set a couple months ago making it even easier!

onesie favour front

If you don’t visit my blog on a regular basis you may want to subscribe or visit again as I will be doing a tutorial on how to make this favour. It’s pretty easy but I’ll list the sizes of circles to use and the measurements of the sleeves etc. You can get two from each sheet of 8.5x11” cardstock.

onesie favour side

I would have used blue and white jelly beans but I didn’t have any so this is filled with a roll of unwrapped Sweet Tarts minus the pink and orange ones. You could use any candy you want of course. Blue and white M&Ms could be cool too. Or blue FIZZY BATH SALTS would be a calorie-conscious option. They are easy and pretty cheap to make, just click on the highlighted text above.

If you are very observant, you may have noticed a little blue paperclip sticking out from the side of the sleeve. I wanted to be able to undo the favour and allow it to lay flat to make a template later so I used paperclips to hold it together temporarily while I photographed it.

onesie favour closeup

I used stars from two different sets, Hanging Out and Bringing Home baby, cut them away from the other stamps they were attached to and used them to background stamp the onesie. The sheep and turtle were cut apart from their stamps too.

I hope if you enjoyed this project you will visit again!

Enjoy, Rebecca

RECIPE
Stamps:
TE Bringing Home Baby, Hanging Out
Ink: Bashful blue, navy-SU!, Memento black
Paper: bashful, brocade blue CS-SU!
Accessories: blue brads, circle, label 1 Nesties, 1 1/4” circle punch-SU!, Copics W3,5, Y21,35,YG63, G21,24, foam dots-Jody Morrow


.

October 01, 2011

Super Simple Card Gift Set for World Card Making Day

This should be an awesome, stamping-filled, paper-loving card making day. Sadly, I have recently learned that a sweet friend of mine has been diagnosed with Stage 4 bone cancer. She isn’t a super close friend but I am still really upset. OK, part of that is because I am pregnant, maybe I am just more likely to cry, I imagine I’d still feel as upset no matter what. I am planning a gift basket for her (Becca, if you already did your own, no prob, I will either do my own or if not, I will include this in it) and figured she’ll need a bunch of thank you cards in the coming months. So instead of rockin’ a few online challenges, I decided to make this set.

ds card set in box

It is a set of 8 cards all the same, just different colours of card bases. They are all stamped with a background stamp in the same colour as the base. The branch is done with PTI Out on a Limb which was stamped twice, once in full and once below just partially.  Ditto with the matching flower image. This was very quick to do! I added the leaves individually, coloured with a Copic and hand drew in the flower centers. It took a lot less time than you might think!

ds card set closeup in box

I wanted glitter along the top edge of the main panel but glitter is so messy so I used Scor-Tape and glittered EP. The butterflies are only adhered in the middles so the wings can be lifted if she is giving them in person. The mail will just squish them back down of course!

ds card set all

Here are all the colours I used. They look good together right? I deliberately chose them so they would look good as a set and still all go with the flower and butterfly colours. I wish I’d had something more formal than the twine at the bottom but I don’t have much ribbon in white that I liked that was also in sufficient quantity for 8 cards. Sheer white with a gold edge would have been nice. Oh, well.
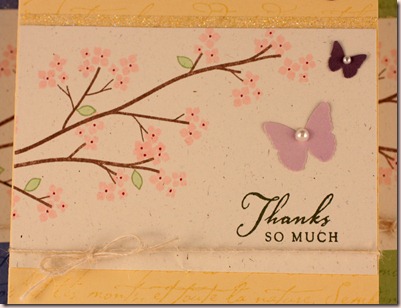
ds card set closeup

I got a new macro lens. I am thrilled with it! I went to a larger camera store than the one near my house and they had several lenses that were lower priced than the ones stocked locally! Yeah! I entered expecting to pay $649 and left with a lens for $449! WooHoo!! I love that you can actually see the sparkle of the glitter!

Enjoy, Rebecca

RECIPE
Stamps:
Out on a Limb and OOAL sents-PTI, background-SU!
Ink: rose red, regal rose, banana, celery, artichoke, amethyst, eggplant, cocoa, brocade blue, pink pirouette-SU!
Paper: natural white CS-PTI, rose red, regal rose, banana, celery, amethyst, eggplant, cocoa, brocade blue CS-SU!
Accessories: pearls-Dollarama, twine-PTI, iridescent ice EP-SU!, butterfly punch-MS, Scor-Tape 1/8”, white taffeta ribbon-SU!, card box-Clear Boxes of Canada
