Showing posts with label Moving cards. Show all posts

May 05, 2018

Time for Fiesta!

Last month Hero Arts sent a really fun Mexican-themed card kit. When I first saw it, I was hesitant as it really isn’t my style. But I get card kits for a reason, to challenge myself, and the images looked fun to colour. Also, the large ornate die was amazing!

Time for Fiesta chibi card

My kids had been begging me to make a Chibitronics card so I combined the kit with some fun lights. The concept was that in the day, the sun in the desert is so hot, it’s practically white hot. But later in the day, it glows orange as it sets. The mouse is coloured with Rather than colour the cacti, I used Distress inks, some Oxide, some regular, to sponge on some colour. After, because the Oxide somewhat covered the stamped lines, I re-stamped using my MISTI.

Time for Fiesta chibi card2

In this photo, you can see that pulling out the tab both completes the sentiment and actives the lights with a switch. I’m not thrilled with the obvious three lights rather than an overall diffused light so I may try to add some vellum over the two layers of tissue I used to see if I can get it to diffuse more. Once you get the switch set up properly, it works really well.

I’m not into scrapbooking much anymore though I always intend to go back to it some time. I kind of stalled out after my second son turned about 18 months. I never got a decent photo of him because he was obsessed with my camera; so every photo has his face next to the lens, massively blurred out, his arm in front of his face as he reached for the camera or was crying from being told he couldn't have the camera! But it is International Scrapbook Day so I thought I’d wish you a good one!

Enjoy, Rebecca

October 07, 2017

Happy World Card Making Day! 2 Mini Product Reviews

Crazy 4 Challenges is happy to have a challenge right on WCMD! Awesome right? For such a happy celebration, our host this month, Bonnie Sharp gave us the best challenge of all! Just make a card! Since that’s what we all usually do, though tags, ATCs, packaging, mixed media pieces and other crafts are all allowed, it made creating super fun!

happy day shaker

It only made sense to create a happy celebration card to go along with this holiday! (I wish it was an official holiday! Wouldn’t that be cool!) I used some balloon dies by MFT and my Gansai Tambi water colours to create the balloons on Bristol smooth paper. I added some foil by using a brush (an old one) and some glue that dries tacky. The kind you can use to make your own glue dots. Ooh, note to self: adding this glue in dots would have made for pretty foiling too! I am usually foiled by whatever foiling technique I use. But I love it so I was determined to get it to work. I’m quite happy with the perfectly imperfect way this turned out, exactly as I had pictured in my mind before starting. The frame was created with some fun Happy Day dies by Concord & 9th. It’s easier to show you than to describe them.

happy_day dies

So, see how there is an outer frame then an inner one with a section missing? It allows you die cut a second time adding in either the flower die OR the happy die! Cool right? It’s partial die cutting ON PURPOSE! What??? :) In addition they have another set with a similar love add on and it includes a smaller frame, the word fits in a landscape position. If you are wondering how versatile dies like this are, you have to watch their excellent videos. Another C&9th set includes the word ‘Day’ which I die cut from some Tim Holtz glitter paper. I added the word to the bottom left, tossed in some sequins (Lucy’s Cards) along with some Martha Steward micro beads and dotted on some silver glitter Nuvo drops. Ta da! All done!

So back to the Tim Holtz glitter paper. It doesn’t shed at all, not even a bit. Which is awesome. But I smile every time I see glitter on my cheek so that’s not as big a deal for me as it is for some people. It is very thin so you’d think it would be easy to die cut. Nope! Unless you back it with cardstock, which kind of negates it being thin and self-adhesive, it refuses to cut cleanly. If you look at the bottom of the paper in your die you will think it’s cut cleanly. But that’s just the backing paper. It would work well with steel rule dies I’m sure but I have very few of those. My final thoughts; I will use it up but likely not buy any more.

Enjoy! Rebecca

September 24, 2017

Let’s Make an Interactive Card!

This was my challenge on Crazy 4 Challenges this week! I love making them so I’m thrilled there are so many dies and stamps coming out to make creating them easier!

c4c interactive slider dogs

So for my card this week. I channeled my inner Sandy Allnock. She creates the most awesome backgrounds for the stamped images she colours. It was actually pretty fun to add ink to the entire image. The park bench took me a while to draw, I had to remember all the lessons I’ve read about perspective and vanishing point! It would have been much easier to create a background if the two dogs could kiss without one being up higher than the other. Because her face is tilted up, she needed to be lower than him so he needed to be up on something. I thought of a rock first but that was too boring.

c4c interactive slider dogs2

Don’tcha just love his blushing cheeks! I created the slider with out using dies. I just drew two lines with pencil, added a curved line at each end by using a small circle die then cut it all out with a craft knife. A die would be much easier but it worked out just fine. The dogs and sentiment are by Avery Elle from the More Furry Friends set.

Come on over and join us this week at Crazy 4 Challenges. If the linky isn’t working, just add you link to the comments.

Enjoy, Rebecca

September 09, 2017

A Glittered Hello

It’s my second week hosting over at the Crazy 4 Challenge blog! This week I chose glitter as my challenge! You get bonus points for using more than one kind/colour or use it in more than one way!

c4c hello gold glitter shaker

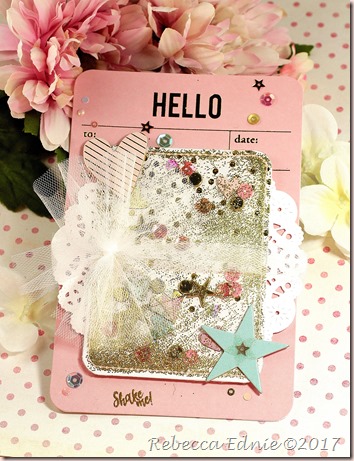
I was inspired to make a shaker card using two Project Life cards and some little embellishments that came with the kit. The shaker was sewn shut with acetate on top using my sewing machine. I sewed it about 2/3 of the way shut then added the little chipboard pieces, sequins and glitter then finished sewing it closed. The chunky glitter unfortunately blocks the view of the goodies inside but I found with another shaker I made that the static dies down after a while. I’ve no idea why but that shaker looked amazing after the glitter settled. Even IRL it looks better than it does here.

c4c hello gold glitter shaker2

I also used glitter in another, more subtle way. If you look closely at the aqua heart, it has a glitter star inside it. I added some bits of doily under the smaller PL card and a tulle puffy bow over the whole card. At the very bottom is a stamp from a new set I bought recently. Heffy Doodle is a new company who recently sold their first stamps via Kickstarter! What a great idea! The little stamp seen below is just one of dozens of small stamps meant to accompany all the awesome shaker cards we’ve all been making lately! So smart. I have a set like this but it is tiny and not nearly as cute! I highly recommend you check them out.

c4c hello gold glitter shaker3

I hope you’ll pop over and play along with my challenge. If you hate glitter, use glitter embossing powder, a glittered embellishment or glitter paper. Jennifer McGuire had a great post earlier this week with some ideas to corral glitter. My own card was shedding quite a bit from between the stitches so I sealed the edges with some glossy accents. Just a tiny bead where the acetate met the paper. Ta Da! All better!

Enjoy, Rebecca

April 08, 2017

Penguin Wobble & Shaker Card

You know how a duck seems so still above the water but is paddling like mad underneath? That’s how I feel lately! I’ve been working really hard on cards for the SplitcoastStampers Dirty Dozen but I can’t show them here yet. I can’t wait until I can! (Want to see them now? Sign up today!) My blog totally doesn’t reflect all the work I’ve done and cards I’ve made! I haven’t forgotten about all you faithful readers! I promise!

Today however, I have a cute card for you for Crazy 4 Challenges. Our theme is zoo animals or just animals in general if you don’t have any wild ones.

c4c penguin shaker

This is a super fun, double interactive card! The penguin looks slightly distorted because he is perched atop a Wobble Spring! This one for some reason seems to angle upwards with the head close to the card base and the bottom up in the air! (maybe I played with it a little too much??? hee hee!!!) The ice floe was hand drawn, I don’t have a stamp to use for it but I think it turned out ok!

c4c penguin shaker2

Who says you have to stop with just one fun thing to play with on your card? I added a shaker to this card as well! It’s even a double sided shaker. What you see through the window is the inside of the card. To make it look finished inside, I added a reverse ice floe behind the one on the front. I just traced the first one flipped over and drew in the interior lines. When I write a message I’ll use the inside ice floe and the mirrored space next to it (where you would usually write your message) and just be careful that my writing doesn’t go into the shaker area. But my 5 yo insisted and I make him a card (he made me one) so this may be appropriated well before I have a chance to send it to anyone else.

The shaker is full of snowflakes, blue and silver sequins, tiny silver confetti and some clear gems that to me look like ice PLUS a couple of penguin friends for my wobble penguin! I hope you had fun seeing my card! Do you have time to play along with us this week! I sure hope so because this was so fun! (Have I said it enough?? Fun Fun FUN!!!) If you get the SSS card kit, this penguin was in this month’s kit along with some other adorable WILD!! critters!

Enjoy, Rebecca

February 15, 2017

Coffee Cup Spinner Card

I LOVE making spinner cards. Some require a lot of detailed and difficult measurements and cuts. They can be worth it but I think the best ones are the simplest. This one requires almost no planning and no measuring!

coffee cup spinner card2

All you have to do is cut or die cut 2 symmetrical images or shapes, sandwiching a thin cord or two strands of thread in between using strong adhesive. Next cut a window in the front of your patterned paper. Then layer your patterned paper on your cardstock and die cut the cardstock layer too. Use some temporary adhesive or washi tape to hold it together if you need to but don’t permanently adhere it together. Once the window is die cut, take apart the layers. Again using strong adhesive, lay the thread or cord on the cardstock as shown. Lastly, adhere the patterned paper down.

coffee cup spinner card

Now for the fun part! Before placing the card in the envelope, twist the image around about 6-8 times. Don’t over twist or your thread might pull from the adhesive and get a bit slack. I’m not usually into the little cutesy faces but the paper was adorable so I figured the coffee cup should match!

Enjoy, Rebecca

January 20, 2017

Guess What? New Design Team!


current-dirty-girl-blinkie_1_orig

I am thrilled to announce that I was asked to be on the Splitcoaststampers Dirty Dozen Design Team! The alumni are some of the biggest names in stamping and I feel so privileged!

SCS tut baby shaker 3

I also had a tutorial and video for a Surprise Shaker Card for SCS a couple of weeks ago and I hope you will check it out. You can see another card I made in this style Twins Surprise Shaker. You might also want to check out my SCS Gallery!

Enjoy, Rebecca

December 05, 2016

NEW! A Fun New Type of Shaker Card!

I have a new shaker card for you today, one I invented. Or at least I’ve never seen it anywhere. Neither had Dina of Splitcoast Stampers who has scheduled me in for a tutorial the first week of January! So exciting.

baby twin slider shaker1

Fortunately for me, I don’t have to wait for my tutorial to come out to show you my idea! This is a card I made for a friend who had twin baby girls. Before you open the shaker portion, this is what the card front looks like.

baby twin slider shaker2

Here you can see the shaker emerge as the front panel is removed. The shaker window is underneath it.

baby twin slider shaker3

And finally with the front panel fully removed, you can see the entire shaker. I filled the shaker with lots of sequins and confetti, a bit too much really. The little onesies are held by stretchy clear jewelry cord (clear thread works just as well) so they don’t go sideways or upside down. That idea came from Jennifer McGuire. I did find that they don’t move much as the sequins underneath them hold them in place so next time, if I use larger items held in my the clear stretchy cord (like the onesies), I will use a double layer of fun foam.

I thought this was a clever idea and I hope you do too. Please share this idea on your blog and share the link with your friends as long as you give me credit. Please keep on eye out for my Splitcoast Stampers tutorial and video on the first Wednesday of January!

Enjoy, Rebecca

RECIPE
Stamps:
Altenew Baby Zoo, Card Directions-Clear Dollar Stamps (pull)
Ink: Versafine black
Paper: Echo Park
Accessories: tab die-PTI, stitched rectangles-SSS, sequins-Lucy’s Little Things, confetti-Martha Stewart, fun foam, clear jewelry cord-Michaels, onesie die-Lifestyle Crafts

May 20, 2016

Interactive Teacher Gift Card Holder Card

When I saw this sketch for Crazy 4 Challenges, I didn’t have anything special in mind. But then I was looking through some old cards and saw one with a special fold that works perfectly with our sketch.

interactive teacher gift card

The way I adhered the panels makes this not only interactive but also a gift card holder! There are basically two mini cards glued to the front of this card!

interactive teacher gift card inside

I will probably add a glue dot just to make sure the gift card doesn’t slip out. If I’d left a wee bit more room (probably have to make a bit larger card) I could have added some glue to the underside of the yellow card, just to the left of the fold line. Then it wouldn’t be able to slip out. But right now it’s a tight fit.

I hope you can play with our sketch this week. It’s very versatile and don’t forget you can change up the shapes or rotate, flip, mirror etc if you wish. Hope to see you over at the challenge blog!

Enjoy, Rebecca

September 17, 2015

Hooray Balloon Card

I just got a new order from PTI so I’m having fun making cards with my new products.

hooray balloon shaker

I’ve been wanting to use some awesome sequins I got from Lucy’s Cards (on Etsy) named Frosted Cupcake! SO I had to pull out some pink and brown papers. They are super old but still lovely.

I used two layers of fun foam and old clear packaging to make the shaker. I added a few ivory and brown sequins to the cupcake mixture. The confetti mixture is made using a die that comes with the shaker dies. I just glued them on to the card in what I hoped would be a semi-random pattern.

Enjoy, Rebecca

Entered in:

Sweet Sunday Sketch

SSSC286


RECIPE
Paper:
doily-local restaurant, DP-Basic grey bittersweet, blush, chocolate CS-PTI
Accessories: balloon shaker dies-PTI, fun foam-Michaels, sequins-Lucy’s, Ellen Hutson and Pretty Pink Posh

August 17, 2015

Back to School Card for The Shabby Tea Room

Hi crafty friends! I have another edition of The Shabby Tea Room for you today! This week we were inspire by a lovely back to school photo with yummy fall colours in it.

tstr school shaker

Aren’t shaker cards fun? Keep in mind that you can add things other than just beads, sequins, micro beads and glitter! There are lots of  new dies out there that make shaped confetti (though you may already have some small dies for flowers hearts and stars) AND you can use some larger 3-D items if you add some extra foam! I used some shaped buttons and brads, I just cut the backs off! I glued the school bus in place as I felt it would look weird upside down being so large. But everything else moves!

tstr 257

This week we were sponsored by Paper Temptress. I received quite a few different papers as part of my design team sample. My favourite was the Antique gold paper I used for the frame of my shaker. It’s such a deep rich gold! The links to all the papers I used are on The Shabby Tea Room website just under my name. Just a note: The Cryogen White is my card base. I sponged it to a rich brown to better match my card front.

I hope you will visit our challenge blog! Maybe you can be our next Top Three or our Winner! And even if you don’t enter, you can take in all the gorgeous projects by The Shabby Girls and leave comments! Thanks so much for joining me today!

Enjoy, Rebecca

RECIPE
Stamps:
Graphic 45 An ABC Primer
Ink: Archival Brown, Vintage Photo, Fired Brick, Scattered Straw, Walnut Stain-Distress, Memento black
Paper: All Paper Temptress except Patterned papers by Graphic 45 and green leaf-old olive CS-SU!
Accessories: Jesse James buttons (inside shaker), sequins-various, red button-Basic Grey, hardware-SU!, flowers-Really Reasonable Ribbon, measuring tape twill, lace-stash

March 18, 2015

Butterfly Shaker Card

This is for the latest CAS(e) this sketch Challenge.

butterfly shaker

I immediately thought about the center rectangle as a recessed area leaving the outer edge was a frame rather than elevating it as a panel. So what to fill the frame with? Of course, a shaker pocket!

CTS_Sketch_114

I used Lawn Fawn and Pretty Pink Posh sequins along with Martha Stewart heart glitter which is so big it’s more like small confetti pieces. The inner panel was cut from the middle after stamping. It was a bit tricky getting the inner panel aligned correctly after adding all the foam without letting the sequins fall out. So I closed the back by replacing the panel and attaching it to the foam on the frame with a piece of copy paper. Then I added the entire thing to the card base.

Click on the sketch to visit the challenge.

Enjoy, Rebecca

RECIPE
Stamps:
Altenew
Ink: chocolate, hawaiian shores, hibiscus burst, raspberry fizz-PTI
Paper: white, aqua mist, hibiscus burst CS-PTI
Accessories: foam tape-Dollar store, sequins-as above, rectangle die-Spellbinders, Wink of Stella pen, love you die-SSS

January 19, 2015

Shabby Love Story Card

I think I made this for a sketch challenge that I didn’t enter… AGAIN! Ugh…

girlie love story

I finally got some new lighting (Happy Anniversary to me!) so I hope that my pictures will look better from now on. (I don’t know yet what this one will look like as my monitor isn’t great. I check my iPhone to see if they are too dark etc. Not sure if that is accurate either!) At least one side of the background won’t look greenish while the other looks pinkish! I have two lamps with identical day light bulbs yet one has a  different colour cast than the other. Weird…

girlie love story easel open

This is a new (to me) set from MFT. I love the fronts they pair in these sentiments. I cut my paper carefully to eliminate any Valentine's sentiments or images as this is from a paper pack called Fourteen. I designed the card so as to leave as much of the GORGEOUS background paper as possible. Ain’t it purdy? As you can see, this is an easel card. I like making them because I can work on a card front and still decide at the last minute to make it an easel-style card. Other specialty cards take lots of measurements and planning. I don’t think of them until it’s too late.

Enjoy, Rebecca

RECIPE
Stamp:
MFT Love Story
Ink: London Fog Memento, Frayed Burlap Distress
Paper: Crate Fourteen DP, PTI Blush CS
Accessories: scalloped punch EK Success, lace-Fabricland, buttons-SU!, doily die, loopy border die-PTI, foam dots-The Sticky Stuff Store, hand-dyed Hug Snug Seam Binding ribbon

December 11, 2014

Sparkle and Shine Snowflake Shaker Card

Whew! That’s quite the title huh?

snowflake shaker card

I recently watched a video by Jennifer McGuire about making a shaker card with a sponged background. I decided to CASE her idea.

snowflake shaker card closeup

I used extra thick foam underneath so I’d have lots of room for shaker goodies. I always overfill so I gave myself some more room. There’s clear, white and a few silver sequins, microbeads and tinsel glitter. I also tossed in a silver embossed snowflake die cut I made for another project and didn’t use. My silver embossed sentiment didn’t show up too well against the shimmery background, should have used white, so I shadowed the letters with a dark grey Copic marker.

I’ve made this for a few challenges: Mojo Monday 375 and the JUGS challenge #270 “sparkle”.

Mojo375Sketch

Screen Shot 2014-11-11 at 3_39_53 PM

Enjoy, Rebecca

RECIPE
Stamps:
SSS
Ink: Versamark, Distress inks – Broken China, Faded Jeans, Dusty Concord, Seedless Preserves
Paper: all from SSS Dec Card Kit
Accessories: silver EP-SU!, foam sheet-Sticky Stuff Store, sequins-Pretty Pink Posh and SSS, snowflake die-large from Spellbinders, small from MFT, tinsel glitter, microbeads-MS, Copic marker, Perfect Pearls spray

December 05, 2014

Sparkle and Shine Vellum Shaker Card

I’ve seen so many cards based on this month’s Simon Says Stamp card kit, it was hard to come up with something original. I think I’ve done a pretty good job.

sparkle and shine shaker

I used the sequins from the kit along with a few other gold and white ones from my stash and I added some chunky gold glitter too. I loved the little heart border so I used it on my vellum shaker. The thread is gold though it’s hard to tell right now. I actually used two layers of vellum then adhered the shaker pocket to the card base. Not sure if that was the best idea because it buckled somewhat even though I held it closed with paperclips. I saw Jennifer McGuire do a similar card (after I made mine) and she sewed one layer of vellum right to the card base. Maybe next time!

Enjoy, Rebecca

RECIPE
Stamps:
Sparkle & Shine-SSS
Ink: Versamark
Paper: both from Kit
Accessories: gold thread?, sequins-kit, Sulyn

April 12, 2014

Happy 5th Blog-iversary Unscripted Sketches! and Giveaway

ETA: I apologize this didn’t post earlier. For some reason my pre-scheduled post didn’t go up as planned at 8am. So sorry.

5thblogiversarylogo

Congrats on 5 awesome years! This week we have some special prizes on the Unscripted Sketches blog so be sure to visit right after you read this post. Don’t leave yet though because I have blog candy here too! But first up is my card.

RebeccaEdnie252

A friend is going through a rough time so I thought I’d send her a Thinking of You card. I dug out these older, gorgeous Webster’s Pages papers and I’m so glad I did. I cut the mirror on the bottom left with an X-acto before I die cut the label shape so I could exclude it. If you’ve never done this technique before, you just cut the part you want to exclude carefully then tuck the die underneath.

I used leftover Spellbinders packaging to create the window for my shaker. I really should make shakers more often, they are so much fun! You can see the sequins inside but it also has microbeads that you can’t see as well.

garnet bar necklace

So, now the moment you’ve been waiting for… I am offering blog candy! I’ve been making lots of jewelry lately so I am offering a silver bar necklace like the one above, with your choice of colour of crystal or stone (from the colours I have). I will contact the winner to find out more about their preferences. So, what do you have to do to enter? It’s easy. Sign up for my email updates (over on the sidebar), leave me a comment saying you signed up AND enter to win at Unscripted Sketches. You can enter by commenting or entering a card or both but if you enter a card, you may come back and leave another comment saying you did so for another chance to win! If the winner I pick hasn’t entered at Unscripted Sketches, I will choose again. I will pick the winner next Saturday and she will have 48 hours to reply.

252

I hope you all enjoy the festivities, other designers are offering blog candy too so be sure to visit all of them. I hope you love this week’s sketch, I thought it was super fun.

Enjoy, Rebecca

RECIPE
Stamps:
Thinking of You-SSS
Ink: Teal Zeal-Memento, Antique Linen Distress
Paper: Webster’s Pages, moss CS-PTI
Accessories: pearls, rhinestones-Kaisercraft, sequins-Ellen Hutson, microbeads-MS, foam dots-Sticky Stuff Store, foam strips-?, roses and leaves-Michaels, white flowers-Prima, ribbon-Dharma Trading

December 07, 2013

Shabby Baby Card for Unscripted Sketches

This sketch was a lot of fun! Some of them kinda stump me at first but this one flowed easily!

RebeccaEdnie234

The ‘Baby’ die is by Marianne I think and the baby things are by Memory Box. They are really quite teensy, for comparison, this is a 5x7 card. The bottle and rattle are about a bit less than an inch high and the soother is only about 3/8” high!

un sc sk234

I coloured them with Copics and oh, so gently sponged them with Distress ink. I also had to be very careful with the word to get ink sponged on the inside areas of the die. I used a Fantastik for the tiny areas. It’s like a sponge tipped pen you can dip in ink. Also good for fixing missed areas of solid stamping.

baby closeup1

The papers are from Little Darlings and G45’s patterns and solids pack. The baby face flower is a chipboard piece. The greyish buttons are Mother of Pearl and look so much nicer IRL!

baby closeup2

I have a couple girlfriends who are pregnant right now so hopefully one of them has a little girl! I have several boy cards already in my stash.

baby closeup3

I do hope to see you over at Unscripted Sketches later this week! We’d love to have you join us! Even if you can’t play. be sure to check out the DT’s awesome projects; they are a talented bunch!

Enjoy, Rebecca

RECIPE
Ink:
Frayed burlap Distress ink
Paper: G45, Ivory CS-PTI
Accessories: EK Success mini scalloped punch, PTI buttons, MOP buttons-Ebay, G45 chipboard, Marianne Baby die, baby things die-Memory Box, Copic Markers, Flowers-Wild Orchid Crafts, Lace-stash, ivory iridescent sequins-Ellen Hutson

November 30, 2013

Snowman Shaker Card for Unscripted Sketches #233

I decided to make a shaker card for this week’s Unscripted Sketches. It’s always fun to make something beyond a basic card!

RebeccaEdnie233

In the shaker box I added white glitter, tinsel glitter and microbeads. Microbeads are idea because they heavy enough to not stick to the acetate window. The tinsel glitter doesn’t stick much either but the regular glitter sure does! The snowman is popped up on foam dots so my shaker is two foam layers thick.

un scr sk 233

I die cut the frame but since my dies weren’t quite the right size, I partial die cut both ends of the rectangle. It’s a great way to get more use from your dies. I used mirrored paper to cut the big snowflake and I used heat n stick powder to add glitter to the white one.

RebeccaEdnie233a

Please come and play with us at Unscripted Sketches this week! We’ve been a bit down in numbers lately so that  means there’s an even better chance of your project making the top three! It’s such a good feeling to be chosen!

Enjoy, Rebecca

RECIPE
Stamps:
SU!
Ink: not quite navy-SU!, Memento black
Paper: CTMH, not quite navy-SU!
 Accessories: snowflake dies-MFT, snowflake ribbon-May Arts, rectangle nesties, tinsel glitter, microbeads-MS, Stampendous white glitter,

October 05, 2013

World Card Making Day!!

Welcome to my WCMD post! I’ve saved several cards I’ve made lately just for this special occasion! So sit back and enjoy! (Check out the end of the post for what’s coming up on my blog soon.)

First off a little card inspired by Jennifer McGuire or maybe Kristina Werner. But if Jenn made it the sentiment would be black and if Kristina made it there would be dash lines somewhere or rounded corners so I suppose that makes it all mine!

heart happy

I cut apart a SSS heart die to get just one heart to cut it from each of two banners. The background was sponged with broken china ink over the SSS Moroccan stencil.

Next up is a Copic coloured card I spent a TON of time on. Not only did the colouring take a long time but the card design did too.

tag slider card

It’s a surprise pop up card but I call it a tag slider card. I changed hte measurements of the tutorial quite a bit though as my card is larger. Cuz when you pull on the tag, the front panel slides up to reveal a message underneath and a place on the tag for a message!

tag slider card 2

Cool right?

tag slider card 3

tag slider card 4

tag slider card 5

The Copic colouring looks smoother IRL. Strange, soft colours usually fades completely on a computer screen. In this case, it actually shows up more strongly! Weird!

vintage hearts

I made this card for a challenge on Swap-Bot to go green and use coffee sleeves. I love the tiny corrugations and that one side of the cardboard is already removed. I die cut the heart and painted the ridges white. Then I used Versamark to add gold embossing to the edges.

And last but not least, two ATCs. They are still cards right? First, a mixed media piece inspired by a canvas I did for my bathroom. I’ll be posting that soon so if you are new to my blog and want to make sure you see it, be sure to subscribe or bookmark me!

sea mm ATC

I used a kraft cardstock base and added some sticky back canvas. Then I added two colours of turquoise, ivory and yellow-green Golden fluid acrylic paint. Then I dry brushed on some gold. I stamped the shell in Archival ink and added the ribbon and button when dry.

rainbow butterflies ATC

This one was sponged with a rainbow of distress ink colours on vintage sheet music paper. Then I added ink direct to paper on white cardstock so the colours would match the sponging when I punched the butterflies. And I added Copic markers to the centers. They are glued on their middles only so the wings can be lifted up.

Have a great WCMD. I hope you enjoy clicking on all the links and I apologize that this post wasn’t up right away. Coming up soon on my blog: how to make multiples of a project-3 parts, preparing, die cutting, stamping; 2 mixed media canvases and how to make a super easy super-hero cape! I also have a few jewellery projects to show you! Make sure you come back now, ya hear?

Enjoy, Rebecca

RECIPE
(Heart Happy)
Stamps:
SSS
Ink: Memento London Fog, Distress Broken China, Scattered Straw
Paper: white CS-PTI, DP-MME
Accessories: foam dots-Jody Morrow, Rock Candy Distress Stickles, SSS banner, heart dies, stencil, lifestyle crafts label dies

(Thanks-Tag Slider)
Stamps:
PTI Thanks all Ways, Flourishes Hollyhocks
Ink: Memento black, night of navy-SU!, HA-Field Greens, Frayed burlap, antique linen distress
Paper: Kraft, vanilla, moss CS-PTI, white CS-XPress it, DP-MME, vintage music paper
Accessories: Cropadile, 1/2”, 1 3/8” circle punch-SU!, Ornate ovals, Rose Creations dies-Spellbinders, mini scalloped punch-EK success, foam dots, Copic markers

(Vintage Hearts)
Ink:
vintage photo, antique linen distress ink, Versamark
Paper: Trousseau 7 Gypsies, kraft, vanilla CS-PTI, coffee sleeves
Accessories: SSS banner, heart dies, PTI heart die, white paint, gold EP-SU!, MOP button-ebay, lace-vintage, flower-Jesse James buttons, foam dots

(Sea Mixed Media ATC)
Stamps:
SU!
Ink: cobalt Archival ink
Paper: Kraft CS-PTI
Accessories: Golden Fluid Acrylic Paints, sticky back canvas-Ranger, MOP button-ebay, ribbon-stash, MS butterfly punch
In case you are wondering, the shell with the slit in it is a name holder from a wedding store.

(Rainbows, Butterflies and Music ATC)