Showing posts with label Unscripted Sketches. Show all posts

May 31, 2014

Saying Goodbye to Unscripted Sketches

I’m sad to say this this is my last Unscripted Sketches post as the owners of the blog have decided to move on to other things. I certainly wish them well. So here is my last project.

RebeccaEdnie259

I love this muted aqua, tan, ivory and chocolate combination. I was stuck for an idea so I started looking at my dies and my eyes settled on my ice cream die. Ah, perfect. When I pulled out this paper pack for obvious reasons, there was already a die cut heart! Even more perfect! I don’t remember cutting it but why not use it?

I added glitter to the ice cream cone with a glue pen and to the card with red line tape. I used the glue pen for the stripes on the heart too.

259
I really hope you will play with Unscripted Sketches one more time this week. I hope we have record numbers of participation for our last hurrah! I’m really sad to see it go. I haven’t been a member long and I so wish this was a long term assignment. I was on design teams before my baby was born but quit quite a long time ago. I didn’t want to work while he was little but I was so ready to start over again. oh well, the search starts again. Have fun!

Enjoy, Rebecca

RECIPE
Paper:
MME, cardstock base-baja breeze-SU!
Ink: Frayed burlap distres
Accessories: foam dots-The Sticky Stuff Store, chocolate glitter –MS, light glitter-Art Institute, heart, ice cream die-PTI, sequins-Ellen Hutson

May 24, 2014

Shabby Watercolour Balloon for Unscripted #258

I really enjoyed the Online Classes Watercolour for Card Makers class. I learned I was not using enough water to get a really good watercolour look.

RebeccaEdnie258

I used lots of water for this! Actually, it was hard to mix the colours to match the papers so when I coloured it, it was too bright. So I tried adding water and lifting the colour to soften the overall look. It worked a bit but was still pretty bright so I added a wash of gesso over top. It worked really well but it dulled the stamping lines so I went over them with a pen.

258

It’s a really fun sketch this week with lots of layers for those of you who love them like I do! I hope you will come and play with us. Be sure to check out the awesome projects by the team at Unscripted Sketches.

Enjoy, Rebecca

RECIPE
Stamps:
Unity
Ink: potting soil Archival ink, frayed burlap Distress
Paper: chocolate CS-PTI, DP-Webster’s Pages, vintage music paper, watercolour paper-Windsor & Newton
Accessories: foam dots-The Sticky Stuff Store, watercolour-Windsor & Newton, lace-vintage, ribbon-May Arts

May 17, 2014

Chalkboard Thanks for Unscripted Sketches #257

I am trying to be more judicious when choosing a sentiment for my cards so I can fill up my stash evenly. One type of card I am always looking for last minute is a hostess card. But since you haven’t actually enjoyed the hospitality yet, it can be awkward to find the right thing to say!

RebeccaEdnie257

KWIM? I can’t say thanks for the meal before I’ve eaten it right? ha ha!! But I like to give a card and small gift when I arrive… So I figured this would work perfectly. And if I needed it as a regular thank you for our family, that would be great too!

I like how the chalkboard technique turned out. I don’t like it when I see it done with just white embossing, no flourishes and no ‘dust’. To me those aspects of the technique are vital to making it look like real chalkboard art.

257

Come on over to the Unscripted Sketches blog and see what everyone has created! This was a tricky sketch for me but you could always straighten those diagonal lines if you like! It’s all about being inspired by the sketch!

Enjoy, Rebecca

RECIPE
Stamps:
Thanks all ways-PTI, Maison (flourishes)-Fiskars
Ink: Versamark, versafine white
Paper: Bazzil black cardstock, Theresa Collins Simple Summer DP
Accessories: enamel dots, washi tape-MME, foam dots-The Sticky Stuff Store, white pastel pencil, white EP-Hero Arts, lace-stash, punch-EK Success

May 10, 2014

Caring Thoughts Card for Unscripted Sketches #256

I need more get well cards in my stash and these ones are even better because they can be used for either Get Well or Thinking of You.

symp toy two

They are identical except for the middles. They are epoxy stickers I’ve hoarded but have finally decided to use. I popped them up on foam dots so they wouldn’t squish the shaped flower petals. I took them off a hydrangea stem.

RebeccaEdnie256

I coloured the flowers with a Copic marker because I though they were too pale despite being a nice ivory colour. They look really pretty!

256

I hope you can play along with this week’s sketch! It’s a really nice one. My card is pretty exact except the banner I added. I always seem to have to change it in some way don’t I? :)

Enjoy, Rebecca

RECIPE
Stamps:
Fancy Flourishes, Healing Sentiments-PTI
Ink: kraft-PTI, frayed Burlap distress, Navy-SU!
Paper: Glitz Designs
Accessories: Foam dots-The Sticky Stuff Store, floral stem-Michaels, epoxy stickers-Anna Griffin,

May 04, 2014

Serenity Pocket Card for Unscripted Sketches 255

I’m not a fan of diagonal lines on card sketches so I had to get creative for this one.

RebeccaEdnie255

So instead of a diagonal pattern, I saw a pocket! The insert is made of patterned paper backed with cardstock for stability then adhered to another cardstock panel so I could split the patterned paper, pop it up on foam dots and inset the rhinestones.

serenity prayer pocket card insert

I was going to stamp a chandelier to match the patterned paper but in the same CD case was this serenity prayer stamp so I changed my mind. The scalloped edge is part of a die cut. It has a double scalloped edge so I cut it in half!

255

I hope you will enjoy this week’s sketch. I know a lot of people like diagonal lines; are you one of them? join us at Unscripted Sketches this week to have some sketchy fun! Not the bad kind of sketchy mind you; just the fun kind!

Enjoy, Rebecca

RECIPE
Stamp:
Clear Dollar Stamps
Ink: Versamark, Vintage Photo Distress
Paper: linen, cream-PTI, DP-Kaisercraft
Accessories: pearls-Dollarama, lace edge die-PTI, gold EP-SU!, foam dots-The Sticky Stuff Store

April 26, 2014

Prairie Smile Card for Unscripted Sketches #254

Doesn’t this card remind you of a prairie dress? I love these patterns and colours.

RebeccaEdnie254

I’ve been wanting to copy the paper piecing technique Melissa Phillips uses for ages. I finally decided it would be perfect with this card. You can see her card here. I’m entering this card in the CASE Study DT challenge.

254

I hope you will join us this week on Unscripted Sketches. I love the ‘sentiment/quote’ part at the bottom. I have tons of tiny stamps I love to stamp repeatedly as a border. What do you have in your stash that would work?

Enjoy, Rebecca

RECIPE
Stamps:
Mega Mixed Messages-PTI
Paper: white CS-PTI, navy CS-SSS card kit, DP-Basic Grey
Ink: night of navy-SU!, Versamark
Accessories: loopy flower die-Memory Box, vintage lace, button, twine-PTI, white EP-HA,

April 19, 2014

Baby Thank You Card Folder for Unscripted Sketches #253 and Giveaway Winner

I love using the sketch for something other than basic cards. This week I was making cards for a friend who just had a baby and the sketch worked beautifully a folder to hold the cards.

RebeccaEdnie253

I used some Webster’s Pages papers to make this. The yellow ribbon looks so pretty. I love that shade of yellow and the chevrons are awesome.

baby folder open

This is the inside of the folder. I designed it myself so if you like it and want the dimensions, let me know.

baby folder close

Here’s a closeup of the embellishments. The arrows are made from Craft-a-board then covered with white cardstock and washi tape.

baby folder matching card elephant ty

This is the card I designed. Sorry that it’s hard to read the tag; it says ‘thanks’. I made the card narrower than the usual 4.25”. It is only 4” which helped because I wanted to get the most from a scrap of 12” wide paper and of course, 4” fits across 3 times but 4.25 only fits twice. That also allowed me to hang the trunk off the edge and still fit into a regular envelope.

253

I hope you will join us at Unscripted Sketches this week. Be sure to check this week’s post to see if you won one of our prizes! I look forward to making the jewelry I am giving away. My winner is Monika Reeck so please email me in the next 48 hours to claim your prize.

Enjoy, Rebecca

RECIPE
Stamps:
Mega Mixed Messages, Bitty Baby Blessings-PTI
Ink: Harvest gold-PTI
Paper: lemon tart CS-PTI, Baja Breeze CS-SU!
Accessories: foam dots- The Sticky Stuff Store, Copic BG72, seam binding ribbon-Masterstroke Ribbon

April 11, 2014

I Love You Watts

I was so inspired by last week’s Unscripted Sketches that I made two cards. This one was for hubby; he’s been behaving himself lately so I needed to let him know. ;)

RebeccaEdnie251 v2

It’s hard to see but I coloured the backside of the vellum bulb bright yellow in the center of the heart and lighter yellow just outside of it. I love colouring hte back of vellum; such an awesome look. I wish it showed up more. The hearts are coloured with a Copic and then I added Glossy Accents to the top.

251

Enjoy, Rebecca

RECIPE
Stamps:
Watts and Watts-SSS
Ink: black Archival-Ranger 
Paper: SSS card kit, scraps white CS
Accessories: holiday shapes die-SSS, Copic R27, Glossy Accents

Unscripted Sketches is Turning 5!

5thblogiversarylogo

It’s our Blog-iversary tomorrow! Be sure to visit Unscripted Sketches tomorrow for a chance to win prizes and I will also be featuring blog candy here. Several other designers are offering blog candy too! Come one back; you don’t want to miss it!

Rebecca

April 05, 2014

Shabby Lace Wedding Card for Unscripted Sketches #251

This week’s sketch is so simple and versatile! It’s a Unscripted Sketches favourite for sure! I decided to get my shabby on for this one and wow, am I ever proud of how it turned out! Especially my handmade flower! I am entering this in this week’s Shabby Tea Room challenge ‘Pretty in Pink’.

RebeccaEdnie251

The flower is made from layers of organza, light see-through bridal fabric, and some crinoline which is heavy and stiff but once wet, it curls up and then dries with lots of texture. The organza flower petals were melted with my heat gun. I use tweezers to hold each petal while I just kiss the edge with the heat gun. It’s easy to end up with lots of melting and no petal so be careful and same for the crinoline; it singes very easily. So go easy if you speed up drying it with your heat gun but that can be a cool look if you want it really shabby. I allowed it to singe in a few places just enough to get a light brown colour to help out the Distress ink I added to make the crinoline ivory.

shabby lace card closeup

The leaves are made in the same way as the petals but this time I used satin fabric. The crinoline will also make nice leaves if you dye it green with reinkers, spray mist or colour it with markers. The green ribbons are hand cut using more organza cut on the bias. If you cut fabric into ribbons this thin in the usual straight way, it will fray too badly to be used. To cut it on the bias, cut your strips, mine were 1/2”, on the 45 degree grain of the fabric. A quilting ruler, rotary cutter and a grid mat with 45 marked on it are a tremendous help.

shabby lace card closeup2

The lace is gorgeous don’t you think? I picked it up in the bridal department of my local fabric store. It was pricey but I bought it on sale and since it had two decorated edges, and I only needed a bit, it was worth the cost. I had a hard time deciding if I wanted it to overlay the whole card or just the bottom but it was too pretty to not use it on the whole card! I just had to arrange my sentiment carefully so you could read it! I just love how the stripes peek out from underneath the lace!

251I made the little pearl accent on the wire, it’s pretty easy, just cut a piece of wire, add a pearl to the center, twist the wire. Then add another pearl a little ways from the bottom of the twist, fold the wire and twist just using that one wire until it is tight. Then twist the two wires together and repeat. Just try to alternate which wire you add the pearls to or one will be really short and the other very long and use lots more wire than you think you’ll need. Twisting wire uses a lot more than you’d think.

TSTR _212

If you’ve always wanted to play but never got the chance, this is the week since this is a pretty easy sketch! And be sure to visit my blog and Unscripted Sketches next week too because we are having our BLOG-AVERSARY! YEAH!! There will be prizes and giveaways on some of our blogs and other fun events so you don’t want to miss it!

Enjoy, Rebecca

Stamps: Say it Loud-WMS
Ink: antique linen Distress, Watering Can Archival-Ranger, London Fog-Memento
Paper: MME Market Pad, cream CS-PTI
Accessories: fabrics, lace as listed above-Fabricland, brad-CTMH, flower, leaf dies-rose creations Spellbinders, ribbon-stash, half-back pearls-can’t remember sorry they are really nice ones, gold wire-beading store, top-drilled pearls-AH Beads, cream silk ribbon-May Arts

March 29, 2014

To the Moon and Back for Unscripted Sketches #250

This week’s Unscripted Sketches sketch was one of my favourites so far!

RebeccaEdnie250

There’s a detail you may not be able to see right away, the navy areas are all covered in pearl-coloured Perfect Pearls which makes the card look pretty and shimmery. If you ever make a card like this, cut the star after watercolouring. My paper warped really badly (it isn’t watercolour paper) and the top corner that’s hanging on my just those two bits of paper was really hard to flatten and even creased at those points. Oh, and sorry about the crooked sentiment, with each letter on a different baseline, it’s a tricky one to stamp straight.

250

I can’t wait to see what you all do with this sketch! (My other idea was fireworks!) Don’t forget you can turn or flip the sketch any way you like!

Enjoy, Rebecca

RECIPE
Stamps:
PTI Mixed Messages and Out on a Limb Sentiments
Ink: navy-SU!
Paper: navy CS-SU!, white CS-PTI
Accessories: star die-PTI, white EP-Hero Arts, watercolour pencils (used brush-to-tip)-Derwent Inktense, Perfect Pearls-Ranger

March 22, 2014

Jewelry Display Canvas Tutorial for Unscripted Sketches 249

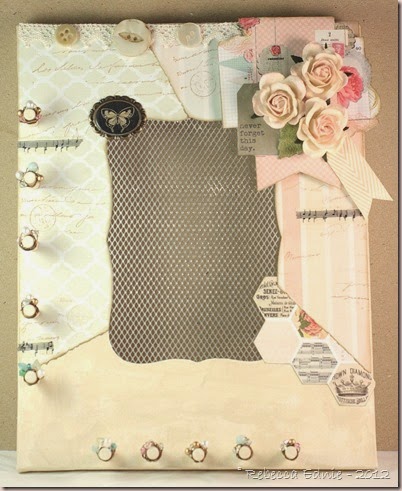
You read that right! Not only do I have a home dec project for you today, I even have a tutorial! I’m afraid I’m not very good at remembering to take photos for every little step but it’s so easy, I promise you will get it. So, project and sketch first then the tutorial! This is also for The Shabby Tea Room Anything Goes!
RebeccaEdnie249

This is a dollar store lover’s dream project! The (wonky) canvas, wire mesh and dowels were all purchased there. I’m sure you could get beads, wire, flowers, washi tape, ribbon, foam squares, charms, lace, paper and paint though I’ve no idea if you can find things that approach the look you see here. I know in the US there are way better stores than here.

jewelry canvas closeup5

Here’s a close-up of some of the pegs, I’ll have more extreme close-ups later. Aren’t the beads pretty? Each peg is slightly different and they are functional as well as lovely. I wanted to make sure that necklaces and bracelets didn’t fall off the pegs!

jewelry canvas closeup7

Everyone knows that earrings go through the mesh right? I still plan to embellish it more, I just ran out of time. I think I’m going to add Tim H’s Grunge Board Printer’s Blocks to spell BLISS at the bottom with gold swirls and pearls/rhinestones/sequins etc. Cool right? I also want to colour the mesh gold. Not sure if I’m going to try to use my Krylon pen or buy some model paint designed for metal.

249

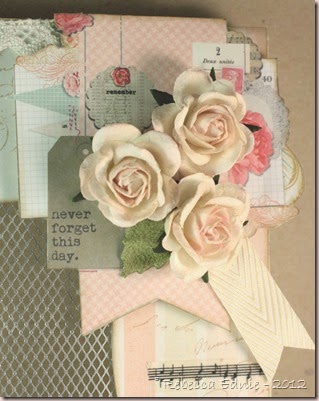
I had a blast with this sketch as you can see! Please visit the other gal’s blogs and leave them some lovin’ (comments) and be sure to support our challenge at Unscripted Sketches by making’  somethin’ groovy and linking it up! And don’t leave now! Please stand by for more close-ups and my tutorial!
jewelry canvas closeup6

Jewelry Display Canvas Tutorial

Need to sort out all your jewelry? Need a place that won’t leave it in knots and tangled with other pieces? Can never find the second earring? Need a great customizable gift for the gal who has everything? Bridesmaids’ Gifts? Tada!

What you need:

Artist Canvas in your choice of size. Unless this is for a girl I’d recommend no smaller than 8x10”. If you want to cover it in full sheets of scrapbook paper, no larger than 11 or 12x16” or you will have more than one seam.

1/4” dowels

a way to cut the 1/4” dowels, I used a small hand saw

1/4” drill bit (in any drill bit set) and drill or ideally a drill press but NOT necessary

sandpaper or rough emery board for sanding the ends of the dowels

rubber or rawhide mallet or hammer if no mallet

metal mesh for opening, you could use sturdy open lace if you can’t find mesh, I know craft stores have it

die or stencil to create shape for opening (optional, you can draw your own shape if you want)

fine tipped scissors or an xacto knife

strong glue or hot glue

22 or 24 gauge craft wire, I used 24 g Antique Bronze Artistic wire

Your choice of small roundish or chip/nugget beads 3-5 per peg, 2-6mm do not recommend doughnut shapes like rondelles or long oval shapes

wire cutters, preferably jewelry flush cutters

some sort of jewelry plier like a chain nose or a flat nose or even a round nose will help but optional

Paint or paper to cover canvas. This is so up to you that I really can’t make a list for you. I used MME paper and Golden Fluid Acrylic paint in Titan Buff. Before that, I added a layer of Gesso over the questionable layer on the canvas when purchased. You could add anything you would to the front of a card or to a scrapbook page, the possibilities are endless. An inspiring word, quote, monogram or her/your name might be nice.

1. Decide on the placement for your pegs. Note in the photo above that you may not be able to add dowels in the corners because of how the wooden frame is put together. Other than that you can wing it or measure precisely.

photo 2

2. Drill through the frame to the other side. This allows you to remove a peg if you need to. Be sure to place something underneath if you are working on a surface you won’t want to mess up. Keep the holes as vertical as possible or your pegs won’t sit straight. (We own a drill press and I own a husband, I’m not going to try to fool anyone here. Though if my garage wasn’t a disaster, I could do it myself. The spiders are still asleep here.)

photo 1

3. Cut the dowels to your preferred length. Mine were 1 1/2” long and my canvas was 3/4” thick so that amount was also what was showing. Unless the necklaces are very thick even right at the back of the neck, that is plenty, even with the wire wrapped beads we will add. Sand them smooth on one side. Do not add the dowels yet!

My hubby asked how I will see what I have on the left when they will be hanging on top of one another. There are two possibilities. If you are a quirky gal, hang it on an angle. If not, hang bracelets there or necklaces that aren’t likely to tangle. If the top necklace hangs on one side of the pegs and the second on the other and vice versa, I think you will be ok. Of course, if you aren’t making this for a sketch challenge, feel free and add more pegs wherever you’d like, just being careful of those corners.

4. Decide what shape your opening will be and trace it onto the back of your canvas. I used the largest Labels 8 by Spellbinders. Make a slit in the opening and cut with scissors or if you are good with an X-acto, use that. Be very careful not to stretch the canvas around the edges. I chose one large opening but you could do more than one small opening too like several small hearts or the centers of flowers.

photo 3

5. Next add your lace or mesh to the backside of the hole. I used Glossy Accents but you could use hot glue. Just be careful with the latter as the mesh will heat up with the heat of the glue. {{You can see here that the drilled holes did hit some of the staples. Didn’t seem to hurt the canvas or the drill bit so don’t worry about it!}}

OK, so the structure is done so we are on to decorating right? Uh, but what about the dowels. Don’t worry, didn’t forget those. When you add them depends on how you are decorating. If you are adding paper, add the dowels last*. If you are painting, add the dowels now. Stencilling-later… you get the idea. If you are doing any kind of technique which requires a flat surface, leave the dowels to later. If you want them to meld with your surface effects, add them now. You could even paint them along with the canvas, remove them (pound a short piece of scrap dowel in from the back about 2/3 of the way then remove the scrap with regular pliers), number them, do whatever other surface treatment you’d like, then replace them. Anyway, whatever you choose, here’s how to do it.

* poke a needle through the holes from the back. Then jab fine tipped scissors (closed) through from the top and press the excess paper into the hole. Unless you have many layers, it will just make it a bit tighter fit. If the dowel won’t go in, remove the lowest layers, keeping the top one intact as best you can. When it folds inwards as the dowel goes it, it gives the nicest finish. Make sure all glue is dry or it will tear.

6. If your dowels aren’t painted or finished, do that now. Pound the dowels into the holes with a mallet until they sit flush with the back of the canvas. A mallet will ensure the wood is not marred and neither is the finish. If you only have a metal hammer, wad up some scrap cardstock, 4-6 layers,  and shape it into a kind of a cup shape over the head of the hammer and tape it on. Now pound it in gently. Unless you wiggled your drill bit, they should fit perfectly and not even need glue. If they are a bit loose, never fear, add a bit of white glue and let that set checking that your dowel is at the correct angle while it dries. A clothespin may help here.
jewelry canvas closeup4

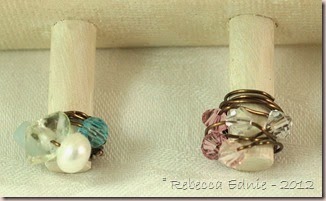
7.  Now, the best part! The beads! I worked with the spool of wire here and it may seem weird at first but it’s great. These were the first two I did and I was still experimenting with the best way. The left one was not the best at all! You are going to use a lot more wire than you’d think. Add your beads to the wire in any order. Begin by adding wire along the length of the peg, starting near the base of the canvas and working up to the top of the peg. This seems like the wrong way but trust me. Now bend the wire 90 degrees and start wrapping it around the peg near the top. When you come around to where you started going around, make sure you wrap around the straight wire you started with and be sure it is tight. Wrap around twice more being sure to catch the straight wire every time.

jewelry canvas closeup3

8. In the photo above #7, you can see the right peg doesn’t have the beads distributed very evenly which wasn’t my aim, these three are much better. Now that you’ve secured the beginning of the wire, you need to slide your first bead along the wire and place it where you want it on your peg. Make a full wrap then add the next and so on. Keep your wire taut the entire time. Don’t worry if it doesn’t end up super tight, many of mine weren’t. We will fix that later. It does need to be tight enough to not spin freely though. You can try tightening the wire, unwrap and start again, or start with new wire, it isn’t expensive! In the photo below, you can see that there isn’t a lot of excess wire.

jewelry canvas closeup2

9. When you finish adding beads, wrap the wire three more times. Then cut the wire leaving a 1” tail near the bottom but try to still hold it tight so it doesn’t uncoil. Next, this is where jewelry pliers come in handy as we want to find a little spot in the wrapping on the side to tuck the end into. If you only have regular pliers, don’t use them just leave two extra inches and work with your fingers. Just thread it in, pull it tight and trim that wire, and the one you started with, closely. If the ends stick out, press them close and out of the way with something metal like the tip of a metal ruler.When working with your fingers, if you are having trouble threading the wire through a small space, magnification might help if you have it and so might putting a small hook shape on the end of your wire. Try threading the wire into a large eye needle and bending it slightly then slipping it in a bit further, bending it again and so on until you have a small hook shape. This will hook under the wire wraps more easily.

10. Your wrapping may cover more width of the peg than you might like. Use jewelry pliers or your fingers to squeeze the wraps together and make the wires closer like a more tightly coiled spring. Add a couple drops of a strong glue like Glossy Accents to the very bottom of the wire, in between the wires if you can, if you feel the wire may slip. Don’t want to lose that baby!

jewelry canvas closeup1

11. Last but not least, this is a home dec project. I highly recommend that you seal all paper layers with some sort of spray sealer or gel medium for longevity.

Enjoy, Rebecca

March 15, 2014

Good Health for Unscripted Sketches

I had to think really hard about this sketch because, as you know, I like to go outside the box. I was thinking about going with pinked-edge squares and doing a quilt theme but it didn’t suit me this time.

RebeccaEdnie248

But I am really into using my homemade texture paste! And I love colouring it! This time I used Copic ink either G21 or 24, I don’t remember which. It takes more than you’d think to get a decent amount of colour since the colours are soft. I tried making the butterfly yellow but didn't like it so coloured over it with a gold paint marker. Perfect! I just picked a random sentiment but turns out a friend is sick so it was a great choice.

248

I hope you will play along with us this week at Unscripted Sketches! If you have lots of scraps, this is definitely the week to play. You can definitely add two squares or more together to show off more of a favourite paper or maybe add something else in a block like ribbon or a piece of fabric. Leaving a block empty near the edge makes for a cool look too! Can’t wait to see you there!

Enjoy, Rebecca

RECIPE
Stamps:
Healing Touch Sentiments-PTI
Ink: Copic ink, Scarlet Jewel-PTI, Olive-SU!, Antique Linen Distress
Paper: kraft, white, moss, scarlet jewel CS-PTI
Accessories: butterfly, stencil-Studio Calico, foam dots-Sticky Stuff Store, flower, leaves die-Sizzix, flourish die-(don’t remember), hex die (used to cut banner tip)-Lifestyle Crafts, mother of pearl button-ebay, silk ribbon (button center)-May Arts

March 01, 2014

Big Adventure Card for Unscripted Sketches #246

The square panel on this week’s sketch reminded me of a buckle. Thinking of a buckle reminded me of some clips by Making Memories I’ve had for ages so I decided to finally use one on this card!

RebeccaEdnie246

Don’t you just love the faint mail pattern on this scalloped sticker? I trimmed the script washi tape down to a smaller width because I though it worked better here. I’m also entering this in Simon Says Stamp: Wednesday challenge to use Pearls and The Shabby Tea Room to use washi tape.

photo

Here you can see that I used Perfect Pearls on the background with a stencil. It is pretty hard to see but in the right light it looks shimmery. (it looks so different than the other pic because I took it with my iPhone.)

246

So what do you see when you look at this sketch? Check out what the design team gals saw by visiting Unscripted Sketches and then make a project and link it up! I look forward to seeing you there!

Enjoy, Rebecca

RECIPE
Ink:
frayed burlap distress ink
Paper: ocean tides CS-PTI, DP, sticker-Making Memories
Accessories: Perfect Pearls spray, clip-MM, washi tape-stash, pearls-Dollarama

February 22, 2014

Shabby Baby Boy Card for Unscripted Sketches #245

I made a baby girl card last week so this week I had to balance it out and make a boy card! I wanted to play with The Shabby Tea Room challenge this week too so I merged the challenges.

RebeccaEdnie245

The papers are from Webster’s Pages, I deepened the aqua and blue paper with some blue ink because I wanted more contrast. I started with a yellow card base and inked both the base and yellow paper with Harvest Gold ink but the look was brighter than I wanted. So I saved that base and paper for another card and started again with an ivory base and inked both the paper and base with Frayed burlap ink. Ahh, much better.

welcome baby boy 2

For the Baby die cut, I layered and adhered 4 cardstock die cuts before adding the final patterned paper layer. It’s about 3/16” thick (between 1/8 and 1/4”) so about the same as if it was chipboard. I made the ribbon rosette by putting red line tape on a circle of scrap cardstock but it still overlapped in enough places that it didn’t want to stick everywhere. So I added a few staples between the layers just where it wouldn’t stick and one at the end  right under where the blocks ended up. I knew I was going to place something in the middle that would cover.

245

Wow, I finally made a card without changing the sketch much at all! I think the only think that is different is I rearranged the layers a bit. But that’s the awesome thing about Unscripted Sketches! You can do with it whatever you like! Follow it to the letter, change it, rotate it or flip it! It’s up to you! And remember, it’s not a card challenge blog, make whatever you like! I hope to see you there!

Photo inspiration _206

Enjoy, Rebecca

RECIPE
Stamps:
PTI
Ink: frayed burlap distress, night of navy, bashful blue-SU!
Paper: yellow, light blue DP-Webster's Pages, navy DP-American Crafts, ivory base, white scraps CS-PTI
Accessories: metal accent-Making Memories??, ribbon-May Arts, twine, tag die-PTI, baby die-Marianne, heart die-SSS, trim-vintage stash