Showing posts with label 3D projects. Show all posts

November 15, 2015

Teacher Thank You Gift Boxes

SHK-blog-badge

This week the challenge was to make something for someone in our community. I decided to get a couple of gift certificates for my children’s teachers and decorate the packaging.

teacher gift boxes

I used a gift box die and a couple of tag dies. Overall this is very simple but since I’ve had strep for the last week, it was all I could muster up.

I hope you play along with Jennifer’s challenges too.

Enjoy, Rebecca

RECIPE
Stamps:
Thank you from SSS
Ink: lipstick red-SSS
Paper: Simple Stories DP, kraft, chartreuse CS-PTI
Accessories: pillow box, tag dies, twine-PTI

November 01, 2015

Beach Paradise Mixed Media Canvas

I’m planning on painting a large three-part canvas for my bathroom. To test out the paints I bought and to help me know what proportions of colours I’d need to mix, I painted this much smaller canvas board.

mixed media beach full

For the background I spread an uneven layer of texture paste not covering it all up as I like the canvas texture. Then I went over that with a great stencil from Red Lead Paper Works and more embossing paste. Next I painted it with acrylic paints, first the sand (a mix of unbleached titanium white and metallic gold), then the sky and finally the sea. The metallic-ness of the gold got a bit lost in the mix so I dry brushed the sand with the gold paint.

mixed media beach close up

It wasn’t enough gold for me so I went over it with gold Gilder’s Paste and that turned out much more shimmery. The gold sat up on top of the lettering and looked so pretty! So now I had my trial for my larger canvas. I remembered to write down my approximate paint mixes then decided to embellish it as it turned out so well. I will put it up downstairs during the summer months. I’ve added air dry clay shells, Prima flowers, sequins and shell beads, buttons, ribbon, real fish net, rhinestones, die cuts, twine, wood veneer, a coin, brads and a pearl stick pin.

mixed media beach

The shell ‘sequins’ area really cool. They are real shell beads called heishi beads and basically look like sequins! I got them at Art Beads.com and I highly recommend them for any application. I might even use them in a shaker card! I know this is out of season but honestly, I could make beachy themed items all year! And I probably will! Stay Tuned!

Enjoy, Rebecca

Entered In:

Simon Says Stamp Monday Challenge: Throwback. I forget when it was but this was for the Paradise challenge.

Simon Says Stamp Wednesday Challenge: Anything Goes

mmmc18

RECIPE
This is a pretty big list. Let me know if there’s anything in particular you’d like to know about.

September 21, 2015

Pumpkin Treat Box

Hello and I’m glad you are joining me for another week at The Shabby Tea Room! This week, we had a yummy inspiration photo.

tstr damask pumpkin favour

I don’t celebrate Halloween so I made some fall decor instead. I plan to put coffee beans and a faux tea light in there. I took the colours from the photo and decided to use the black plus white and one other colour scheme. I just substituted ivory for the white and dark red for the yellow/orange combo. The cute little treat box is from The Cutting Cafe who is our sponsor this week. It was a breeze to print out and construct; I highly recommend you check them out!

ca tstr 261

So, I kinda wish I could have a do over on the glass glitter I added to the burgundy roses. I was a bit too much for such small flowers and while I scraped a lot of excess away, I still regret it. But it wasn’t bad enough to bother wasting the flowers and starting again especially since I attached them with E6000 glue! It’s a fabulous glue for bulky 3-D items but no way are those coming off with out major tearing.

I do hope you will play with us this week! We have fabulous prizes for the top winners. Be sure to visit the blog to see the FABULOUS creations by our awesomely talented designers and leave em some love!

Enjoy, Rebecca

RECIPE
Stamps:
damask-Gel-a-Tins
Ink: Archival black-Ranger, Peeled Paint Distress
Paper: vanilla, celery CS-SU!, black CS-PTI
Accessories: roses- Really Reasonable Ribbon, lace-stash (from my wedding favours from almost 18 years ago!), silver gel pen-Pentel, leaf die-Spellbinders, sequins-Theresa Collins and Ellen Hutson, Glass Glitter- Recollections, Art Institute, Glitter Ritz

September 07, 2015

Shabby Muffin Tin

I LOVE the papers our sponsor for The Shabby Tea Room gave us this week! They are fabulous. Kuddos to Digital Papers by Janet!

shabby muffin tin 1

I looked at the page I had just printed out and I noticed they perfectly matched this muffin tin I thrifted and spray painted. Awesome! So I spent the better part of three days finding little odds and ends to add to this. I finished it with lots of sequins and rhinestones.

ca tstr 259a

I just love vintage cameras! Especially this type with the accordion sides.

shabby muffin tin 2

The camera circles and the tags are the digi papers. You can link to them directly from the links above my project on The Shabby Tea Room or the link above to Janet’s store. Other camera themed die cuts were found on a die cut pack by Maggie Holmes. I’m not sure which collection it’s from.

shabby muffin tin 3

Please let me know if you are wondering about a specific product. I’d be here all night if I tried to list everything. I hope you will play along with our challenge this week! I love cameras but you can also be inspired by wreaths, autumn colours or anything else you see in the photo! We love shabby projects but we accept any style! Be sure to visit the blog to see all the fabulous creations and leave the gals some LOVE!

Enjoy, Rebecca

April 13, 2015

Messy Wire Wrapped Bangle and Earrings

I’ve been making jewellery again! I find it really creatively inspiring to try making something other than paper crafts once in a while.

messy wire wrapped bracelet1

I started with a typical wire bangle but used much more wire. When I finished the first round of wire, I made sure it fit me perfectly then just kept wrapping! Some of the beads were added to the bracelet at the beginning and some in the subsequent wraps. I added the charms last. This may seem difficult but I assure you it isn’t. If any one would like to know how, maybe I’ll make a video!

messy wire wrapped bracelet2

There is room for more charms if I want to add more. I also made some earrings to match.

messy wire wrapped bracelet3

The earrings are made from silver sheet that I sawed myself. Then I textured the metal with a ball peen hammer. I also made the ear wires. The Chinese Crystals are from ZnetShows. They have the most gorgeous beads. These arrived in a mix of the black, clear and white. Some of the clear ones however, have a silvery coating on half the bead. They are so shiny! I have also made a barefoot sandal using these beads but I need a pedicure before I can photograph it.

messy wire wrapped earrings

They also make the best cultured sea glass beads, pendants and pieces. Full disclosure, I was provided with these beads but I wouldn’t use them unless I thought they were high quality.

Enjoy, Rebecca

March 29, 2015

Bird and Nest Bathroom Sign

I’ve been wanting to make a bathroom sign for a long time. We have two doors close together and even when we direct someone to the washroom, they aren’t sure which door to open.

bird sign

We had a nasty computer paper printed sign in the ugliest font ever since our annual BBQ last summer. I was so sick of looking at it! So I pulled out a plaque that hubby brought home from work. Ya know those ‘employee of the month’ type cheapie plaques?  Yep, one of those. It’s not real wood so I sanded it down enough to let gesso stick and covered it in 4 coats.

bird sign3

Then I covered part of it in the damask stencil using molding paste. I allowed that to dry then added white crackle paste in a fairly thick layer to the unstencilled areas. After that dried, I added the roses stencil over the crackle. So much glorious texture! (check out the area under the BATH letters in the above photo) Then I added some mists over top. I added a mist to the bottom too but I didn’t like the colour so I over coloured it in Copic airbrushing. That was much better, a warmer colour.

bird sign2

Next I started to work on the nest and branch. The nest was premade but I had to cut it in half first. Before cutting it, I applied some gel medium to the area where I planned to cut it. Not such a good idea. It didn’t dry completely clear so I had to colour it and cover it up with some raffia. What a pain! I’d recommend white glue if you ever need to do something similar. To make the branch, I used some wire covered in some sort of natural twine type stuff. I twisted 5 pieces together, shaped them and glued on the leaves and buds.

The bird was made from 5 layered ivory die cuts coloured with Copic airbrushing. I used a black rhinestone for the eye. I added 3 beads to the nest for eggs. Then last but not least, I added the copper Perfect Pearls, the letters and the rhinestone and ribbon bundle along with some bling. The rhinestone already had a loop on it and that’s how I tied on the ribbons. I really wish you could see this in person; it’s soooo much prettier! I’ll try to add some closeups later.

mmmc10

I made this for the Monthly Mixed Media Challenge. This month’s theme was Birds of a Feather. Click the graphic to visit the challenge.

Enjoy, Rebecca

March 08, 2015

Lace and Roses Mini Pail

This is for the Shabby Tea Room Challenge this week.

lace and roses pail

I took a basic pail I got from either a dollar store of the Dollar Spot in Target and added some metallic rub-on to the outside. I quickly realized that, even with heat setting, it wasn’t going to set. Bummer. So I added some workable fixatif. Bad idea. It seemed to work but if rubbed to hard, it came off. Then I tried adding some red line tape to attach the lace. The first piece of tape wouldn’t stick at all and removed the rub on and fixativ from the area I was taping and a bit beyond. Seriously? I decided to embrace the uneven nature figuring it lent to the distressed look I was going for.  At least the second piece of tape stuck.

TSTR _247

Next I added a Spellbinders fancy label which I stamped and distressed with more rub-on. I used ribbon to attach the label and added some pearls. I didn't have quite the right colour of roses so I added some Copic airbrushing to them. Perfect! These were adhered over top of some mini ivy die cuts. I used Copic markers on white paper to get just the right colour. Click on the photo to link to the challenge.

Enjoy, Rebecca

RECIPE
Stamps:
SU! french script
Ink: Cup o joe-HA, melon berry-PTI
Paper: ivory-PTI
Accessories: vintage lace, raspberry rickrack-stash, roses-Really Reasonable Ribbon, pearls-Dollarama, pail-dollar store or dollar spot, ivy die-Memory Box, rub-on metallic paste-stash, Krylon workable fixatif, label die- Spellbinders

June 16, 2014

Pink n Lace Gift Box for The Shabby Tea Room

Yep, you read that right!  I won top spot for THIS card and was awarded a chance to work with The Shabby Tea Room design team for this week! I am so excited!

This week we were asked to take inspiration from the photo below AND make a gift or gift box or packaging. That was perfect for me!

roses gift box for tstr GDT1

I painted a paper mache box with a base coat of gesso, then with acrylic paint. The gesso helps the paint I added embossing paste using a very detailed damask stencil.

roses gift box for tstr GDT2

I added some feet by Tim Holtz which I distressed using white acrylic paint. I wasn’t sure how to glue them on but I found some No Nails which is a tube of super strong glue. It looks a lot like caulking but it is a different texture. It worked beautifully!

roses gift box for tstr GDT3

Here’s a closeup of the top. The roses are from Really Reasonable Ribbon and the white fluffy things are from Melissa Frances. I made the beaded sprigs. The layers on top are toile-stamped cardstock, then a doily, then a label die cut with a stamped edge and then all the florals. I tossed on a lot of sequins including some to accent the lace on the side of the lid. The toile-stamped paper also has a ruffled edge.

roses gift box for tstr GDT4

I think this is the best shot I got of the side with the lace and embossing. It’s near impossible to see the sequins since they are transparent but they do sparkle nicely.

TSTR #223

Isn’t this a gorgeous inspiration photo? I hope you are all inspired and come and join us at The Shabby Tea Room  this week. You have until Sunday evening to play along. Just make sure you don’t forget to make a gift or gift project.

Enjoy, Rebecca

RECIPE
Stamps:
Vintage-PTI, toile-unknown-maybe PTI?
Ink: pretty in pink
Paper: white CS, doily (salvaged from local restaurant)
Accessories: roses-RRR, white flowers-Melissa Frances, foundations-TH, ruffled edging, lace-sewing store, paper mache box, beads and wire-Michaels, sequins-Ellen Hutson, MS paint, Making Memories paint, velvet ribbon-stash

June 15, 2014

Ocean Blog Hop

ocean blog hop

Welcome to my late entry for the Ocean Blog Hop. Between being being very busy and late with my blog post and the hostess missing my name so I wasn’t added to the original line up, I’m hoping I get at least a few comments!

photo1

I’m afraid my before photos are dismal. I took them in low light with my iPad and as cool as Apple devices are, their phones are not known for their low light amazingness. This is of course not all I received, some were already in their pieces and I received a larger quantity of some that didn’t fit in the photo. Of the two small green ones, some are round and some are faceted. They seem to be cultured sea glass, the round ones were between the freeform stick shaped beads and the faceted were packaged separately.

ocean blog hop necklace

This is a really hard necklace to capture in one shot with the equipment I have anyway. I used the items above plus some shell beads, amazonite, Swarovski crystals, freshwater pearls and some nifty chain.

ocean blog hop necklace side

What I couldn’t show you above in the supply photo were the pretty sea horse charms I used in the necklace. I also used to have Swarovski crystal starfish on the end of the dangle with the circle chain and multiple beads at the end but as I only had one, I took it off for now. The focal bead is from Unicorne Beads which I bought from ArtBeads.

ocean blog hop earrings

I’ve been wanting to try bead wrapping for a while so I thought I’d had a go of it. I’m semi-happy with it. I like the right far better than the left which was the first one I did. You get better the more you do right?

ocean blog hop bracelet

And now, my bracelet. Basic stringing and not that creative but I’ve never used spacer bars before so it was new for me. It wasn’t until after that I realized I had one more spacer bar and while I was making it, I’d been wishing I’d had another. But I’m never one to waste supplies and as I’d be wasting not just one strand of stringing wire but TWO, I just CAN’T restring it though I’m very tempted. I also wish it had more colour in it but I was determined to make one piece with nothing in it except the beads from the kit. I may add a charm though.

ocean blog hop tourmaline necklace

I did make one more piece using the bracelet from the kit but I have crappy photos and have since given away. I would have taken better pix before giving it away but I offered to make something for an Autism fundraising golf tournament silent auction without realizing it was 5 days away! By the time I got the reply and realized I had 3 days to make and deliver it, I was kind of in a rush. I packaged it without thinking and at the last second thought about pictures. Oops. It’s a shame I no longer own this lovely pendant but oh well. And I know it went to a good cause.

Since you can’t see it well, I’ll explain the beading pattern. Purple seed bead (PS), Green Tourmaline coins(GT), PS, tiny white Swarovski bicones PS, GT, PS. Then for the other grouping, it’s a green glass pearl with purple tourmaline coins then a bit larger white Swarovski bicones next to that. Thanks to everyone who made it this far. These alternate all along the length. I attached the pendant with a lobster clasp so it can be removed in the cooler months. It’s hard to see, but I made my own hook and eye clasp. It’s the first time I tried a clasp like this and I’m really proud. Click on any photo to see it better.

Thanks for reading this far and I hope you enjoyed my creations.

Rebecca

May 16, 2014

Blush Pearls and Hearts Bracelet

I’ve been making lots of jewelry lately but I’m a bit behind posting. This one tinkles a bit as I wear it and so reminds me of faeries!

pearls n hearts bracelet

It is made almost entirely of jump rings. So except for the pearls, it is all made of wire! The jump rings silver plate for the non-coloured ones and coloured aluminum for the pink ones. The pink is quite subtle so enlarge the pic by clicking on it if you’d like a better look. The little hearts are made from silver wire which I shaped then soldered closed. I also made my clasp, from the same wire I think. 18g silver.

Considering I’ve never made anything like it before, I am thrilled with it! I’m really new to anything made with jump rings, called chain maille, and new to soldering too. I am going to be selling these so let me know if you are interested! The jump rings and pearls come in lots of other colours too. And if hearts aren’t your thing, I can substitute your choice of charms. If you know jewelry, it’s a basic chain made of the silver rings with two pink rings in each silver one, one on each side.

Enjoy, Rebecca

All supplies available at Fire Mountain Beads or ArtBeads.

April 19, 2014

Baby Thank You Card Folder for Unscripted Sketches #253 and Giveaway Winner

I love using the sketch for something other than basic cards. This week I was making cards for a friend who just had a baby and the sketch worked beautifully a folder to hold the cards.

RebeccaEdnie253

I used some Webster’s Pages papers to make this. The yellow ribbon looks so pretty. I love that shade of yellow and the chevrons are awesome.

baby folder open

This is the inside of the folder. I designed it myself so if you like it and want the dimensions, let me know.

baby folder close

Here’s a closeup of the embellishments. The arrows are made from Craft-a-board then covered with white cardstock and washi tape.

baby folder matching card elephant ty

This is the card I designed. Sorry that it’s hard to read the tag; it says ‘thanks’. I made the card narrower than the usual 4.25”. It is only 4” which helped because I wanted to get the most from a scrap of 12” wide paper and of course, 4” fits across 3 times but 4.25 only fits twice. That also allowed me to hang the trunk off the edge and still fit into a regular envelope.

253

I hope you will join us at Unscripted Sketches this week. Be sure to check this week’s post to see if you won one of our prizes! I look forward to making the jewelry I am giving away. My winner is Monika Reeck so please email me in the next 48 hours to claim your prize.

Enjoy, Rebecca

RECIPE
Stamps:
Mega Mixed Messages, Bitty Baby Blessings-PTI
Ink: Harvest gold-PTI
Paper: lemon tart CS-PTI, Baja Breeze CS-SU!
Accessories: foam dots- The Sticky Stuff Store, Copic BG72, seam binding ribbon-Masterstroke Ribbon

March 22, 2014

Jewelry Display Canvas Tutorial for Unscripted Sketches 249

You read that right! Not only do I have a home dec project for you today, I even have a tutorial! I’m afraid I’m not very good at remembering to take photos for every little step but it’s so easy, I promise you will get it. So, project and sketch first then the tutorial! This is also for The Shabby Tea Room Anything Goes!
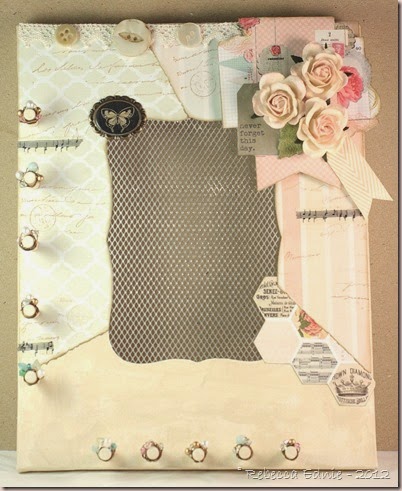
RebeccaEdnie249

This is a dollar store lover’s dream project! The (wonky) canvas, wire mesh and dowels were all purchased there. I’m sure you could get beads, wire, flowers, washi tape, ribbon, foam squares, charms, lace, paper and paint though I’ve no idea if you can find things that approach the look you see here. I know in the US there are way better stores than here.

jewelry canvas closeup5

Here’s a close-up of some of the pegs, I’ll have more extreme close-ups later. Aren’t the beads pretty? Each peg is slightly different and they are functional as well as lovely. I wanted to make sure that necklaces and bracelets didn’t fall off the pegs!

jewelry canvas closeup7

Everyone knows that earrings go through the mesh right? I still plan to embellish it more, I just ran out of time. I think I’m going to add Tim H’s Grunge Board Printer’s Blocks to spell BLISS at the bottom with gold swirls and pearls/rhinestones/sequins etc. Cool right? I also want to colour the mesh gold. Not sure if I’m going to try to use my Krylon pen or buy some model paint designed for metal.

249

I had a blast with this sketch as you can see! Please visit the other gal’s blogs and leave them some lovin’ (comments) and be sure to support our challenge at Unscripted Sketches by making’  somethin’ groovy and linking it up! And don’t leave now! Please stand by for more close-ups and my tutorial!
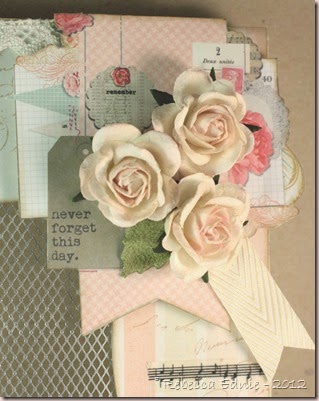
jewelry canvas closeup6

Jewelry Display Canvas Tutorial

Need to sort out all your jewelry? Need a place that won’t leave it in knots and tangled with other pieces? Can never find the second earring? Need a great customizable gift for the gal who has everything? Bridesmaids’ Gifts? Tada!

What you need:

Artist Canvas in your choice of size. Unless this is for a girl I’d recommend no smaller than 8x10”. If you want to cover it in full sheets of scrapbook paper, no larger than 11 or 12x16” or you will have more than one seam.

1/4” dowels

a way to cut the 1/4” dowels, I used a small hand saw

1/4” drill bit (in any drill bit set) and drill or ideally a drill press but NOT necessary

sandpaper or rough emery board for sanding the ends of the dowels

rubber or rawhide mallet or hammer if no mallet

metal mesh for opening, you could use sturdy open lace if you can’t find mesh, I know craft stores have it

die or stencil to create shape for opening (optional, you can draw your own shape if you want)

fine tipped scissors or an xacto knife

strong glue or hot glue

22 or 24 gauge craft wire, I used 24 g Antique Bronze Artistic wire

Your choice of small roundish or chip/nugget beads 3-5 per peg, 2-6mm do not recommend doughnut shapes like rondelles or long oval shapes

wire cutters, preferably jewelry flush cutters

some sort of jewelry plier like a chain nose or a flat nose or even a round nose will help but optional

Paint or paper to cover canvas. This is so up to you that I really can’t make a list for you. I used MME paper and Golden Fluid Acrylic paint in Titan Buff. Before that, I added a layer of Gesso over the questionable layer on the canvas when purchased. You could add anything you would to the front of a card or to a scrapbook page, the possibilities are endless. An inspiring word, quote, monogram or her/your name might be nice.

1. Decide on the placement for your pegs. Note in the photo above that you may not be able to add dowels in the corners because of how the wooden frame is put together. Other than that you can wing it or measure precisely.

photo 2

2. Drill through the frame to the other side. This allows you to remove a peg if you need to. Be sure to place something underneath if you are working on a surface you won’t want to mess up. Keep the holes as vertical as possible or your pegs won’t sit straight. (We own a drill press and I own a husband, I’m not going to try to fool anyone here. Though if my garage wasn’t a disaster, I could do it myself. The spiders are still asleep here.)

photo 1

3. Cut the dowels to your preferred length. Mine were 1 1/2” long and my canvas was 3/4” thick so that amount was also what was showing. Unless the necklaces are very thick even right at the back of the neck, that is plenty, even with the wire wrapped beads we will add. Sand them smooth on one side. Do not add the dowels yet!

My hubby asked how I will see what I have on the left when they will be hanging on top of one another. There are two possibilities. If you are a quirky gal, hang it on an angle. If not, hang bracelets there or necklaces that aren’t likely to tangle. If the top necklace hangs on one side of the pegs and the second on the other and vice versa, I think you will be ok. Of course, if you aren’t making this for a sketch challenge, feel free and add more pegs wherever you’d like, just being careful of those corners.

4. Decide what shape your opening will be and trace it onto the back of your canvas. I used the largest Labels 8 by Spellbinders. Make a slit in the opening and cut with scissors or if you are good with an X-acto, use that. Be very careful not to stretch the canvas around the edges. I chose one large opening but you could do more than one small opening too like several small hearts or the centers of flowers.

photo 3

5. Next add your lace or mesh to the backside of the hole. I used Glossy Accents but you could use hot glue. Just be careful with the latter as the mesh will heat up with the heat of the glue. {{You can see here that the drilled holes did hit some of the staples. Didn’t seem to hurt the canvas or the drill bit so don’t worry about it!}}

OK, so the structure is done so we are on to decorating right? Uh, but what about the dowels. Don’t worry, didn’t forget those. When you add them depends on how you are decorating. If you are adding paper, add the dowels last*. If you are painting, add the dowels now. Stencilling-later… you get the idea. If you are doing any kind of technique which requires a flat surface, leave the dowels to later. If you want them to meld with your surface effects, add them now. You could even paint them along with the canvas, remove them (pound a short piece of scrap dowel in from the back about 2/3 of the way then remove the scrap with regular pliers), number them, do whatever other surface treatment you’d like, then replace them. Anyway, whatever you choose, here’s how to do it.

* poke a needle through the holes from the back. Then jab fine tipped scissors (closed) through from the top and press the excess paper into the hole. Unless you have many layers, it will just make it a bit tighter fit. If the dowel won’t go in, remove the lowest layers, keeping the top one intact as best you can. When it folds inwards as the dowel goes it, it gives the nicest finish. Make sure all glue is dry or it will tear.

6. If your dowels aren’t painted or finished, do that now. Pound the dowels into the holes with a mallet until they sit flush with the back of the canvas. A mallet will ensure the wood is not marred and neither is the finish. If you only have a metal hammer, wad up some scrap cardstock, 4-6 layers,  and shape it into a kind of a cup shape over the head of the hammer and tape it on. Now pound it in gently. Unless you wiggled your drill bit, they should fit perfectly and not even need glue. If they are a bit loose, never fear, add a bit of white glue and let that set checking that your dowel is at the correct angle while it dries. A clothespin may help here.
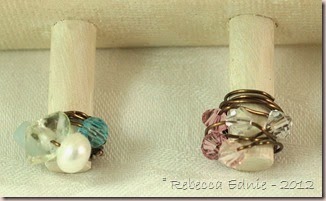
jewelry canvas closeup4

7.  Now, the best part! The beads! I worked with the spool of wire here and it may seem weird at first but it’s great. These were the first two I did and I was still experimenting with the best way. The left one was not the best at all! You are going to use a lot more wire than you’d think. Add your beads to the wire in any order. Begin by adding wire along the length of the peg, starting near the base of the canvas and working up to the top of the peg. This seems like the wrong way but trust me. Now bend the wire 90 degrees and start wrapping it around the peg near the top. When you come around to where you started going around, make sure you wrap around the straight wire you started with and be sure it is tight. Wrap around twice more being sure to catch the straight wire every time.

jewelry canvas closeup3

8. In the photo above #7, you can see the right peg doesn’t have the beads distributed very evenly which wasn’t my aim, these three are much better. Now that you’ve secured the beginning of the wire, you need to slide your first bead along the wire and place it where you want it on your peg. Make a full wrap then add the next and so on. Keep your wire taut the entire time. Don’t worry if it doesn’t end up super tight, many of mine weren’t. We will fix that later. It does need to be tight enough to not spin freely though. You can try tightening the wire, unwrap and start again, or start with new wire, it isn’t expensive! In the photo below, you can see that there isn’t a lot of excess wire.

jewelry canvas closeup2

9. When you finish adding beads, wrap the wire three more times. Then cut the wire leaving a 1” tail near the bottom but try to still hold it tight so it doesn’t uncoil. Next, this is where jewelry pliers come in handy as we want to find a little spot in the wrapping on the side to tuck the end into. If you only have regular pliers, don’t use them just leave two extra inches and work with your fingers. Just thread it in, pull it tight and trim that wire, and the one you started with, closely. If the ends stick out, press them close and out of the way with something metal like the tip of a metal ruler.When working with your fingers, if you are having trouble threading the wire through a small space, magnification might help if you have it and so might putting a small hook shape on the end of your wire. Try threading the wire into a large eye needle and bending it slightly then slipping it in a bit further, bending it again and so on until you have a small hook shape. This will hook under the wire wraps more easily.

10. Your wrapping may cover more width of the peg than you might like. Use jewelry pliers or your fingers to squeeze the wraps together and make the wires closer like a more tightly coiled spring. Add a couple drops of a strong glue like Glossy Accents to the very bottom of the wire, in between the wires if you can, if you feel the wire may slip. Don’t want to lose that baby!

jewelry canvas closeup1

11. Last but not least, this is a home dec project. I highly recommend that you seal all paper layers with some sort of spray sealer or gel medium for longevity.

Enjoy, Rebecca
