Showing posts with label Crazy 4 Challenges. Show all posts

September 29, 2018

Fall Branches Bouquet

Welcome to another week at Crazy 4 Challenges! With it turning fall here in the Northern Hemisphere, we were asked to make a a fall-themed card. I’d forgotten what the challenge was but when I looked it up, I was like “YAY” as I had been working on a fall card anyway! Fun coincidence!

c4c 18 fall branches

The stamps are from the September Hero Arts kit. I stamped them in Antique Linen Distress ink but added a few stampings to the upper part of the bouquet even though the stems didn’t reach. I just painted them in as I watercoloured the image. The antique linen is so light that it doesn’t interfere with the watercolour plus it also dissolves away with the water because it’s a water reactive ink. The painting of the leaves and berries isn’t that interesting  because they are too small to add much shading.

But the vase, there’s more to talk about. I used a very damp brush to add water to the image. Then I dropped in very concentrated colour on the top, left and bottom. I allowed the paint to move on it’s own with little interference. As it started to dry a bit, I added more and more colour to the left with my board tilted slightly downwards. I loved how the paint was moving so I allowed it to dry completely on it’s own which I rarely do. When I was done, I added stamping over the background, Antique Linen in the middle and a tiny bit of Vintage Photo applied with a foam blender to the sides only. Then I added sponging in the same way with the same colours. Last, I added a warm grey shadow under the vase. I normally would add some sequins or embellishments but I wasn’t sure how I was going to use the card. There’s a high likelihood that I’ll use it for a sympathy card and I don’t bling them up like I do with normal cards.

I hope you are inspired by my card and our challenge this week. The challenge is open until Friday midnight so I hope you will pop on by and play along!

Enjoy, Rebecca

September 24, 2018

Numbers Celebrate

This week at Crazy 4 Challenges we were asked to make a birthday card with numbers on it. If you have been reading my blog for a while, you probably already know that I don’t celebrate birthdays so I made a basic celebration card instead.

c4c 18 numbers celebrate

The sketch is Sketch Saturday #531. It’s a great basic sketch that was easy to work with . I grabbed some older paper, sorry but I don’t remember the names of the packs. I used an Altenew set, Label Love, for the Celebrate sentiment. The twine I tied around the panel loops through the eyelet in one way for the first wrap and through the other way for the second wrap. I like how it balances out the tag so it doesn’t twist funny. I adhered it with some foam tape.

Thanks for joining me this week! You have 5 more days to play along with this challenge so pop on over to the C4C blog to join us!

Enjoy, Rebecca

September 20, 2018

Pumpkins and Sunflowers

No!! It can’t be fall already, can it? I don’t like fall much because it means winter is close by and I hate the cold. But these images are too fun to pass up!

c4c 18 pumpkin sketch

Speaking of the images, the stamps are by Hero Arts from last year’s fall card kit. The images are all layered giving loads of colour to these simple shapes without any colouring. I researched sun flowers to come up with one that was non-traditional. There is a super pretty one that’s actually pink? They also come in a dark purple, a rich burgundy, white and yellow and the one I stamped, pink and yellow. It took me a while to come up with the perfect colour combos for both colours of the sunflowers and pumpkins but I love the final variety I was able to achieve.

C4C452Sketch

I arranged my elements according to the sketch challenge for this week at Crazy 4 Challenges. My base was some woodgrain paper then adding a gold mirrored die cut from Spellbinders. I tucked some patterned paper and lace under the gold die cut for some rustic charm and to fulfill the vertical panel on the sketch. I love the combination of rustic elements, the lace, woodgrain and autumn images, alongside the elegance of the gold die cut and embossing.

I hope you can play along with us this week! I’m running a bit late this week so you only have one more day to play! It’s a great sketch because you can do so much with it!

Enjoy, Rebecca

September 08, 2018

Ornate Heart Love Card

Whew! This summer has been so busy! I’ve taken a break from Crazy 4 Challenges for a couple of weeks but I’m back with a fun new theme. This week we were asked to make a love or thank you card for a family member. This card will likely be my sister’s anniversary card next year.

c4c 18 ornate heart love card

I took inspiration from Jennifer McGuire who has shown a couple of variations on the gate fold card on her blog in the past few weeks. I’m used to gatefold cards being made from just one piece of 5.5x8.5” paper but her way uses two sheets that size. So I tried it out for this card. For the background, I used a piece of paper from My Mind’s Eye. The ornate heart came from a Hero Arts kit from a while back. Isn’t it lovely? I stacked 5 die cuts together to make the die cut sturdy enough then covered it in Versamark and WOW Vanilla sparkle embossing powder twice. Last I added some Caramel Cream Nuvo Drops to some spots.

c4c 18 ornate heart love card2

On the inside, I added a layered Love sentiment. I used Avery Elle rose gold embossing powder for the bottom layer. I added three layers until it was nice and shiny and smooth. Then the next layer was stamped with Versamark then embossed with WOW vanilla champagne powder which has gold glitter in it. It didn’t show up very well because the gold glitter made it look splotchy. So I added some SSS Pale Blush Pink ink right on top of the embossing. It helped fill in the flourish part of the stamping.

c4c 18 ornate heart love card3

I hope you love my card because I was very proud of it! I’d love it if you would play along with us over at the C4C blog. All you have to do is make a love or thank you card for someone in your family!

Enjoy, Rebecca

August 23, 2018

Autumn Coffee Card

I just got my August Hero Arts card kit so I was excited to use it. When I make card, I often start out without knowing exactly where I’m going with it. But when I have a sketch to work with, it makes it so much easier!

coffee shaker

Today we have a sketch for you at Crazy 4 Challenges. The large center shape made me think shaker! I don’t think I could ever get sick of making and shaking them! I forgot that even Distress glitter sticks to the acetate sheet. I’ve done this before and it does finally settle so I wasn’t too worried but I was bummed that it didn’t make for a better photo! The cups are both stamped on patterned paper and coloured with Copics. The curvy cup reminded me of me and the other of my husband so I added appropriate sentiments. I hate coffee so switching them wouldn’t have worked. The background paper was from the Hero Arts kit, so unique. It’s thin though so I added a background layer of cardstock before die cutting it. The leaves were cut with Spellbinders dies, coloured with either Copics or Distress sponging then splattered them with first brown watercolour then gold watercolour. I did the same with the background.

I hope you can come by the C4C blog and join us this week!

Enjoy, Rebecca

July 29, 2018

Praying for You

Sometimes we have to make cards for some pretty serious occasions. We usually think of sympathy cards as being the hardest. But I find one other category is even tougher.

c4c 18 sea praying for you

Making cards for someone who is seriously ill or dying is definitely the hardest. Sometimes we can’t even make them for the person but instead for their family because they are too ill to appreciate a card. I call these hope cards as you can always hope for a miracle. Hope or sympathy cards were the theme at Crazy 4 Challenges this week. I usually use Thinking of You or a sentiment with prayers or praying in it if that’s appropriate. For imagery, I tend to go with the same things I’d use for sympathy cards. Writing inside the card is the hardest.

I used a Prima paper pad for the papers. The scalloped circle is by Spellbinders cut from Ocean Tides cardstock, but as the cardstock wasn’t bright enough, I added some BG15 marker. It’s a great way to use up some ink if your marker is too juicy too! The plain circle is actually stitched from Simon Says Stamp. The kraft card base was stamped with various postmark stamps from Rubber Buggy. They don’t show much, mostly in the torn areas. I distressed this card pretty heavily. Not sure why, maybe just because I haven’t done it in a while. I was working with the latest Global Design Project #148, case the designer.

Enjoy, Rebecca

Entered In:

GDP#148

GDP148_Connie Collins

July 21, 2018

Kindness Enclosed: Flower and Wood Frame Card

For the third week of the month at Crazy 4 Challenges, I designed a sketch for us to use. I’ll be honest, I CASE’d this from a card I saw but when I went to find the name of the designer, I’d lost it! oops!

c4c 18 peony wood frame sketch

So I learned some fun things when I was making this card. I tried a few different dies to make a frame. But, none of them were working quite right. So I tried making a frame with my new Infinity Rectangle Dies by Hero Arts. To save time, I used some cheap watercolour paper I bought for my son. I cut the frame 3 times. Then I wanted it to look like a wood frame so I embossed it with my Gemini Junior using a PTI texture plate. But, I made my sandwich too thick. My machine moaned and groaned but it finally allowed the sandwich through. My frame was deeply embossed but also quite warped and even torn in one place! At first I was annoyed assuming I’d have to redo my frame. Then I looked at it again. I liked that the frame wasn’t perfect, it made it look more rustic. Also, the torn part went together quite well while the remaining portion that showed could be hidden under the flower. I highlighted the texture with some gold wax paste.

c4c 18 peony wood frame sketch2

The flowers are from a Spellbinders stamp n die set. I used professional watercolours from several brands to colour the image that was stamped in Antique Linen Distress ink. I used spring moss cardstock for the card base, then some patterned paper with soft printed dots. A doily and some sequins added some shabby chic texture to this card. I wasn’t sure what kind of sentiment I wanted to use and I knew that I needed some new cards for More Love Letters. I try to send a couple of cards each month. It’s hard to know what sentiment to use when making cards in advance, so I went with a kindness sentiment from a set by Hero Arts.

Enjoy, Rebecca

July 01, 2018

Party Balloons!

This week at Crazy 4 Challenges, we were asked to try out the Eclipse Technique. I did another card with this technique recently so I’ll have to post it soon.

c4c 18 party eclipse technique

Basically the technique requires you to cut a word or shape out of a background then add foam tape and add the die cut back into the spot from which it was cut. The background can be stamped, painted, printed (like patterned paper) or in my case, die cut! I cut a bunch of balloons all in white then added them to the card. The paper I used was not too thick so the die would cut through both layers. The balloons are by MFT, the confetti by PTI and the party from Winnie and Walter. I added Copic marker colouring to the balloon areas of the word die cut to make the word stand out more; all white would have been pretty boring right?!

So this card could be used for a male or female, I used only a bit of pink and purple for the die cuts and none for the sequins. I added a couple of strips of paper along the edges for another pop of colour. I rarely add a full sheet of paper when I do a layer. If just two edges show, I add strips of paper. If I want a layer that shows all around, I often cut the center out so I can save that bit for die cutting. I don’t do this on small layers but it does save money in the long run.

I hope you can come up with a cool design using the eclipse technique! Please join us over at the blog!

Enjoy, Rebecca
June 23, 2018

Time for Summer, Baby!

We’ve had some pretty hot temperatures lately here in Southern Ontario so a bathing suit card was perfect for this week’s Crazy 4 Challenges theme of Ombre!

c4c 18 ombre bsuit

I absolutely ADORE this background paper. I could have 10 sheets of it and it still wouldn’t be enough. I wanted 2 layers under the bathing suit  but I also wanted to let that awesome ombre paper shine so I used some vellum for my lowest layer. The bathing suit was popped up on foam but I chose to cut multiples of the ‘relax’ die cut to make it more dimensional. However, when it came time to add it to the card, I realized I was in a bit of a pickle as the ‘x’ is a separate piece! So I cut several more of the ‘x’ until I raised it up to match the rest of the word. I also did that with the ‘r’ so it would match the ‘x’. A touch of shimmer pen to the swimsuit and ‘relax’ plus a few coordinating sequins and I was done!

I hope you have lots of ideas for making a project with some ombre paper or other supplies. Maybe a watercoloured or sponged background? Don’t forget to link up your creation!

Enjoy, Rebecca

June 16, 2018

Cupcake Celebration!

We have a very intricate sketch this week at Crazy 4 Challenges! It’s got lots of shapes and layers to work with.

c4c 18 june sketch cupcakes

This project was coloured entirely with Copic markers with the exception of the inks on the banner but even that is shaded with Copics. I started by colouring the cupcakes but then I couldn’t find a background paper I liked for the life of me! ugh!! So, next I airbrushed a background with the same Copics I used to colour the cupcakes! I thought it turned out subtle but nice. The strips of paper and the die cut frames were also coloured using the same markers. The frames were made with some of the first dies ever manufactured, basic squares and scalloped squares from Spellbinders. The cupcakes, dies and the celebrate banner are all from the Baker’s Dozen set by PTI.

Isn’t this a fun sketch? Come on over to the C4C blog to play along with the Crazies this week!

Enjoy, Rebecca

June 02, 2018

Summer Flamingo Card

So apparently yesterday was Barefoot Day which makes that the theme for Crazy 4 Challenges. Which suits me fine as I regard socks as torture devices only to be worn when desperate! That means I’m barefoot anytime I’m inside and as much of the year as I can manage outside.

c4cbarefoot flamingo

All the papers are from Authentique, a pack called Utopia. The flamingo is an Echo Park die that I cut from more patterned paper. To make the dots not quite so prominent, I added some Worn Lipstick Distress ink. Then it was a bit too plain pink so I added some orange, just a touch, with Marmalade to mimic the flowers. I hand cut the monstera leaf, I just love those, don’t you? So vibrant in colour and organic in shape! The hibiscus flower (or whatever it is) is a wood veneer accent that I coloured. I filled the Polaroid-style frame from Simon Says with various Lucy’s Sequins. The aren’t as bright as the flamingo but that’s ok as I wanted the flamingo to stand out anyway. And they do look brighter IRL.

I hope you can find something in your stash that is barefoot so you can play along. Basically any bird or animal that isn’t dressed in some sort of outfit with shoes will work so hopefully you have lots to choose from! Even some sea creatures in shells have a ‘foot’, snails do too! So lots of ideas you can work with. Head on over to our blog and link up your project!

Enjoy, Rebecca

May 25, 2018

The Most Annoying Graduation Card EVER!!

So the challenge this week at Crazy 4 Challenges was to make a graduation card. Seems simple right? Oh, you would think so…

c4c 18 grad

Oh but I had to complicate things by using Chibitronics lights. These are usually pretty easy to use, I’ve done it before, no big deal! Well, this time I spent HOURS agonizing over why they wouldn’t light. So I get all but one working… try to adjust the last light in the sequence… don’t change a. single. thing. with the other three lights. Now the first three don’t work and the last one does!!!!! AHHHHH!!! {insert bag language here}. So hubby comes to help. After much ‘rewiring’ all of the lights work. By now I’ve tried soldering the lights (apparently I’m very bad at it), taking lights out and replacing them and adding the special fabric conductive tape to try and make them work. Hubby gets them all working. Great. Off he goes, I add the card front, one light goes out!! {insert tearing hear and rending of garments here}. After another hour, I finally get it to work. Ta Da!! (total of 5 hours now working on this card!)

c4c 18 grad2

Why oh why did I go to all this fuss and frustration? Well my baby is graduating from Kindergarten this year. I know, it’s a silly thing to have a kindergarten graduation but it is so terribly cute and he loves Chibi lights cards so much. I just HAD to get it to work. He’s actually been in kindergarten for three years now. Being born mid-December, he really wasn’t ready for JK the first year so he only went for afternoons until March, you know, like in the olden days!! June of last year (16/17 school year) he just wasn’t ready for grade 1. He would have been so far behind. He was diagnosed last year with ADHD, learning issues and academic delay. He should get special help but brilliantly, they don’t really help kids until they are already way behind in grade 3. Because many kids catch up by then. ugh…

As we don’t celebrate his birthday, he is only older than the other kids in his class for a week or so before the holidays. When he comes back from break, he will be the same age as any kind with a very early Jan birthday. So not really a social stigma which some parents worry about. So for him, leaving kindergarten is a real accomplishment. More so than for other kids.

Back to the card! I forgot to get a photo of the pull tab which is also the switch for the lights but it says ‘happy graduation’. He saw me making it but he hasn’t seen it finished so he will still be surprised.

I hope you can join us this week with your own graduation card. Don’t forget to link it up and leave a nice comment for the team and their inspiration!

Enjoy, Rebecca

May 24, 2018

Smile Tropical Card

It’s time for another sketch over at Crazy 4 Challenges! I’d just gotten my May Simon Says Stamp card kit when I made this card so I just had to use it for this card!

c4c smile floral

As I often do, I treated the sketch as more of a suggestion rather than making my card match it exactly. I also flipped the sketch turning it upside down.  The clusters of leaves and flowers represent the circles on the sketch and the adorable little scalloped circles sub in for the small banners. I also added some yellow vellum, (that matched perfectly! Wahoo!) so the stickers would stand out from the busy background paper. I actually needed to use two layers to get enough opacity to cover the paper. I used a Hero Arts tag die to cut the tags but ran it through my die cutter again after repositioning the paper so I got a narrower tag.

C4C435Sketch

I’ve been having trouble with the program I use to write my blog posts so I’m afraid you only have tonight and tomorrow to play along but I hope you love this sketch enough to make some time!

Enjoy, Rebecca

May 12, 2018

Camel Train

I had to think really hard about this week’s Crazy 4 Challenge Theme. Trains. That’s very specific and believe it or not, I have NO train stamps! What? I have over 7000 stamps collected across more than 14 years but not a single train? How is this possible? So I had to get very creative this week!

c4c 18 camel train

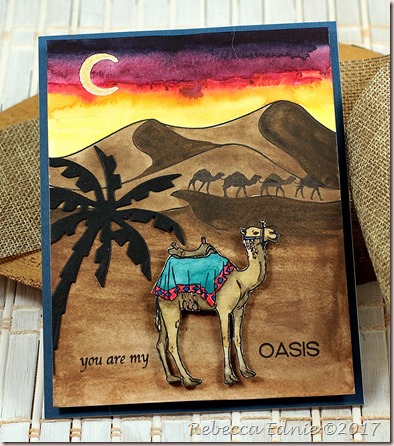
So I give you a CAMEL train! Also known as a caravan, a camel train delivers goods across many miles. Almost the entire card was done with one stamp set by Hero Arts from a recent card kit. Other than that, all I used was a single ink pad, one die and my watercolour paints. Oh, and some embossing powder for the moon but that is optional. I just think it would be pretty hard to leave the moon intact while painting around it with such deep colours. I used a lot of water to do the sky because extra water means blooms which I love in sunset or sunrise skies.

c4c 18 camel train2

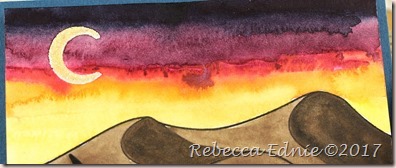
Here is a close up of the sky. I do wish I’d brought the darker colours down lower but oh well. I just love sunrises and sunsets!

c4c 18 camel train3

I really wish you could see the lovely shimmer in the Daniel Smith bronzite paint I used for the sand. I tinted it darker with a dark brown paint for the shaded sand areas but you can still see the shimmer. Oh, and the intense metallic bronze tintedFinetec watercolour I used for the details on the camel’s tack (or at least that’s what they call the hardware you put on a horse); it’s very metallic! I didn’t mind that the sandy areas didn’t come out smooth as sand really isn’t in real life. I hand-cut the camel because the white edges really wouldn’t have worked well.

I hope you have better luck with your stash than I had with mine and you have some train stamps! Come on over to the C4C blog and join us this week!

Enjoy, Rebecca

May 05, 2018

Dad Hero Card

Our challenge at Crazy 4 Challenges this week was to make a super hero card! I was a bit stumped by this one! I have one super hero stamp but it’s really old so I pretty much gave it to my son who loves it. Sure, I could have used it anyway but I don’t have any papers that would go with it either! Not really my style as you know!!

c4c 18 dad hero

So I looked through my stash and found a hero sentiment. Perfect! The Fun Fasts paper is a journaling tag from Basic Grey; the papers are from the same collection all of which I received in a Simon Says Stamp kit from ages ago. I love the floral paper; it’s pretty but not so much that it can’t be used on a masculine card.

c4c 18 dad hero2

I used the shadow stamping technique for the sentiment. With dark ink like I used, you can just shift your paper and stamp again with the lighter ink. However, if you want to use a lighter ink for the main image or sentiment, you will need to emboss it to keep the shadow ink from overlapping. I didn’t want a shiny sentiment so I used some WOW matte clear embossing powder. I didn’t really need to emboss because my main ink was dark but better to do it when I don’t need to then forget when I do need it!

Have you got some cool super hero supplies? Come on over and play our latest challenge with us!

Enjoy, Rebecca

April 28, 2018

Snow in April?

And not just on my card! We recently had a massive ice storm so I guess it is perfect that our Crazy 4 Challenges theme this week is to be inspired by the phrase, ‘skating on thin ice".’

c4c 18 skating on thin ice

The large snowflake striped die is by Memory Box which I cut from white cardstock and some fancy specialty paper layered to create a 3-D embellishment. The edge of the patterned paper was scalloped using a Simon Says Stamp die which reveals some fun striped patterned paper underneath. From Honey Bee stamps I used the stamps and dies for the sentiment. Overall, this is a pretty simple card with not too much technical or intense going on. But sometimes simple is all you need right? :)

Do you have a take on the phrase ‘skating on thin ice’? Join us over at the C4C blog.

Enjoy, Rebecca

April 21, 2018

Seaside Happy Retirement Card

Do you love the sea? The beach is my favourite place! It’s where I would go if I was to retire so I often make retirement cards with this theme. This week at Crazy 4 Challenges we were asked to use a sketch so I managed to combine the two.

c4c 18 seaside retirement

The paper is from a pack by Prima. It’s an unusual collection of florals, vintage ephemera and masculine papers. These papers were ones with a definite masculine feel so they were perfect for a guy card. Only problem is that most of the wording on the ephemera images was love based. Not exactly perfect for a card for hubby to give to a colleague! ha! I’ve recently been redoing and reorganizing my craft room; in the process I found this awesome tag I saved from a pair of Nevada Jeans. I had to cut off the top of the tag as it was too big but this part of it was perfect and just the right size to fill the spot that had a very obvious lovey sentiment!

Do you  love sketch challenges? Be sure to pop on over to our blog to see the main sketch (my version is a bit of a take on the sketch, not exact) and link up your own version!

Enjoy, Rebecca

April 14, 2018

Mom, Love You More Than Coffee

I love the smell of coffee even though I don’t drink it. My mom never drank it when I was a kid and my dad only drank it when he was at work. So I’d only wake up to the smell of coffee when my grandparents were visiting. It’s one of the best smell memories of my childhood!

c4c 18 mom coffee

So when I saw our challenge at Crazy 4 Challenges was to be inspired by, you guessed it, coffee!!! I made the coffee cup with paper piecing and layered die cuts to make it more like a chipboard embellishment. I even carefully trimmed out the cup itself, the small rim and handle is all you can see, and layered it up a bit more so it’s higher than the saucer and the coffee is a couple of layers lower. It’s a small thing but adds some fun texture while keeping the card fairly flat. Even with the small flowers, the card will still mail with standard postage. That’s always a bonus!

The stamps are by Neat & Tangled, don’t you love the sentiment? So cute right? I added the Mom die cut and some tiny stamped hearts just to add a little something extra. The gorgeous paper is by Prima, it’s one of my faves. I kind of wish I’d added some messy thread under the cup but oh well!

I hope you love coffee-themed crafting as much as I do! So join us over at C4C and link up your project!

Enjoy, Rebecca

March 21, 2018

Mermaid Songs Canvas

Once in a while, I like to make a project other than a card for Crazy 4 Challenges. I made this mermaid a while back and started the canvas but hadn’t finished it yet. I happened to notice it right while I was deciding what to make so it worked out perfectly!

c4c 18 mermaid canvas

When I started, I had a slightly different plan so I covered the canvas with Tim Holtz tissue paper. Then I covered it with watered down gesso. Next I mixed up a concoction of acrylic paint and shimmer acrylic paint for the sky. The shimmer paint was old and pretty thick so it made a sort of paste so instead of painting it on, I used a palette knife. It gave me some really cool texture! I liked it so much that I repeated the technique for the sea except I added much more of the shimmer paint. For this layer I also used a palette knife to give me some texture. I deliberately applied it in wave-like motion and because I didn’t mix it completely, there is some colour variation as well especially in the lower corners. It’s subtle and didn’t show up well here because the shimmer reflects the light so strongly.

mermaid canvas closeup

To follow the sketch I needed a half circle at the bottom so I mixed up another concoction this time with gold and buff paints, some texture paste and some gold glitter. Again, it was applied with a palette knife; I didn’t use any template, I just applied it like cake icing until I got a shape I liked. While the paste was still wet, I embedded shells, shell chips and added some more glitter; gold glitter all over and some bright colours to look like coral and little creatures sticking to the rock. Some green glitter was applied to look like sea weed as well. I liked it so much that I created a large sea weed growing off the top of the rock using texture paste and glitter. The shape I wanted was much too small for the palette knife so I used a new set of silicone tipped tools I bought.

mermaid canvas rock closeup

For the corals, I used a stencil from Red Lead paper company. I tried adding pink and red glitter but I waited too long (off washing the stencil) so it was splotchy and I didn’t like the colours. So I mixed some Autumn Rose and Copper Nuvo drops and painted that over the top. I liked that so much better! I used another Red Lead stencil to add the words using gold paint mixed with light modeling paste. It kept a hint of shimmer which I liked. So much is shimmery on this canvas that this is a nice contrast.

Also to match the sketch, I added some sea creatures to the canvas. These chipboard shapes were from Michaels; I covered them with various paints. The Prima doll stamp by Julie Nutting was stamped on scrapbooking paper from Craft Smith except for the skin which was stamped on X-Press It paper and coloured with Copic markers. Last I added some Nuvo drops for bubbles, a plastic starfish to her headband and a few sea gulls in the sky.

Join us over at the C4C blog with your project featuring this fun sketch.

Enjoy, Rebecca

March 11, 2018

Crazy 4 Chickens?

Sadly Crazy Designer Bonnie had to step down from the team but before she left she gave us her challenges for the month. This week she challenged us to use chickens as inspiration. Apparently she had chickens for over 40 years! I can only imagine how delicious those eggs would be! If you don’t have any chicken in your stash, feel free to use the closest bird stamps or papers you have.

c4c 18 eggs in nest

Yes, my card features eggs not a bird, but if you look carefully, you’ll see the birds I stamped on the cardstock in the background. A lot of what I used is from the Hero Arts kit from last month. The eggs and nest are die cuts, the branch is one of the stamps and even the small butterfly and tiny leaf branch were in the stamp set. I coloured the eggs with watercolour and sponged ink onto the nest except for the leaves which I coloured with pencils. After the eggs were dry, I flicked on some very dark brown watercolour with a tiny brush to get the smallest dots.

The watercolour I used is quite chalky which is normally terrible for watercolour. But this pan in particular works amazingly for lettering (use a brush to apply it to your calligraphy nib) and the chalky look was perfect for the eggs too. It’s a handmade watercolour by DesignsByRachelBeth on Etsy. Her darker colours are not chalky at all and have luscious pigments. I highly recommend them.

Fun challenge right! Pop on over to the Crazy 4 Challenges blog to join us this week. Be sure to link up your fowl creations by Friday midnight!

Enjoy, Rebecca