Showing posts with label My Mind's Eye. Show all posts

August 23, 2017

Mr & Mrs Shaker Card

If I had enough time and sequins, I would make all my cards shaker cards!

SCS 01 mr and mrs wm

This card uses dies from Papertrey for the bride and groom. The frame was created with good old Labels 1 Nestabilities by Spellbinders. I altered a lot of cardstock for this card. The black cardstock was already black but I wanted some shimmer so I added some Delicata ink. The gold frame and die cut sentiment were painted with gold leafing paint. Along with the sequins, this ends up being a pretty shiny, blingy card!

The patterned papers are by My Mind’s Eye and I think I could use 5 pads! It’s one of my favourite paper pads ever! I love foiled papers. So here’s a tip when you are making shaker cards: if you plan to put any sentiments or embellies over the shaker, block those areas off with foam tape. That way you don’t waste excess sequins filling the shaker especially since you won’t even see them most of the time!

Enjoy, Rebecca

August 15, 2017

Monochromatic Coffee Drinks

Our challenge this week was to make a monochromatic card; you can still use black and white/ivory. I got the new Perfect Blend stamps and dies from Neat & Tangled stamps during their recent sale. This was a perfect time to use them!c4c monochromatic I love getting Frappuccinos at Starbucks. I’m not into coffee but I sure love those! There was a sale on them, half price for a week, I am ashamed to say I had one almost every day!

This card uses some old My Mind’s Eye paper for the base and other layers. The drinks were stamped on X-Press it paper and blended with Copic markers. The straws are a separate piece, I inserted them into the cup die cut by using a craft knife to cut where a real drink lid would be cut and tucked them in. The drink mix inside the cups was coloured with R 81, 83, and 85 markers in a swirly pattern. I was trying to mimic those drinks where they add syrup to the cup first then blend the drink making pretty swirls. I saw Sandy Allnock do this once and it looked fantastic. The layers were cut with Label 55 dies from Spellbinders and the banner was hand cut except for the banner end which was done with Fishtail Banners from Sunny Studio. Believe it or not, I got that pretty lace at the dollar store! It’s a really nice cotton lace.

Monochromatic cards are so fun and easy because so many of the decisions are already made! Hope you can come and join us this week!

Enjoy, Rebecca

July 15, 2017

Congratulations Wedding Shaker

Shakers are all the rage and I can’t seem to stop making them!! Have you made any yet? If not, you have to try them! They are super fun to both the making and the playing! I keep mine for a couple days before making so my 5 year old son, Teddy, and I can play with them! He’s completely enamoured with all my interactive cards.

SCS 01 congrats wm

Do you even find you have a piece of patterned paper (My Mind’s Eye-Fancy That) that is so lovely you can’t bear to cut it up? I find that to be true often when a paper has a border or is a full-sheet design rather than a repeating pattern. The gold dots around the edges of this piece were so pretty, I couldn’t bear to cut it small enough for an A2 card so this card is a whopping 6x6”! Yes, you will have to buy oversized envelopes or make them yourself. But I think it’s worth it!

TIP: One way to mail an oversized card without buying or making special envelopes is to wrap it in tissue, add some washi tape, a pretty tag or an embellishment then mail it in a plain white 9x12” envelope cut down to size.

Instead of building from the bottom up to make my shaker, I decided to work from the top down. That way my shaker’s edges are hidden under the gold striped paper. This is an elegant way to create a shaker especially if you find you have trouble getting the layers to align and look neat. My paper was cut with an oval nesting die (Spellbinders) to create a frame for my shaker then the acetate was adhered to the back of the frame. You don’t need as much adhesive for this layer as there won’t be any sequins trying to escape! To make things easier, I used the nesting dies to cut fun foam Strong adhesive was added to the fun foam on both sides. I placed the fun foam on a scrap of a quilt patterned paper then added my sequins. Finally I placed it altogether!

Love this card? Be sure to Pin or Share!

With so many sequins, all this card needed was a layered black sparkly die cut sentiment (Simon Says Stamp/Wink of Stella) and a silk ribbon (May Arts) bow. I haven’t given this one away yet because I’m still busy playing with it there haven’t been any weddings or anniversaries yet but I hope the happy couple will love this card!

Enjoy, Rebecca

October 22, 2015

Floral Ampersand Thanks

Freestyle collage is fairly new to me but I try! I think some of the journaling cards in the last SSS kit are so fun and lend themselves to this style.

floral ampersand thanks

I used more mirrored cardstock in the upper left corner of the journaling card. It looks green because it is reflecting a colour from the background. Try to disregard that will ya? I made the little paper clip flag using self-adhesive ribbon which made it so easy!

Enjoy, Rebecca

Entered in:

Mojo420

RECIPE
Stamps:
SSS hearts and sentiment
Ink: angel pink-Memento, black archival-Ranger, soft stone-PTI
Paper: DP, &, card-My Mind’s eye, Card base-blushing bride-SU!
Accessories: cork-WRMK, sequins-Lucy’s Cards, Krylon gold leafing pen, ribbon-unknown

October 21, 2015

Butterfly Thanks

I am so in love with last month’s Simon Says Stamp kit, I have to play with it again before the next one shows up.

butterfly thanks

Now i have to start by saying that the hearts cut from the striped paper are not black. They are backed with gold mirrored paper. You can see it a bit through the vellum just under the bow.  The other gold is gilder’s paste which I used on the edges of the card front and on the raised edges of the embossed butterfly.

The striped panel is raised with fun foam. But then when I went to add the banner and ‘thanks’, I was a bit stuck on how to raise it up to match the striped panel’s height. I ended up using white fun foam cut with the word die and carefully placed behind word die cut. It works quite well!

Enjoy, Rebecca

Entered in:
rs186

RECIPE
Paper:
mirrored cardstock-scrap, pink CS and DP-My Mind’s Eye, black CS, vellum-PTI
Accessories: doily die-PTI, word die-Mama Elephant, sequins-Sulyn Industries, butterfly die and folder- Sizzix, heart veneers-Studio Calico, Goldfinger gilder’s paste

October 04, 2015

Happy (Belated) World Card Making Day!


w&w wcmd logo

Yeah, another WCMD! I found a few challenges to play so here’s what I came up with.

hello heart

This one is for the Winnie and Walter watercolour challenge. I had fun using my new Kuretake watercolours and the latest Simon Says Stamp card kit. The colours are more vibrant IRL, I don’t know what is with some cards and how they photograph!

I hope you had fun working on your WCMD projects!

Enjoy, Rebecca

RECIPE
Stamps:
SSS October kit I See You
Ink: versamark, archival black-ranger
Paper: W&N watercolour paper, vanilla CS-SSS kit, My mind’s Eye paper and journaling card
Accessories: embroidery floss, hello die-kit, gold twine, EP-SU!, Kuratake watercolours

June 29, 2015

The Shabby Tea Room Design Team Application 3

Can I just tell you how much I love My Mind’s Eye? Their shabby chic paper packs are just amazing!

tstr invite

I added some gold to this card which is seen in photo in the macaron and the tea cup; you can just see that it has a gold edge. I’ve always loved to work with gold, it’s the only embossing powder I’ve every used up except white and clear! It’s awesome that it’s finally trendy again! I don’t personally care but it’s nice to see more products being made in gold!

rs170

I’m also making this for Retro Sketches 170. And of course The Shabby Tear Room DT call.

Enjoy, Rebecca

The Shabby Tea Room Design Team Application 2

For this card, I was inspired by the colours, flowers and overall look of the photo. For The Shabby Tear Room DT call.

tstr banner card

I also used a sketch challenge but it’s over now :(. I coloured the mid-tone flower with Copic markers. It’s a shame I didn’t have time to colour an image for this application but I for sure will do so in the future. That’s if I make the team of course! ;)

Enjoy, Rebecca

The Shabby Tea Room Design Team Application 1

I have loved this challenge blog for years now. I’m so excited to see if I am chosen as a Design Team member!

The inspiration photo is below.

tstr tea card

I love the tea theme and colour combination found in the inspiration photo. I paper-pieced and Copic-coloured the tea pot and cups.

June 2015 DT Call

Isn’t this gorgeous? I had such fun working on cards for this DT call. I am posting 4, yes four! cards tonight so please forgive me for not posting a RECIPE like I normally do. Feel free to email me if you have any questions regarding the supplies I used.

Enjoy, Rebecca

April 25, 2015

Navy and Pink PTI Blog Hop

pti blog hop logo

Welcome to another PTI Blog Hop! My card was made when I was very tired this morning, I got up early because I couldn’t sleep, so please forgive a lack of inspiration. Overall though, I think it’s a pretty card worth posting.

navy pink PTI hop 0415

I really wish PTI made a cardstock that was about halfway between blush and hibiscus and not peachy/coral like Melon Berry and Berry sorbet. Then I would have used that for the sentiment panel and the flowers would stand out more. IRL the sponging on the edges of the flowers shows more and they stand out from the background a bit better.

04 15 PTI hop insp

Such a gorgeous inspiration photo right? The flowers were made with a die from Memory Box and I took the time to shape them nicely before adding them to the card. I should have sponged them before shaping them though so I will make a note to myself for next time. Not only did they not sponge very smoothly but the tiny tab used to keep the flower 3-D

navy pink PTI hop 0415 2

I love making lots of types of cards but I find myself using get well and thanks most so I love having lots of choices of sentiment in these two categories. This set, Healing Touch Sentiments, has lots of options. I am dying to get a Get Well die though. Anyone know of one? The only one I can find, from Hero Arts, isn’t in a font I like too well.

_121

I used Cardabilities sketch 121 for this card. Isn’t it awesome? They have the best sketches for all cards but especially shabby chic ones.

Enjoy the rest of the hop! Rebecca

RECIPE
Stamps:
fancy flourishes, Healing Touch sent-PTI
Ink: Paris dusk-Memento, hibiscus burst
Paper: DP-MME, cardstock all PTI
Accessories: Cherry Blossom die-Memory Box, Labels 8-Spellbinders, leaves die-SSS, gem-stash, border die-PTI
Tools: MISTI, Embossing stylus

March 08, 2015

Howdy Neighbour

I made this card for a family I know who is into horses. I haven’t seen them in a while so I thought they might appreciate this card.

howdy neighbour

I think this was also for a a sketch challenge because this isn’t exactly a card layout I’d think up myself. But as happens about 50% of the time, I forgot to link it up in time. sigh…

Dontcha love those wooden embellies? I love using wood veneers, but especially on more rugged themed cards. The twine was supposed to look like a lasso. Did it work?

Enjoy, Rebecca

RECIPE
Stamps:
MFT
Ink: cup o joe-HA, (don’t recall the other colours)
Paper: DP-MME, kraft CS-PTI
Accessories: twine-May Arts, wood veneer stars-Studio Calico, Copic marker (circle around horse head and colouring veneers), circle dies-Spellbinders, lace-vintage, wooden dots-MME

Masculine Thinking of You Card

Sadly my great uncle is sick in the hospital. I knew he would love a card but most of my get well cards were too young for him. So I set to work.

masc get well

We are both very religious so I knew he would appreciate this stamp with a scripture on it. While it doesn’t exactly say ‘get well’, I don’t think it needed to. The buttons look too bright for the card colours but IRL they are a perfect match. This is a pretty basic card so there isn’t much to tell you about. Click on sketch to visit the challenge.

mojo387

Enjoy, Rebecca

RECIPE
Stamps:
SSS
Ink: Grey Flannel- Memento
Paper: light grey CS-SU!, dark grey, ivory CS-PTI, DP-MME
Accessories: buttons-Basic Grey, embossing folder-Sizzix

January 09, 2015

Love Story Card

I’ve been sick for so long, all of December (I’m still not better), I feel like a stranger to this blog. Thanks to all of you who are still here with me!

love story banner card

I used this week’s Fusion Challenge which happens to be their Anniversary! Congrats on a great year to Fusion! I was inspired by so much from this photo. I’d actually already pinned it from Maggie Holmes’ blog. It was a birthday party backdrop for one of her deliciously adorable daughters.

First Birthday

I decided to use the gold frame, banner, sticks with little flags on them and the overall pinkness as my inspiration. I really wanted to add some flowers and ribbon but decided to leave it as is. anything I envisioned just overwhelmed the design and left it too off balance. BTW, it is a rectangle card. The diagonal lines of the gold-painted sticks make it look like the top is wider than the bottom but it’s an optical illusion. It looks better IRL.

26-One Year Celebration[6]

To make the frame, I deliberately only lightly embossed the shimmery gold cardstock frame. I didn’t want the paper to crack nor warp the thin frame too much. It worked beautifully. The sticks were painted with a gold paint pen.

I’m entering this in the Card Concept Challenge #26. And another Happy Anniversary to the CCC! Yeah, I am so glad I found you. This is my first time even seeing this challenge!

Enjoy, Rebecca

RECIPE
Stamps:
MME love sentiment, flourishes-PTI
Ink: Versamark, Versacolour-could white
Paper: golf shimmer cardstock-SU!, kraft, black CS-PTI, DP-MME
Accessories: BBQ skewers- grocery store, Krylon gold paint pen, banner die-SSS, frame dies-Lifestyle crafts

November 13, 2014

Shabby Roses Thinking of You Card

I made this cad for the Wednesday SSS challenge that just ended. Nuts, when am I going to learn I have to post these right away! Ugh!

shabby rose TOY card

This card was a struggle that I don’t often find when making shabby cards. I started by using a fancy tag die that I recently bought. It needed to have a larger middle part for stamping the sentiment so I partially die cut both ends leaving a gap in the middle that I hand-cut to connect them. But it just didn’t work right with the lace and ribbon I REALLY wanted where I arranged it. The fancy end on the left just didn’t fit well. It’s a pretty big die cut. So I ended up cutting off the fancy ends. After all that finicky die cutting!

The vellum I used was too white so I airbrushed it with an E53 Copic marker. Then I still felt it didn’t stand out enough so I edged it first with a Wink of Stella glitter pen but that didn’t look right, too uneven. So I finally swiped the edges of the vellum with embossing ink and dipped it in embossing powder. Why the uneven EP looks good but the uneven Stella didn’t, I’ll never know. The ribbon doesn’t appear to match but it does IRL.

If you look really carefully, there are a few tiny mirrored bits on the lace. The light only reflected on two of them, they look like dark dots. They are the centers of bright shiny gold sequins. I thought they were pretty so I am going to use them here and there. There are two on the sentiment panel too. The sequins were given to me AGES ago and I ignored them until now. I even forgot I had them! I’m so happy I didn’t throw them out!

Enjoy, Rebecca

RECIPE
Stamps:
a.muse studio background script stamp (hard to tell it’s not part of the paper), SSS sentiment
Ink: Memento cocoa, Versamark
Paper: MME Record it, spring moss CS-PTI
Accessories: May Arts silk ribbon, lace-Fabricland, button-OA, twine, Foam Tac clear dimensional adhesive, gold EP-SU!

October 07, 2014

Chalkboard with Stamped Floral Wreath

I love trying new techniques and this one was introduced to me by Jennifer McGuire.

chalkboard watercolour flowers

On kraft cardstock, I stamped the floral wreath with white pigment ink. Then I stamped over the white images with dye ink. Then I combined that technique with another from Jennifer, to add another colour of ink over the original stamping, to accent each flower and leaf. After stamping the first time with coloured ink, you ink up your stamp with the accent (darker or brighter)colour then remove some ink with a cloth. In this case, I removed about half the ink leaving the center inked. Then stamp over your original stamping, carefully lining everything up. That leaves the centers a bit brighter/darker. Click to enlarge the photo as it’s hard to see.

I added the sentiment with black EP and carefully trimmed around it. I added a few little random dots to make the wreath look more filled in and added it to a simple card.

Enjoy, Rebecca

RECIPE
Stamps:
SSS
Ink: versamark white ink, various hero arts and PTI inks
Paper: kraft CS-PTI, DP-MME (I think)
Accessories: pearls-Dollarama, foam dots-The Sticky Stuff Store, Divine Twine

May 31, 2014

Saying Goodbye to Unscripted Sketches

I’m sad to say this this is my last Unscripted Sketches post as the owners of the blog have decided to move on to other things. I certainly wish them well. So here is my last project.

RebeccaEdnie259

I love this muted aqua, tan, ivory and chocolate combination. I was stuck for an idea so I started looking at my dies and my eyes settled on my ice cream die. Ah, perfect. When I pulled out this paper pack for obvious reasons, there was already a die cut heart! Even more perfect! I don’t remember cutting it but why not use it?

I added glitter to the ice cream cone with a glue pen and to the card with red line tape. I used the glue pen for the stripes on the heart too.

259
I really hope you will play with Unscripted Sketches one more time this week. I hope we have record numbers of participation for our last hurrah! I’m really sad to see it go. I haven’t been a member long and I so wish this was a long term assignment. I was on design teams before my baby was born but quit quite a long time ago. I didn’t want to work while he was little but I was so ready to start over again. oh well, the search starts again. Have fun!

Enjoy, Rebecca

RECIPE
Paper:
MME, cardstock base-baja breeze-SU!
Ink: Frayed burlap distres
Accessories: foam dots-The Sticky Stuff Store, chocolate glitter –MS, light glitter-Art Institute, heart, ice cream die-PTI, sequins-Ellen Hutson

March 22, 2014

Jewelry Display Canvas Tutorial for Unscripted Sketches 249

You read that right! Not only do I have a home dec project for you today, I even have a tutorial! I’m afraid I’m not very good at remembering to take photos for every little step but it’s so easy, I promise you will get it. So, project and sketch first then the tutorial! This is also for The Shabby Tea Room Anything Goes!
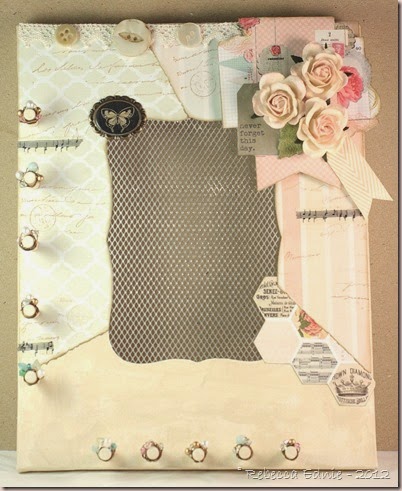
RebeccaEdnie249

This is a dollar store lover’s dream project! The (wonky) canvas, wire mesh and dowels were all purchased there. I’m sure you could get beads, wire, flowers, washi tape, ribbon, foam squares, charms, lace, paper and paint though I’ve no idea if you can find things that approach the look you see here. I know in the US there are way better stores than here.

jewelry canvas closeup5

Here’s a close-up of some of the pegs, I’ll have more extreme close-ups later. Aren’t the beads pretty? Each peg is slightly different and they are functional as well as lovely. I wanted to make sure that necklaces and bracelets didn’t fall off the pegs!

jewelry canvas closeup7

Everyone knows that earrings go through the mesh right? I still plan to embellish it more, I just ran out of time. I think I’m going to add Tim H’s Grunge Board Printer’s Blocks to spell BLISS at the bottom with gold swirls and pearls/rhinestones/sequins etc. Cool right? I also want to colour the mesh gold. Not sure if I’m going to try to use my Krylon pen or buy some model paint designed for metal.

249

I had a blast with this sketch as you can see! Please visit the other gal’s blogs and leave them some lovin’ (comments) and be sure to support our challenge at Unscripted Sketches by making’  somethin’ groovy and linking it up! And don’t leave now! Please stand by for more close-ups and my tutorial!
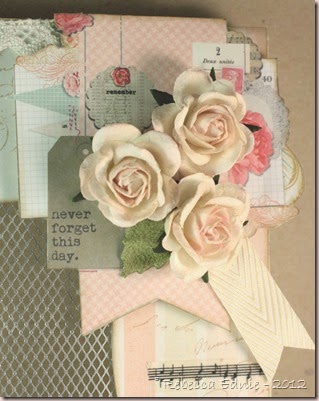
jewelry canvas closeup6

Jewelry Display Canvas Tutorial

Need to sort out all your jewelry? Need a place that won’t leave it in knots and tangled with other pieces? Can never find the second earring? Need a great customizable gift for the gal who has everything? Bridesmaids’ Gifts? Tada!

What you need:

Artist Canvas in your choice of size. Unless this is for a girl I’d recommend no smaller than 8x10”. If you want to cover it in full sheets of scrapbook paper, no larger than 11 or 12x16” or you will have more than one seam.

1/4” dowels

a way to cut the 1/4” dowels, I used a small hand saw

1/4” drill bit (in any drill bit set) and drill or ideally a drill press but NOT necessary

sandpaper or rough emery board for sanding the ends of the dowels

rubber or rawhide mallet or hammer if no mallet

metal mesh for opening, you could use sturdy open lace if you can’t find mesh, I know craft stores have it

die or stencil to create shape for opening (optional, you can draw your own shape if you want)

fine tipped scissors or an xacto knife

strong glue or hot glue

22 or 24 gauge craft wire, I used 24 g Antique Bronze Artistic wire

Your choice of small roundish or chip/nugget beads 3-5 per peg, 2-6mm do not recommend doughnut shapes like rondelles or long oval shapes

wire cutters, preferably jewelry flush cutters

some sort of jewelry plier like a chain nose or a flat nose or even a round nose will help but optional

Paint or paper to cover canvas. This is so up to you that I really can’t make a list for you. I used MME paper and Golden Fluid Acrylic paint in Titan Buff. Before that, I added a layer of Gesso over the questionable layer on the canvas when purchased. You could add anything you would to the front of a card or to a scrapbook page, the possibilities are endless. An inspiring word, quote, monogram or her/your name might be nice.

1. Decide on the placement for your pegs. Note in the photo above that you may not be able to add dowels in the corners because of how the wooden frame is put together. Other than that you can wing it or measure precisely.

photo 2

2. Drill through the frame to the other side. This allows you to remove a peg if you need to. Be sure to place something underneath if you are working on a surface you won’t want to mess up. Keep the holes as vertical as possible or your pegs won’t sit straight. (We own a drill press and I own a husband, I’m not going to try to fool anyone here. Though if my garage wasn’t a disaster, I could do it myself. The spiders are still asleep here.)

photo 1

3. Cut the dowels to your preferred length. Mine were 1 1/2” long and my canvas was 3/4” thick so that amount was also what was showing. Unless the necklaces are very thick even right at the back of the neck, that is plenty, even with the wire wrapped beads we will add. Sand them smooth on one side. Do not add the dowels yet!

My hubby asked how I will see what I have on the left when they will be hanging on top of one another. There are two possibilities. If you are a quirky gal, hang it on an angle. If not, hang bracelets there or necklaces that aren’t likely to tangle. If the top necklace hangs on one side of the pegs and the second on the other and vice versa, I think you will be ok. Of course, if you aren’t making this for a sketch challenge, feel free and add more pegs wherever you’d like, just being careful of those corners.

4. Decide what shape your opening will be and trace it onto the back of your canvas. I used the largest Labels 8 by Spellbinders. Make a slit in the opening and cut with scissors or if you are good with an X-acto, use that. Be very careful not to stretch the canvas around the edges. I chose one large opening but you could do more than one small opening too like several small hearts or the centers of flowers.

photo 3

5. Next add your lace or mesh to the backside of the hole. I used Glossy Accents but you could use hot glue. Just be careful with the latter as the mesh will heat up with the heat of the glue. {{You can see here that the drilled holes did hit some of the staples. Didn’t seem to hurt the canvas or the drill bit so don’t worry about it!}}

OK, so the structure is done so we are on to decorating right? Uh, but what about the dowels. Don’t worry, didn’t forget those. When you add them depends on how you are decorating. If you are adding paper, add the dowels last*. If you are painting, add the dowels now. Stencilling-later… you get the idea. If you are doing any kind of technique which requires a flat surface, leave the dowels to later. If you want them to meld with your surface effects, add them now. You could even paint them along with the canvas, remove them (pound a short piece of scrap dowel in from the back about 2/3 of the way then remove the scrap with regular pliers), number them, do whatever other surface treatment you’d like, then replace them. Anyway, whatever you choose, here’s how to do it.

* poke a needle through the holes from the back. Then jab fine tipped scissors (closed) through from the top and press the excess paper into the hole. Unless you have many layers, it will just make it a bit tighter fit. If the dowel won’t go in, remove the lowest layers, keeping the top one intact as best you can. When it folds inwards as the dowel goes it, it gives the nicest finish. Make sure all glue is dry or it will tear.

6. If your dowels aren’t painted or finished, do that now. Pound the dowels into the holes with a mallet until they sit flush with the back of the canvas. A mallet will ensure the wood is not marred and neither is the finish. If you only have a metal hammer, wad up some scrap cardstock, 4-6 layers,  and shape it into a kind of a cup shape over the head of the hammer and tape it on. Now pound it in gently. Unless you wiggled your drill bit, they should fit perfectly and not even need glue. If they are a bit loose, never fear, add a bit of white glue and let that set checking that your dowel is at the correct angle while it dries. A clothespin may help here.
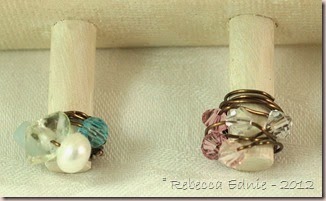
jewelry canvas closeup4

7.  Now, the best part! The beads! I worked with the spool of wire here and it may seem weird at first but it’s great. These were the first two I did and I was still experimenting with the best way. The left one was not the best at all! You are going to use a lot more wire than you’d think. Add your beads to the wire in any order. Begin by adding wire along the length of the peg, starting near the base of the canvas and working up to the top of the peg. This seems like the wrong way but trust me. Now bend the wire 90 degrees and start wrapping it around the peg near the top. When you come around to where you started going around, make sure you wrap around the straight wire you started with and be sure it is tight. Wrap around twice more being sure to catch the straight wire every time.

jewelry canvas closeup3

8. In the photo above #7, you can see the right peg doesn’t have the beads distributed very evenly which wasn’t my aim, these three are much better. Now that you’ve secured the beginning of the wire, you need to slide your first bead along the wire and place it where you want it on your peg. Make a full wrap then add the next and so on. Keep your wire taut the entire time. Don’t worry if it doesn’t end up super tight, many of mine weren’t. We will fix that later. It does need to be tight enough to not spin freely though. You can try tightening the wire, unwrap and start again, or start with new wire, it isn’t expensive! In the photo below, you can see that there isn’t a lot of excess wire.

jewelry canvas closeup2

9. When you finish adding beads, wrap the wire three more times. Then cut the wire leaving a 1” tail near the bottom but try to still hold it tight so it doesn’t uncoil. Next, this is where jewelry pliers come in handy as we want to find a little spot in the wrapping on the side to tuck the end into. If you only have regular pliers, don’t use them just leave two extra inches and work with your fingers. Just thread it in, pull it tight and trim that wire, and the one you started with, closely. If the ends stick out, press them close and out of the way with something metal like the tip of a metal ruler.When working with your fingers, if you are having trouble threading the wire through a small space, magnification might help if you have it and so might putting a small hook shape on the end of your wire. Try threading the wire into a large eye needle and bending it slightly then slipping it in a bit further, bending it again and so on until you have a small hook shape. This will hook under the wire wraps more easily.

10. Your wrapping may cover more width of the peg than you might like. Use jewelry pliers or your fingers to squeeze the wraps together and make the wires closer like a more tightly coiled spring. Add a couple drops of a strong glue like Glossy Accents to the very bottom of the wire, in between the wires if you can, if you feel the wire may slip. Don’t want to lose that baby!

jewelry canvas closeup1

11. Last but not least, this is a home dec project. I highly recommend that you seal all paper layers with some sort of spray sealer or gel medium for longevity.

Enjoy, Rebecca

January 25, 2014

Pink and Gold Notebook for PTI Blog Hop

PTI blog hop logo

The theme this week is PINK! Yeah! I’ve been using a bit less pink as I’ve gravitated to more teal, aqua and turquoise. But my love of pink is still strong!

pink challenge PTI hop notebook

I used my love of gold (for me it’s not a trend, I’ve always preferred gold to silver) and the gold in the photo below to inspire my notebook.

untitled

Pretty isn’t it? I especially love the heart garland, I was going to use hearts, now I still wish I had. Anyway… The way it’s made is pretty obvious so I won’t bore you. Just one tip. If you don’t have enough ribbon to go around the notebook and then tie too, cut it, attach the ends near the front and back edges, then disguise the ends in some way. Use buttons, die cuts, chipboard cut outs, or in my case, a glitter strip, which is a premade product, to cover the ends.

pink challenge PTI hop notebook 2

Just a couple close-ups of the details I added. I cut these small flags by hand as I don’t have a flag die yet. The glitter in these strips is rock solid, absolutely none flakes off and it’s very thin and flexible. A wonderful product. The lace I used is a score from my local fabric chain store. so delicate and dainty I have to apply it with the tiniest line of glossy accents but it’s worth it.

pink challenge PTI hop notebook3

Another shot of this lovely lace and I promise, this text is much easier to see IRL. Not only do I need  better lighting but when I use natural lighting apparently I desperately need to find my lens hood. Ugh. When I bought my lens, I didn’t know what it did and I stashed it in my black hole of a basement. My stomach turns in knots when I think of having to find anything down there. And I really need a nice rose ink that’s darker than this one too.

Enjoy the hop! Hope to see you around here again some time!

Rebecca

RECIPE
Stamps:
Take Note-PTI
Ink: Rose shadow-Hero Arts
Paper: kraft CS-PTI, DP-MME Lavender
Accessories: circle dies-PTI, notebook-PTI, lace-FabricLand, glitter tape-Darice, foam tape-Jody Morrow

November 16, 2013

Love This Kite Card for Unscripted Sketches

Welcome to another Unscripted Sketches card. This one was really fun!

RebeccaEdnie231

I decided that I was going to embellish each of the horizontal lines on the sketch rather than leaving them plain. I adore the ‘love this’ font. It’s from a new SSS stamp set I got in a card kit.

Sketch_231

Thanks for coming by to visit! I hope you will come by the US blog to play with us! We are always looking for new people with new styles and takes on the sketch to wow us!

Enjoy, Rebecca

RECIPE
Stamp:
Love this-SSS
Ink: Memento Teal Zeal, Frayed burlap distress
Paper: kraft cs-PTI, DP-MME, cheap white CS
Accessories: MME sticker, aqua ribbon-Really Reasonable Ribbon, MS lace punch, buttons, twine-PTI

October 05, 2013

World Card Making Day!!

Welcome to my WCMD post! I’ve saved several cards I’ve made lately just for this special occasion! So sit back and enjoy! (Check out the end of the post for what’s coming up on my blog soon.)

First off a little card inspired by Jennifer McGuire or maybe Kristina Werner. But if Jenn made it the sentiment would be black and if Kristina made it there would be dash lines somewhere or rounded corners so I suppose that makes it all mine!

heart happy

I cut apart a SSS heart die to get just one heart to cut it from each of two banners. The background was sponged with broken china ink over the SSS Moroccan stencil.

Next up is a Copic coloured card I spent a TON of time on. Not only did the colouring take a long time but the card design did too.

tag slider card

It’s a surprise pop up card but I call it a tag slider card. I changed hte measurements of the tutorial quite a bit though as my card is larger. Cuz when you pull on the tag, the front panel slides up to reveal a message underneath and a place on the tag for a message!

tag slider card 2

Cool right?

tag slider card 3

tag slider card 4

tag slider card 5

The Copic colouring looks smoother IRL. Strange, soft colours usually fades completely on a computer screen. In this case, it actually shows up more strongly! Weird!

vintage hearts

I made this card for a challenge on Swap-Bot to go green and use coffee sleeves. I love the tiny corrugations and that one side of the cardboard is already removed. I die cut the heart and painted the ridges white. Then I used Versamark to add gold embossing to the edges.

And last but not least, two ATCs. They are still cards right? First, a mixed media piece inspired by a canvas I did for my bathroom. I’ll be posting that soon so if you are new to my blog and want to make sure you see it, be sure to subscribe or bookmark me!

sea mm ATC

I used a kraft cardstock base and added some sticky back canvas. Then I added two colours of turquoise, ivory and yellow-green Golden fluid acrylic paint. Then I dry brushed on some gold. I stamped the shell in Archival ink and added the ribbon and button when dry.

rainbow butterflies ATC

This one was sponged with a rainbow of distress ink colours on vintage sheet music paper. Then I added ink direct to paper on white cardstock so the colours would match the sponging when I punched the butterflies. And I added Copic markers to the centers. They are glued on their middles only so the wings can be lifted up.

Have a great WCMD. I hope you enjoy clicking on all the links and I apologize that this post wasn’t up right away. Coming up soon on my blog: how to make multiples of a project-3 parts, preparing, die cutting, stamping; 2 mixed media canvases and how to make a super easy super-hero cape! I also have a few jewellery projects to show you! Make sure you come back now, ya hear?

Enjoy, Rebecca

RECIPE
(Heart Happy)
Stamps:
SSS
Ink: Memento London Fog, Distress Broken China, Scattered Straw
Paper: white CS-PTI, DP-MME
Accessories: foam dots-Jody Morrow, Rock Candy Distress Stickles, SSS banner, heart dies, stencil, lifestyle crafts label dies

(Thanks-Tag Slider)
Stamps:
PTI Thanks all Ways, Flourishes Hollyhocks
Ink: Memento black, night of navy-SU!, HA-Field Greens, Frayed burlap, antique linen distress
Paper: Kraft, vanilla, moss CS-PTI, white CS-XPress it, DP-MME, vintage music paper
Accessories: Cropadile, 1/2”, 1 3/8” circle punch-SU!, Ornate ovals, Rose Creations dies-Spellbinders, mini scalloped punch-EK success, foam dots, Copic markers

(Vintage Hearts)
Ink:
vintage photo, antique linen distress ink, Versamark
Paper: Trousseau 7 Gypsies, kraft, vanilla CS-PTI, coffee sleeves
Accessories: SSS banner, heart dies, PTI heart die, white paint, gold EP-SU!, MOP button-ebay, lace-vintage, flower-Jesse James buttons, foam dots

(Sea Mixed Media ATC)
Stamps:
SU!
Ink: cobalt Archival ink
Paper: Kraft CS-PTI
Accessories: Golden Fluid Acrylic Paints, sticky back canvas-Ranger, MOP button-ebay, ribbon-stash, MS butterfly punch
In case you are wondering, the shell with the slit in it is a name holder from a wedding store.

(Rainbows, Butterflies and Music ATC)
