Showing posts with label gift ideas. Show all posts

November 07, 2015

Share Handmade Kindness Challenge

SHK-blog-badge

So have you heard about this challenge? Jennifer McGuire started this challenge to share something handmade with others. This week we were to share with friends or family.

treble clef and flourish necklace

I made this necklace for my BFF. She is a piano player, teacher and general music lover. I know that she adores the shape of a treble clef so I made her a treble clef pendant out of sterling silver wire. I’ve already given it to her and she LOVES it. Now I have to wonder what the coming weeks will bring if we’ve already covered friends and family!

Enjoy, Rebecca

November 01, 2015

Fall Thank You Card and Candle

We have another fabulous inspiration photo this week at The Shabby Tea Room. I love the softness of the photo and the fall colours.

fall stencil bg ty w candle

I decided to make a card and a candle as a gift. It will probably be a hostess gift at some point. I added lots of sparkle using gold glimmer mist and a Wink of Stella pen. The ribbon on the card is sari silk ribbon I bought from eBay. It’s so lovely to work with.

fall stencil bg ty

The background was stencilled with ink then I stamped over it before I removed the stencil. Then I sprayed it with gold glimmer mist. I also added some to the card base.

fall candle tstr

The candle is one from the dollar store in such a cute little tin. I added paper to the bottom and wrapped gold twine around the lid. On top I added layers of paper, seam binding ribbon and a cute little apple die cut. If you die cut corrugated cardboard and it flattens too much, use a fine tipped embossing stylus to pull up the bumps.

fall candle 2 tstr

I love having small gifts on hand to use in a pinch. Do you create items to have in your stash besides cards?

tstr 258

We’d love to have you join us this week at the The Shabby Tea Room. You don’t have to make a card, make anything you like! We love to have as many participants as we can get, new friends or old.

Enjoy, Rebecca

Entered in:

CAS-ual Fridays Chic Challenge: Tic Tac Toe (closed)

Simon Says Stamp Monday Challenge: Throwback – Autumn

Simon Says Stamp Wednesday: Anything Goes

Paper Players Fall Thank You Cards

pp269

mmmc18

Fm232F

Graphic have embedded links to challenges.

RECIPE
Stamps:
French script-SU!
Ink: Antique linen, vintage photo distress, kraft-PTI
Paper: chocolate CS-PTI, vanilla, olive, various browns CS-SU!
Accessories: fall dies-Echo Park, leaves-Elizabeth Craft, sentiment-Mama Elephant

September 21, 2015

Pumpkin Treat Box

Hello and I’m glad you are joining me for another week at The Shabby Tea Room! This week, we had a yummy inspiration photo.

tstr damask pumpkin favour

I don’t celebrate Halloween so I made some fall decor instead. I plan to put coffee beans and a faux tea light in there. I took the colours from the photo and decided to use the black plus white and one other colour scheme. I just substituted ivory for the white and dark red for the yellow/orange combo. The cute little treat box is from The Cutting Cafe who is our sponsor this week. It was a breeze to print out and construct; I highly recommend you check them out!

ca tstr 261

So, I kinda wish I could have a do over on the glass glitter I added to the burgundy roses. I was a bit too much for such small flowers and while I scraped a lot of excess away, I still regret it. But it wasn’t bad enough to bother wasting the flowers and starting again especially since I attached them with E6000 glue! It’s a fabulous glue for bulky 3-D items but no way are those coming off with out major tearing.

I do hope you will play with us this week! We have fabulous prizes for the top winners. Be sure to visit the blog to see the FABULOUS creations by our awesomely talented designers and leave em some love!

Enjoy, Rebecca

RECIPE
Stamps:
damask-Gel-a-Tins
Ink: Archival black-Ranger, Peeled Paint Distress
Paper: vanilla, celery CS-SU!, black CS-PTI
Accessories: roses- Really Reasonable Ribbon, lace-stash (from my wedding favours from almost 18 years ago!), silver gel pen-Pentel, leaf die-Spellbinders, sequins-Theresa Collins and Ellen Hutson, Glass Glitter- Recollections, Art Institute, Glitter Ritz

April 13, 2015

Messy Wire Wrapped Bangle and Earrings

I’ve been making jewellery again! I find it really creatively inspiring to try making something other than paper crafts once in a while.

messy wire wrapped bracelet1

I started with a typical wire bangle but used much more wire. When I finished the first round of wire, I made sure it fit me perfectly then just kept wrapping! Some of the beads were added to the bracelet at the beginning and some in the subsequent wraps. I added the charms last. This may seem difficult but I assure you it isn’t. If any one would like to know how, maybe I’ll make a video!

messy wire wrapped bracelet2

There is room for more charms if I want to add more. I also made some earrings to match.

messy wire wrapped bracelet3

The earrings are made from silver sheet that I sawed myself. Then I textured the metal with a ball peen hammer. I also made the ear wires. The Chinese Crystals are from ZnetShows. They have the most gorgeous beads. These arrived in a mix of the black, clear and white. Some of the clear ones however, have a silvery coating on half the bead. They are so shiny! I have also made a barefoot sandal using these beads but I need a pedicure before I can photograph it.

messy wire wrapped earrings

They also make the best cultured sea glass beads, pendants and pieces. Full disclosure, I was provided with these beads but I wouldn’t use them unless I thought they were high quality.

Enjoy, Rebecca

March 18, 2015

Thanks Card Set

Sadly my great-uncle is in the hospital dying. My poor great-aunt has been there as many hours as is humanly possible. Lots of people have been helping out, bring food etc. So I figured she will need some thank you cards shortly.

sweet sketch thanks

This first card is for the Sweet Sunday Sketch. I liked the wonky panel. I like my banners to point to the right though so I flipped the sketch. The banner is actually made from white CS swiped with Tattered Rose ink. It took ages because my pad is a bit dry. But the colour was perfect with this Theresa Collins paper.

260

This next one is one of my favourite CAS sketches. I die cut the Thanks and coloured it with Copic markers. I only used two so the ombre isn’t that pronounced but it looks nice. W5 and 7. Very simple but interesting.

ombre thanks

The last card layout was one I stumbled upon. I started by trying out the colours I was thinking of using on a scrap in the bottom. I didn’t like the colours so I stamped another bunch of hexagons higher up. This colour combo was much better but when I looked at my scratch paper, I had a much more interesting layout than the single cluster I had planned. I added two more clusters, to balance everything out, and ta da!

hex thanks (2)

I had one more happy accident. I had planned for a totally flat card. Very mailable but boring. But I couldn’t think of what to add. Then I goofed and inked the stamp I always stamped in yellow in the aqua ink and stamped. Not a pretty colour, NUTS! So I stamped it on scrap paper, cut it out and added it with foam dots.

hex thanks set

The top left and bottom right most hexagons are up on foam dots. I hope my aunt likes these. I kept her in mind when I made them as she loves soft colours and quilting. I think the hexagons look like quit squares, don’t you?

Enjoy, Rebecca

RECIPE

Thanks for Your Support and Ombre Thanks
Stamps:
Thanks all ways-PTI
Ink: cup o joe-HA, tattered rose, frayed burlap-Distress
Paper: Theresa Collins DP, kraft, white CS-PTI
Accessories: die-Mama Elephant, W5, 7

Hex Thanks Cards
Stamps:
Hexagons, Thanks all Ways-PTI
Ink: harvest gold, sweet blush, melon berry, aqua mist-PTI
Paper: white, harvest gold, sweet blush, melon berry, aqua mist CS
Accessories: foam dots-Sticky Stuff Store

February 11, 2015

Balloon Tag and Package

A matching tag and packaging was another PTI challenge. I had just made the tag in the post previous to this one with a set I neglect and thought about stamp sets I don’t use often enough for this tag.

balloon tag

I bought Everyday Button Bits a while ago second-hand and I’ve only used it once. So I decided to use it and use up some of those enormous buttons I don’t use much. I don’t use Vintage Labels a lot either so it made for a good match. I think this would make a good baby gift package.

Enjoy, Rebecca

RECIPE
Stamps:
as above
Ink: archival black-Ranger, Hawaiian shores-PTI
Paper: white, aqua mist CS-PTI
Accessories: chartreuse, wisteria, spring rain buttons-PTI, labels 1 dies-Spellbinders, cloud dies-PTI, washi tape-stash, baker’s twine-Divine twine

November 15, 2014

Warm Winter Wishes Gift Bag for WMS PJ Party

PAJAMA-PARTY-LOGO

This is for the Wrap It Up Warm challenge to make a gift bag or box with a cozy feel. I hope the ‘hugs’ sentiment is sufficiently cozy.

snowman gift bag

I used a Wink of Stella pen on the swirl on the patterned paper. The handles came from another gift bag, I have no idea how long it’s been since I saved them but it reinforces that my hoarder ways are sometimes quite useful! (Well, I am a saver but it’s not so bad as hoarder status… yet!)

The base of the box/bag is a cracker box. I modified it since it was too big as is. I just cut it down so that it was less than 6” each dimension because I had originally meant to use 6x6” paper on it. But as it turned out, I used 12x12” paper and ended up using less (ok, only a smidge less) than a full sheet to cover the entire thing! Yeah! I even cut the fancy tag shape from the remaining paper! I added ink to it to darken it and make the silver EP stand out. I used the silver EP on the snowflake too.

I hope you have fun visiting other stops linked to the PJ party!

Enjoy, Rebecca

RECIPE
Stamps:
Say It Loud-WMS
Ink: Versamark, night of navy-SU!
Paper: Echo Park
Accessories: marshmallow and clear sequins-Pretty Pink Posh, tag fie-Spellbinders, foam dots-The Sticky Stuff Store, bells-Michaels, twine-?, stickers-Echo Park, Lindeman snowflake die-Memory Box, snowflake brad-?, silver EP-SU!

October 01, 2014

ZnetShows Cultured Sea Glass Necklace

I am on the Znetshows Design Team! They make the most marvellous cultured sea glass and carry a wide variety of glass pearls and Chinese crystal beads.

znet fiesta sea glass

Today I’m featuring the fabulous cultured sea glass. They have so many colours and shapes. I love how these bright colours work so well together. I added each of them to the basic ear wire with a briolette-style silver wire wrap. The green bead is actually on the ear wire. There was a kink in the end of it but I straightened it then kinked it back in place to keep the bead from falling off. I used round beads, eclipse shaped pendants and the leaf shapes.

These were super easy to make, they only took about 15 minutes. They would be great to make assembly line as gifts!

Enjoy, Rebecca

May 16, 2014

Blush Pearls and Hearts Bracelet

I’ve been making lots of jewelry lately but I’m a bit behind posting. This one tinkles a bit as I wear it and so reminds me of faeries!

pearls n hearts bracelet

It is made almost entirely of jump rings. So except for the pearls, it is all made of wire! The jump rings silver plate for the non-coloured ones and coloured aluminum for the pink ones. The pink is quite subtle so enlarge the pic by clicking on it if you’d like a better look. The little hearts are made from silver wire which I shaped then soldered closed. I also made my clasp, from the same wire I think. 18g silver.

Considering I’ve never made anything like it before, I am thrilled with it! I’m really new to anything made with jump rings, called chain maille, and new to soldering too. I am going to be selling these so let me know if you are interested! The jump rings and pearls come in lots of other colours too. And if hearts aren’t your thing, I can substitute your choice of charms. If you know jewelry, it’s a basic chain made of the silver rings with two pink rings in each silver one, one on each side.

Enjoy, Rebecca

All supplies available at Fire Mountain Beads or ArtBeads.

April 19, 2014

Baby Thank You Card Folder for Unscripted Sketches #253 and Giveaway Winner

I love using the sketch for something other than basic cards. This week I was making cards for a friend who just had a baby and the sketch worked beautifully a folder to hold the cards.

RebeccaEdnie253

I used some Webster’s Pages papers to make this. The yellow ribbon looks so pretty. I love that shade of yellow and the chevrons are awesome.

baby folder open

This is the inside of the folder. I designed it myself so if you like it and want the dimensions, let me know.

baby folder close

Here’s a closeup of the embellishments. The arrows are made from Craft-a-board then covered with white cardstock and washi tape.

baby folder matching card elephant ty

This is the card I designed. Sorry that it’s hard to read the tag; it says ‘thanks’. I made the card narrower than the usual 4.25”. It is only 4” which helped because I wanted to get the most from a scrap of 12” wide paper and of course, 4” fits across 3 times but 4.25 only fits twice. That also allowed me to hang the trunk off the edge and still fit into a regular envelope.

253

I hope you will join us at Unscripted Sketches this week. Be sure to check this week’s post to see if you won one of our prizes! I look forward to making the jewelry I am giving away. My winner is Monika Reeck so please email me in the next 48 hours to claim your prize.

Enjoy, Rebecca

RECIPE
Stamps:
Mega Mixed Messages, Bitty Baby Blessings-PTI
Ink: Harvest gold-PTI
Paper: lemon tart CS-PTI, Baja Breeze CS-SU!
Accessories: foam dots- The Sticky Stuff Store, Copic BG72, seam binding ribbon-Masterstroke Ribbon

March 22, 2014

Jewelry Display Canvas Tutorial for Unscripted Sketches 249

You read that right! Not only do I have a home dec project for you today, I even have a tutorial! I’m afraid I’m not very good at remembering to take photos for every little step but it’s so easy, I promise you will get it. So, project and sketch first then the tutorial! This is also for The Shabby Tea Room Anything Goes!
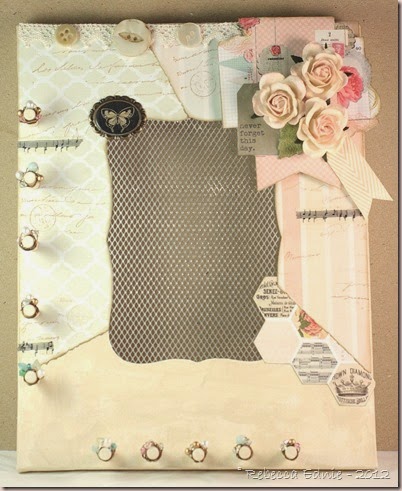
RebeccaEdnie249

This is a dollar store lover’s dream project! The (wonky) canvas, wire mesh and dowels were all purchased there. I’m sure you could get beads, wire, flowers, washi tape, ribbon, foam squares, charms, lace, paper and paint though I’ve no idea if you can find things that approach the look you see here. I know in the US there are way better stores than here.

jewelry canvas closeup5

Here’s a close-up of some of the pegs, I’ll have more extreme close-ups later. Aren’t the beads pretty? Each peg is slightly different and they are functional as well as lovely. I wanted to make sure that necklaces and bracelets didn’t fall off the pegs!

jewelry canvas closeup7

Everyone knows that earrings go through the mesh right? I still plan to embellish it more, I just ran out of time. I think I’m going to add Tim H’s Grunge Board Printer’s Blocks to spell BLISS at the bottom with gold swirls and pearls/rhinestones/sequins etc. Cool right? I also want to colour the mesh gold. Not sure if I’m going to try to use my Krylon pen or buy some model paint designed for metal.

249

I had a blast with this sketch as you can see! Please visit the other gal’s blogs and leave them some lovin’ (comments) and be sure to support our challenge at Unscripted Sketches by making’  somethin’ groovy and linking it up! And don’t leave now! Please stand by for more close-ups and my tutorial!
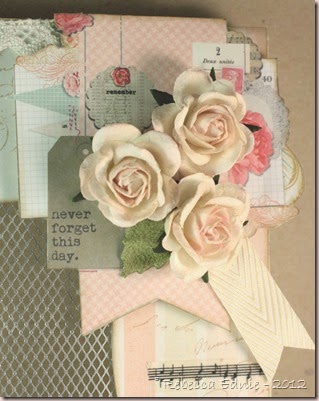
jewelry canvas closeup6

Jewelry Display Canvas Tutorial

Need to sort out all your jewelry? Need a place that won’t leave it in knots and tangled with other pieces? Can never find the second earring? Need a great customizable gift for the gal who has everything? Bridesmaids’ Gifts? Tada!

What you need:

Artist Canvas in your choice of size. Unless this is for a girl I’d recommend no smaller than 8x10”. If you want to cover it in full sheets of scrapbook paper, no larger than 11 or 12x16” or you will have more than one seam.

1/4” dowels

a way to cut the 1/4” dowels, I used a small hand saw

1/4” drill bit (in any drill bit set) and drill or ideally a drill press but NOT necessary

sandpaper or rough emery board for sanding the ends of the dowels

rubber or rawhide mallet or hammer if no mallet

metal mesh for opening, you could use sturdy open lace if you can’t find mesh, I know craft stores have it

die or stencil to create shape for opening (optional, you can draw your own shape if you want)

fine tipped scissors or an xacto knife

strong glue or hot glue

22 or 24 gauge craft wire, I used 24 g Antique Bronze Artistic wire

Your choice of small roundish or chip/nugget beads 3-5 per peg, 2-6mm do not recommend doughnut shapes like rondelles or long oval shapes

wire cutters, preferably jewelry flush cutters

some sort of jewelry plier like a chain nose or a flat nose or even a round nose will help but optional

Paint or paper to cover canvas. This is so up to you that I really can’t make a list for you. I used MME paper and Golden Fluid Acrylic paint in Titan Buff. Before that, I added a layer of Gesso over the questionable layer on the canvas when purchased. You could add anything you would to the front of a card or to a scrapbook page, the possibilities are endless. An inspiring word, quote, monogram or her/your name might be nice.

1. Decide on the placement for your pegs. Note in the photo above that you may not be able to add dowels in the corners because of how the wooden frame is put together. Other than that you can wing it or measure precisely.

photo 2

2. Drill through the frame to the other side. This allows you to remove a peg if you need to. Be sure to place something underneath if you are working on a surface you won’t want to mess up. Keep the holes as vertical as possible or your pegs won’t sit straight. (We own a drill press and I own a husband, I’m not going to try to fool anyone here. Though if my garage wasn’t a disaster, I could do it myself. The spiders are still asleep here.)

photo 1

3. Cut the dowels to your preferred length. Mine were 1 1/2” long and my canvas was 3/4” thick so that amount was also what was showing. Unless the necklaces are very thick even right at the back of the neck, that is plenty, even with the wire wrapped beads we will add. Sand them smooth on one side. Do not add the dowels yet!

My hubby asked how I will see what I have on the left when they will be hanging on top of one another. There are two possibilities. If you are a quirky gal, hang it on an angle. If not, hang bracelets there or necklaces that aren’t likely to tangle. If the top necklace hangs on one side of the pegs and the second on the other and vice versa, I think you will be ok. Of course, if you aren’t making this for a sketch challenge, feel free and add more pegs wherever you’d like, just being careful of those corners.

4. Decide what shape your opening will be and trace it onto the back of your canvas. I used the largest Labels 8 by Spellbinders. Make a slit in the opening and cut with scissors or if you are good with an X-acto, use that. Be very careful not to stretch the canvas around the edges. I chose one large opening but you could do more than one small opening too like several small hearts or the centers of flowers.

photo 3

5. Next add your lace or mesh to the backside of the hole. I used Glossy Accents but you could use hot glue. Just be careful with the latter as the mesh will heat up with the heat of the glue. {{You can see here that the drilled holes did hit some of the staples. Didn’t seem to hurt the canvas or the drill bit so don’t worry about it!}}

OK, so the structure is done so we are on to decorating right? Uh, but what about the dowels. Don’t worry, didn’t forget those. When you add them depends on how you are decorating. If you are adding paper, add the dowels last*. If you are painting, add the dowels now. Stencilling-later… you get the idea. If you are doing any kind of technique which requires a flat surface, leave the dowels to later. If you want them to meld with your surface effects, add them now. You could even paint them along with the canvas, remove them (pound a short piece of scrap dowel in from the back about 2/3 of the way then remove the scrap with regular pliers), number them, do whatever other surface treatment you’d like, then replace them. Anyway, whatever you choose, here’s how to do it.

* poke a needle through the holes from the back. Then jab fine tipped scissors (closed) through from the top and press the excess paper into the hole. Unless you have many layers, it will just make it a bit tighter fit. If the dowel won’t go in, remove the lowest layers, keeping the top one intact as best you can. When it folds inwards as the dowel goes it, it gives the nicest finish. Make sure all glue is dry or it will tear.

6. If your dowels aren’t painted or finished, do that now. Pound the dowels into the holes with a mallet until they sit flush with the back of the canvas. A mallet will ensure the wood is not marred and neither is the finish. If you only have a metal hammer, wad up some scrap cardstock, 4-6 layers,  and shape it into a kind of a cup shape over the head of the hammer and tape it on. Now pound it in gently. Unless you wiggled your drill bit, they should fit perfectly and not even need glue. If they are a bit loose, never fear, add a bit of white glue and let that set checking that your dowel is at the correct angle while it dries. A clothespin may help here.
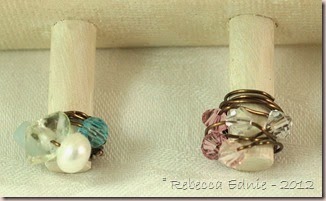
jewelry canvas closeup4

7.  Now, the best part! The beads! I worked with the spool of wire here and it may seem weird at first but it’s great. These were the first two I did and I was still experimenting with the best way. The left one was not the best at all! You are going to use a lot more wire than you’d think. Add your beads to the wire in any order. Begin by adding wire along the length of the peg, starting near the base of the canvas and working up to the top of the peg. This seems like the wrong way but trust me. Now bend the wire 90 degrees and start wrapping it around the peg near the top. When you come around to where you started going around, make sure you wrap around the straight wire you started with and be sure it is tight. Wrap around twice more being sure to catch the straight wire every time.

jewelry canvas closeup3

8. In the photo above #7, you can see the right peg doesn’t have the beads distributed very evenly which wasn’t my aim, these three are much better. Now that you’ve secured the beginning of the wire, you need to slide your first bead along the wire and place it where you want it on your peg. Make a full wrap then add the next and so on. Keep your wire taut the entire time. Don’t worry if it doesn’t end up super tight, many of mine weren’t. We will fix that later. It does need to be tight enough to not spin freely though. You can try tightening the wire, unwrap and start again, or start with new wire, it isn’t expensive! In the photo below, you can see that there isn’t a lot of excess wire.

jewelry canvas closeup2

9. When you finish adding beads, wrap the wire three more times. Then cut the wire leaving a 1” tail near the bottom but try to still hold it tight so it doesn’t uncoil. Next, this is where jewelry pliers come in handy as we want to find a little spot in the wrapping on the side to tuck the end into. If you only have regular pliers, don’t use them just leave two extra inches and work with your fingers. Just thread it in, pull it tight and trim that wire, and the one you started with, closely. If the ends stick out, press them close and out of the way with something metal like the tip of a metal ruler.When working with your fingers, if you are having trouble threading the wire through a small space, magnification might help if you have it and so might putting a small hook shape on the end of your wire. Try threading the wire into a large eye needle and bending it slightly then slipping it in a bit further, bending it again and so on until you have a small hook shape. This will hook under the wire wraps more easily.

10. Your wrapping may cover more width of the peg than you might like. Use jewelry pliers or your fingers to squeeze the wraps together and make the wires closer like a more tightly coiled spring. Add a couple drops of a strong glue like Glossy Accents to the very bottom of the wire, in between the wires if you can, if you feel the wire may slip. Don’t want to lose that baby!

jewelry canvas closeup1

11. Last but not least, this is a home dec project. I highly recommend that you seal all paper layers with some sort of spray sealer or gel medium for longevity.

Enjoy, Rebecca

February 09, 2014

Music and Roses Necklace

I’ve been making more and more jewelry lately but dang it is it hard to photograph with out some sort of stand! Especially necklaces. Earrings are pretty easy but not necklaces! I FINALLY got a stand so yeah! This one is my favourite because it goes with pretty much anything!

music and roses

This one is actually a little bit crafty! I added vintage music paper to the back of the Swarovski flat backed baroque pendant (not all are flat on the back) with Glue and Seal then sealed the sides and back with the same. You can see how the facets reflect the light in the picture. I finally managed to take a good sharp picture that shows sparkle! I was starting to wonder where my photography skills had gone!

I hope you like it!

Enjoy, Rebecca

Pendant, 6mm gold pearls-Swarovski, champagne rondelles-Znetshows, roses-local bead store, wire-bronze 24g artistic wire, bronze 6mm, 20g ID jump ring, 8mmlobster clasp

Technique Used: wire wrapped and linked beads (to learn try Fire Mountain Beads or Artbeads or YouTube), dont know that I’ve ever seen instructions for the gluing technique, email me if you’d like a further explanation

January 18, 2014

Bracelet Card for Unscripted Sketches #240

I finally found a sketch where I could combine my love of jewellery making and my design team sketch!

RebeccaEdnie240

I used Memory wire and many types of glass, crystal and stone beads and pearls to make this bracelet. I had a general pattern to work with but it is pretty much random. I started with the largest heart beads and laid them out red, white, red… Then I filled in with the next largest beads. I didn’t use a bead board and didn’t make an effort to keep the beads in order thus the randomness. I just made sure that each type of bead had the same number placed between each large heart-shaped bead; some just one and others 2.

240

When it came time to string them, I just grabbed them and added them, again, no order. I used pink cat’s eye, pink and white pearls, large white and gold lamp work beads, pink glass lentil beads, small red hearts, medium pink quartz beads, large pink Czech crystals and a couple others. It’s very hard to see but if you enlarge the photo, you might be able to see that the dangle on the end of the bracelet is made with a heart-shaped head pin I made Cute huh? To support the weight of the bracelet, I reinforced the panel with cereal box board and the card does stand quite well!

Adding the ribbon was a bit of a trick. I wanted the ribbon to hold hte weight of the bracelet but not dig into the panel’s sides and not droop. The side pieces are faux, the don’t connect to the bow. The bow ribbon is first attached through a hole in the reinforced panel and pops through then ties around the bracelet. Just untie to release the bracelet. If you retie the bow, the card might look a bit empty but it would hide the hole so still look nice! The hearts are a die cut covered in EP.

I’m so excited so many of you played our sketch last week! Please keep it up! I can’t wait to see what you do with this week’s sketch at Unscripted Sketches. This is a perfect one for people who like to colour because you can play with the proportions like I did to make it a focal sized panel but it also works great for a focal sentiment or photo for scrappers! The sky’s the limit!

Enjoy, Rebecca

RECIPE
Bracelet: beads-various sources including ebay, Beadalon

Card:
Paper: Fancy Pants DP, Bazzill CS, white CS for die cut, punching-scrap
Ink: Versamark
Accessories: gold EP-SU!, die-Memory Box, ribbon-SU!, hole punch-WRMK

December 26, 2013

Icicle Lights Jewellery Set

Wanna know what’s been keeping me so busy lately? Well yes, three kids but I’ve also been getting  into making jewellery. In the next few weeks, I will be showing you what I've been up to!

icicle lights for katie

This is one of my latest pieces. I made this for my autistic son’s respite worker. She’s leaving for three month’s to go to Australia and her work also asks her to bling it up since it’s a nice place so this works for both. It uses headpins (a silver wire with a flat end on it which acts as a stopper) which I strung Swarovski round and bicone crystals in blue, teal and white then turned a 3/4 loop with round nose pliers and slipped the loop over the chain.

Then I completed the loop and wrapped the wire tail around the wire stem just above the beads. I cut the chain to size, added a clasp to the chain and that’s it! The earrings are even easier. Add the beads to the headpin, wrap the loop. Add the earring wire. That’s it. It you are working with thicker wire than I am, you can just turn a loop and not even wrap it!

icicle lights for katie earrings

Planning the beads so they hang nicely, look good and keep them in order while making the was the harder than the construction. I wish I’d planned the second and third in from each end a little better as they don’t lay well. The other’s just don’t have support behind them in the photo to lay perfectly but the end ones just sit funny because they don’t have room. Oh well.

The earrings aren’t as interesting (I don’t like crazy earrings) but I did use a long French wire, (heck I don’t know what they are really called but that’s what I call em) so that makes them a bit more unique. When I asked our worker what style she likes or what preferences she has all I got was “I’m sure I’ll like anything you will make. Whatever you’d like to make.'” and “blue” so I think I’m good!

Enjoy Rebecca

RECIPE
any decent bead store has everything you see here. I used a basic jump ring and lobster claw closure. There are dozens of tutorials on line to teach you how to make wrapped loops and open and close jump rings, the only skills i used. Try Fire Mountain Beads and Artbeads

December 14, 2013

Door Sign for Unscripted Sketches #235

This week I took inspiration from an unconventional source. An item from a women’s steals site.

RebeccaEdnie235

The item I was inspired by was basically the same, a sign for your door with a turning upper layer that rotates to reveal several different signs which I should at SheSteals.com. There was one for your dishwasher, clean vs dirty, too. There are magnets on the back to hold it in place. I would have added some lade or ribbon or more layers of paper but I wanted it to be weather-proof in case I left it out and it started to rain or snow. What I have to really remember is to not leave it out too long with the ‘Come on in’ left showing!!

door sign b

I made it with die cut circles of craft-a-board and patterned paper with a brad and a flattened bead cap in the center. The flower is made from a Memory Box cherry blossom die which I stiffened with outdoor Mod Podge also applied to the rest of the project. Unfortunately, outdoor Mod Podge is sticky even when dried for a long time, I feature I HATE (I hear Martha Stewart decoupage medium is weather proof and not sticky but I didn’t have any) so inside I added two 1” circles of naked craft-a-board so the larger circles would rotate smoothly.

un sc sk235

There is still one more spot on the under layer for another little note but I couldn’t think of anything else. I can still add something if I want to later. I’ll probably have to add a piece of paper or use Staz-on or archival ink because I’ve sealed it but it could work. These are quick and easy to make; contact me if you’d like the exact measurements. It turned out that three messages underneath would fit perfectly so just email me for the circle and cut off dimensions!

We will still be having sketches all through the holidays so if you find yourself bored at all be sure to come on out and play. Do you sew? Quilt? Knit? Do Mixed Media? Paint? Doesn’t just have to be basic card making, paper crafts and scrapbooking though of course we love to see those crafts! We welcome anything you create! We’d even be happy to see baking that fits the sketch! Please play with our super talented team this week too at Unscripted Sketches!

Enjoy, Rebecca

RECIPE
Paper:
Authentique, Craft-a-board-Ellen Hutson, chocolate, peach (don’t know real name) CS-SU!
Ink: Teal Zeal-Memento
Stamps: really old alphabet stamps
Accessories: Memory Box cherry blossom die, bead cap, brad-stash, Mod Podge, Circle Nesties
