Showing posts with label Technique Challenge. Show all posts

August 30, 2015

SAF Mix n Match Challenge

This one was a breeze for me. I use lots of patterned papers together all the time!

saf 15 mix n match

I kept it very simple this time and copied one of the sketched used in the video. I was running low on time and it saved me thinking about what to make.

Enjoy, Rebecca

SAF Threads

I LOVE using thread to make thread nests as per Laura in her video. But I like ‘em much more messy than Miss Laura! But for this one, I used the twine. I made some thread nests in later projects.

saf 15 threads

I used three types of twine in three different ways on this card. I loved the buttons with the twine looped though them so much that I had to use three!

In case you are wondering, yes, hubby likes it. It’s a thank you for painting our bathroom!

Enjoy, Rebecca

August 25, 2013

SAF Sprinkle of Salt–Smiles Card

I’m afraid I didn’t get the dramatic results everyone else got from this technique. Maybe I didn’t use enough water? But the card is still pretty and useable.

SAF13 salt

I have a small confession to make. I burned the bottom corner of my paper as I dried it so I had to cover it with something. Thank goodness for die cut lace! It adds a little touch I like anyway. This shabby gal can only make so many totally CAS cards right? :) I think I made add a few rhinestones too!

Enjoy, Rebecca

RECIPE: die, stamp, hibiscus burst cardstock-PTI, reinkers-SU!

July 29, 2013

Waltzing Mouse Stamps PJ Party–Classy Lady Card

WMS PAJAMA-PARTY-LOGO

Apparently Waltzing Mouse Stamps wasn’t happy to simply have a plain old blog hop, no sirree! Claire decided to have a PJ party! Wahoo! Sounds like fun to me!

classy lady

The new PJ party has several challenges. Most of them only have prize opportunities if you use new stamps which I don’t own. However, the last one asked you to use any WM stamps to create a background. This I CAN do. I decided to use a sentiment stamp stamped repeated for my background with one stamped in a darker colour as the actual sentiment! Inspired right? OK, not that inspired but still pretty nice. (Its a bit hard to see above to check out the close up below. It shows up way better IRL.)

classy lady bg

I also made this for a challenge on the Joan’s Garden’s Blog for this week which asked us to use a floral patterned paper, a doily and a 3-D flower with greenery as well as the challenge constant which is to use a product sold at Joan’s Gardens. Uh oh. Until I just looked this up, I thought it was any patterned paper! I used music paper except for the tiny paper piecing at the top of the mannequin and you can’t tell it’s floral because its sooo tiny and so light. I hope you trust me Joan! :) I used Distress ink which she sells but that was so easy it almost felt like cheating and although she sells MME paper I couldn’t remember if she sold that particular pack or not. So while I was pretty sure I was already covered, I decided to use Rose Creations dies to make my flower.

classy lady flower

I used vintage music paper and cut the flowers. Then I used pink ink to sponge the petal tips. No need to get fancy, just slap some ink on there, oh, I also used an ink blending tool she sells. Then crunch the petals up into little balls which gives them some texture, uncrunch them and stack onto a brad. Form the innermost flower layer’s petals into a bud shape and glue into place holding it while it dries. Repeat with the next flower layer making a slightly less tight bud shape. Now start pulling the petals up tight towards the bud holding it in your hands as you go working around the flower. When you get to the end, surprisingly, it will hold its shape! Now, with a fine tipped bottle of glue, shoot some glue deep in between the petals to help the flower hold its shape. I hold it for a couple of minutes while it starts to dry or you can tuck it into a small circular container like a toilet paper roll or a small jar.

Enjoy, Rebecca

RECIPE
Stamps:
WMS
Ink: chocolate, berry sorbet-PTI, Antique Linen Distress
Paper: DP-MME, chocolate, vanilla CS-PTI, vintage music paper-stash
Accessories: Foam dots-Jody Morrow, doily-local restaurant rescued from under dessert :) rose creations dies-spellbinders, leaf die-SU!, W00, 01 Copic markers, embossing stylus (veining on leaves), washi tape-Freckled Fawn, Glossy Accents, brad-SU!

May 09, 2013

Flip Card for Waltzing Mouse Stamps Challenge

Waltzing Mouse Stamps has a challenge right now to make a moving or interactive card. I decided to make a shaped flip card.

Flip card WMS challenge

I used a partial die cutting technique to cut the flip portion of the card. And I modified the card to make the center portion narrower which allowed more to show through the opening when the card is closed. The part the thank you is stamped on. I did a trial using the paper sizes and score lines used the tutorial on Splitcoast Stampers and there wasn’t enough showing to stamp on or to look right. Which also meant making the overall card smaller to maintain an overall size of 4.25x5.5”.

Flip card WMS challenge2

Other than that, I just decorated the card as usual. I was a bit tricky to mat the front of the card with patterned paper. I wish I had added it before doing the die cutting but I managed.

Flip card WMS challenge3

When the card is closed you can’t see this flourish but I added it because you can see it from the back where I will put my message to the recipient.

Enjoy, Rebecca

April 25, 2013

Soft and Shabby for PTI Angled Blog Hop

PTI blog hop logo

The challenge this month is to place some elements on an angle. This wasn’t too hard! I enjoy asymmetrical designs and most angled designs are.

apr 13 pti blog hop graphic

soft n shabby for PTI hop

I made all three of my flowers on this card. I used a Cheery Lynn Dye for two of them and a tutorial from Pretty Little Mess blog (see sidebar) for the third.

I also used this week’s Deconstructed Sketch. Click on it to visit the blog post.

deconstr sketch99


I’m also entering this card in this week’s Joan’s Gardens Challenge to use the word Tulips as an acronym for items used in the card.

T-Trim, I used lace
U-Upside Down, I used the corsage pins facing down rather than up like I usually do. (this one is really hard)
L-Lavender, I used lots on the card
I-Items from Joan’s Gardens, the Cheery Lynn Die I used for the flowers
P-Pearl tips on the corsage Pins, also designer Paper and Perfume bottle
S-Sentiment

I hope you enjoyed my card. If you have any questions, feel free to email me and don’t forget to subscribe by email or RSS if you’d like to visit again and be sure to not miss future posts.

Enjoy, Rebecca

RECIPE
Stamps:
Mega Mixed Messages
Ink: Winter Wisteria-PTI, Frayed Burlap Distress ink
Paper: MME DP, kraft CS-PTI
Accessories: May Arts ribbon, corsage pins-Michaels, flower making die-Cheery Lynn, perfume charm-Jesse James buttons, hexagon, circle dies-PTI, lace-Fabricland, ticket corner dies-SU!, Bow Easy

February 05, 2013

Interactive Card Zipper Card for PTI Challenge

PTI 6 ann

Nichole challenged us to make an interactive card in honour of their 6th anniversary. We were to be inspired by one of the team’s projects. Seeing Jessica’s fridge magnet with a photo of her son on it made me think of my son whose 12th birthday is today.  And I loved how Heather used die cut letters on one of her projects. While we don’t celebrate birthdays, this rather important milestone was on my mind. I guess the inspiration is a rather loose interpretation but still…
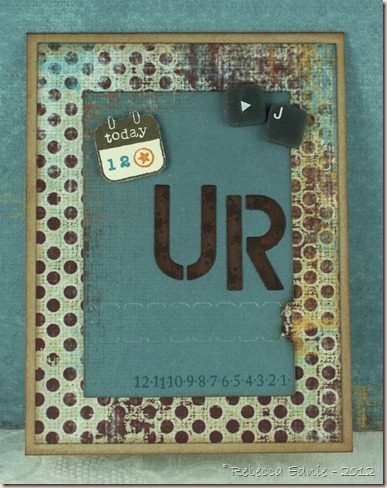
j is 12

So I made this card for him. Inside it has the following words. Energetic Fun Silly Caring Friendly Amazing. I won’t give it to him for a while so it doesn’t seem like a b-day card. It isn’t easy to line up the stamping underneath the tear strip unless you plan ahead so I’ve got a tutorial below showing you how I do it. It isn’t too hard but I have a couple of tips.

The grey keyboard keys are actually off a flexible keyboard. The kind you can roll up. My 5 yo tore it apart so I saved the keys for embellishments! At least something good came of it. The numbers at the bottom are from Boy Basics-Out of this World. I taped off most of the numbers so I count just ink some numbers individually and stamped the additional numbers to create an 11 and a 12.

So here’s how to line up whatever you hide beneath the tear strip.

1. Die cut your tear strip die (aka zipper die) and choose a scrap to use underneath the tear strip. Using a pencil, draw two parallel lines just less than 1\2” apart. Using slightly less than the width of the tear strip will ensure your stamping doesn’t touch the edges of the zipper opening on the finished card since they won’t be smooth and straight. Place the paper with the lines on it under the die cut, line it up with the tear strip and trace the notched end. Slide the paper so your notched pencil line disappears slightly under the die cut. Trace the other side of the die. Again, by making your pencil marks slightly smaller than the die cut opening, you ensure you leave space where the zipper strip attaches in case the recipient doesn’t tear it off completely.
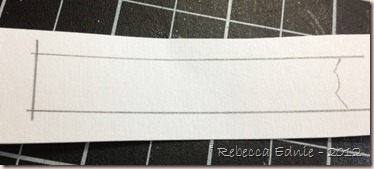
tear strip interactive card tut5

2. Stamp your choice of images or sentiments within the pencil lines. Then erase your pencil lines so you can barely see them. I didn’t trim the notched end now because it makes it hard to line up later.

tear strip interactive card tut2

3. Add Scor-Tape or other strong adhesive to the back of the die cut close to the tear strip. As close as you can place it. Remove the backing except for the small portions shown.
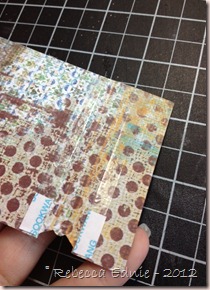
tear strip interactive card tut1

4. Line up the stamped scrap using the faint pencil lines. Make sure no stamping shows from either end and you need to leave enough room to trim your notch.

tear strip interactive card tut3

5. Trim off the straight side flush with the die cut and trim out the notched end while looking at the back. Because you left the backing on close to the notched end, it is easy to get your scissors in. When you are satisfied with the trimming, remove the last bits of backing. You could cut the notched end in advance but it would be hard to line up the scrap. If you wish to cut it ahead of time, I recommend you use a larger scrap and when you draw the lines, mark another where the bottom of the die cut would be so you can use that to line it up. (Next time I’ll be more careful and cut it smoother.)

tear strip interactive card tut4

6. Add more Scor-Tape. You want to be sure that tugging the strip doesn’t pull the die cut off the card! For the top portion, I just used my usual adhesive. Burnish the adhesive well. Apply to your card or project!

tear strip interactive card tut6

I hope this helps you line up your die cuts!

Enjoy, Rebecca

RECIPE
Stamps:
tag and words (inside) CTMH, countdown numbers, ink splotches-PTI
Ink: Walnut Stain, Vintage photo Distress, Teal Zeal-Memento, pumpkin pie-SU!
Paper: kraft, natural white, chocolate CS-PTI, DP-MME
Accessories: foam dots-Jody Morrow, stencil letter dies-Sizzix, interactive die-PTI,

